Niagara / unreal GDC

Loking how to make a custom spawning module, but can’t figure it out.

From the existing modules you’d think it’s just setting an amount to a make spawn info and feeding that to the parameter map output… but that doesn’t work.

sometimes the provided burst spawner doesn’t work either for me.

EDIT… Indeed it is just that, but had to be in emitter Update, not emitter Spawn.
When I disable update age, for some reason there are more particles made created ?

A Fibonacci Sphere Location module was recently added to Dev-Niagara.

Point Clouds !

Was actually very simple. Still need to counter for Houdini’s coordinate system, it’s actually rotated incorrectly.

Limited to a million points for now. But that’s probably per system… so maybe i can chop it up. The full point cloud is over a billion points though… So maybe this is beyond Niagara.

Although, maybe with a custom streaming data interface, and some kind of optimized sparse voxel renderer…

Is there a way to turn everything in a system / emitter off, and only have id/pos/color parameter map, with no updates going ?

1 Like

Nice.

Yep I’d definitely look at some kind of streaming DI and specialized renderer for bringing in such large point cloud data sets.

You could just remove everything from the update script.
Currently this will still do some work but in the future it should be relatively trivial to detect this case and skip all update work entirely.

To your previous point, if you disable update age then age will stay at 0.
All our spawning modules work off Particles.Age, Particles.NormalizedAge, and DeltaTime. In the case of the burst spawner, if you spawn at 0 and age is always 0 I expect it would just keep spawning.

https://vimeo.com/278840709

2 Likes

Is there an easy way to drive material parameters in Niagara? Or do I have to feed it through blueprint?

Have you ever try DynamicParameter before?

1 Like

Exactly what I needed… working already… you are a hero!

1 Like

CREATING SHORTCUTS IN NIAGARA (especially an “Add Comment” Shortcut):

Hey everyone!

Thank you all so much for making this such a cool community!!
I’ve just started using Niagara myself, and I can’t contribute as much as most people here, but hopefully this helps someone.

I’ve noticed that there is no easy way to “Add Comment” in Niagara. In BP, you just click “C” and the Comment box pops up. So if you want to create a new Shortcut in Niagara, you can follow my quick tutorial in the attached image. I show how to create an “Add Comment” Shortcut–but you can create nearly anything!

INSTRUCTIONS:
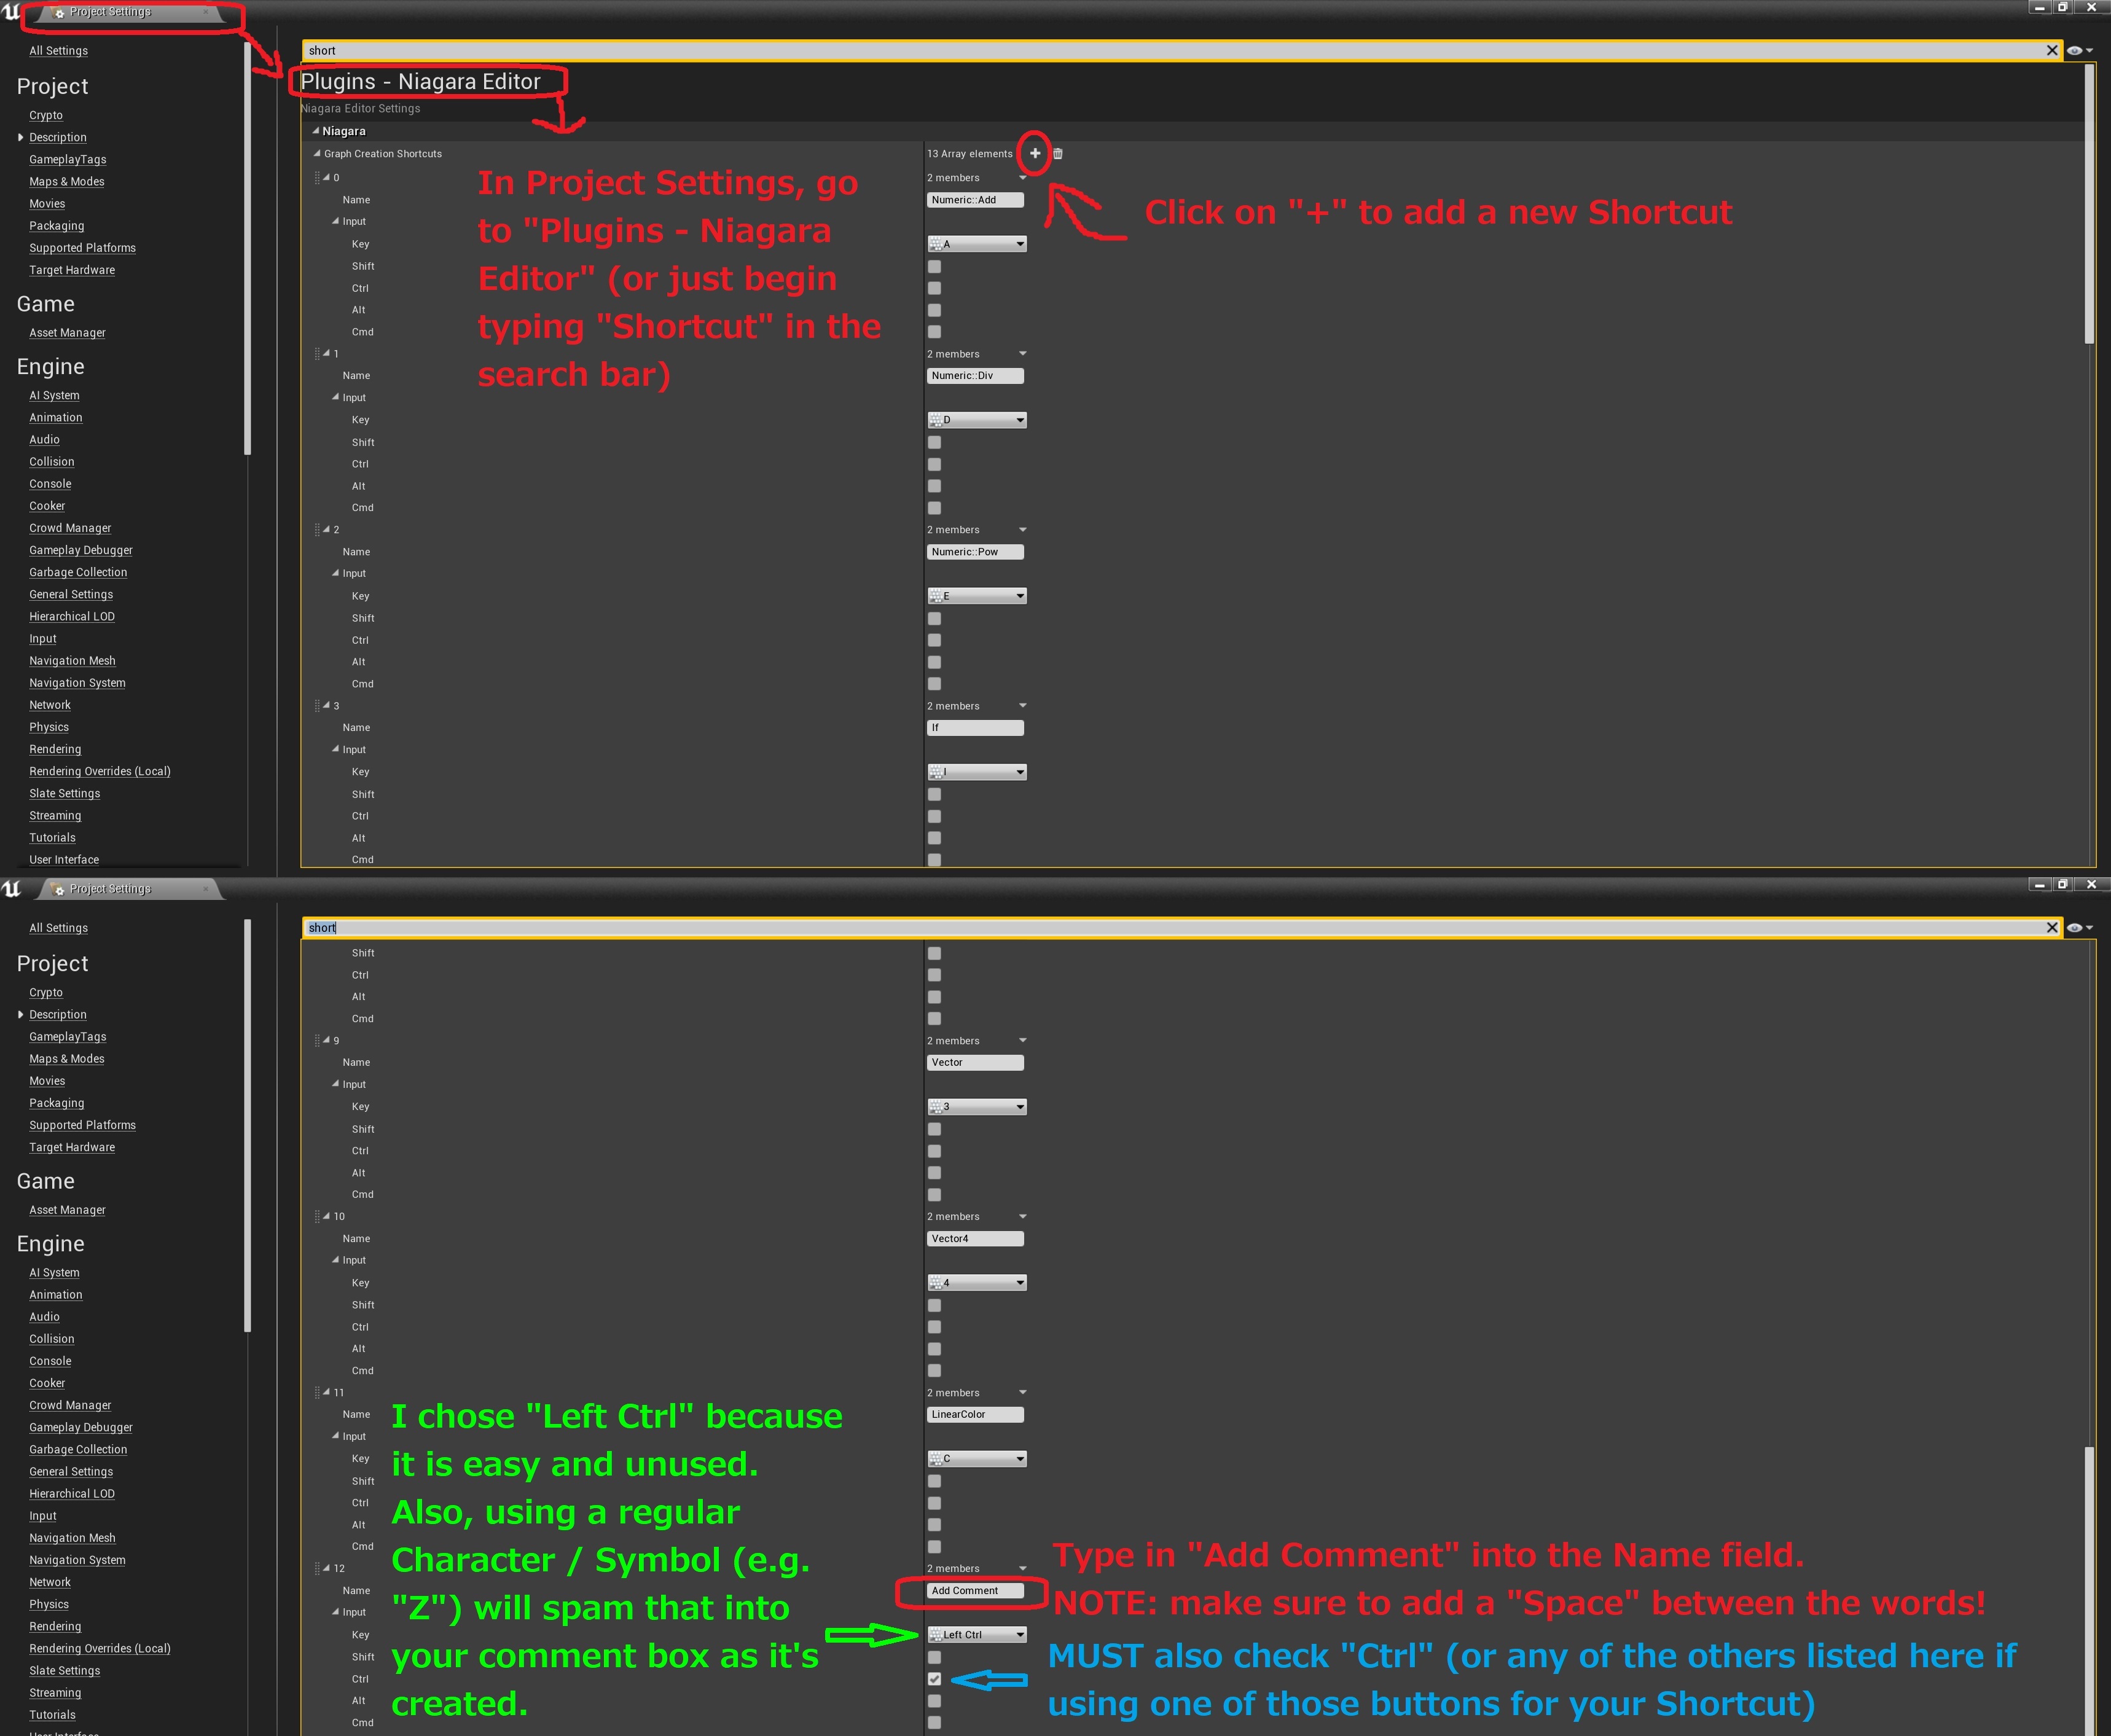
This is demonstrated in the image, but I’m posting it here just in case someone has a hard time reading it ;). First, go to Project Settings. You can just begin typing “Shortcut” into the search, or go to “Plugins - Niagara Editor.” Click on the “+” symbol at the top to create a new Shortcut.

I chose to use “Left Ctrl” because it is convenient and not already taken as a Shortcut. But also, using a regular Character / Symbol for your “Add Comment” Shortcut will begin spamming that Character / Symbol into your Comment Box. For example, let’s say you use “Z”. You’ll hold down the “Z” key and left click your mouse. Your comment box will appear, but until you release the “Z” key, it will spam “zzzzzzzz” into your comment box! That’s why I chose to use “Left Ctrl,” since it won’t type anything into the Comment box. But please note that, if you use Ctrl, Shift, Cmd, or Alt, make sure also to check that button in the Checkbox!

Finally, make sure that you type in “Add Comment” (include the space!) into the “Name” field. Each Shortcut requires that the Name field correspond with the desired command. Unfortunately, I don’t have any sort of list for these yet…but maybe someone knows a good place to start?!

UPDATE: as of 4.20.1, using “Mouse Left Click” seems not to work. So instead, I’d suggest using “Left Ctrl” as your input and then also checking the “Ctrl” box, as explained above.

1 Like

To Epic guys:

I made a small change to the Spawn Burst Instantaneous module to spawn ribbon particles in the right order. Maybe a tiny change you can add? I didn’t see any side-effects when playing around with it other than the ribbon particles get ordered correctly. ((Changed IntervalDT on commented node to 0.0001)).

Before:

image

After:

image

Edit: Yes, I copied and changed the name, but it’s literally a copy of:

NiagaraScript’/Niagara/Modules/Emitter/SpawnBurst_Instantaneous.SpawnBurst_Instantaneous’

2 Likes

Hey Steyrboy, we have beam spawn and update modules that handle that for you and provide a number of other functions useful to beam authors (such as indexing multiple beam spawns in a frame into their own IDs for supporting multi beam emitters. Check out spawn beam or update beam in the latest previews, and there will be example content in the official 4.20 release that shows how both statically spawned and dynamic endpoint beam emitters work.

4 Likes

I’ll definitely check this out after work, sounds like it’s what I’m looking for :slight_smile:

STATIC RANDOM FLOATS PER PARTICLE

Hey @cannabis.cod3r

Thank you so much for this tut (and all the others)!
I’ve learned so much just following along with what you’re doing and then trying to figure some other cool things out on my own.

I noticed you had to find a workaround for generating random float values per Particle. I believe I have found an acceptable solution that can generate Static Random Floats per Particle so that they don’t change on Update and can scale immediately, regardless of Particle count. Please see the attached images.

INSTRUCTIONS:
In case the image is blurry or hard to read. I basically made a curve (100 seconds) and added multiple waves to it. I then use the Curve + two Module float variables and a little (crappy) math to take random points on that curve per particle in Particle Spawn (so the script is only run once and not per Update). MapSet a float and use that in the Particle Update rather than the .csv file. Everything else is exactly as shown in the tut.

Hopefully someone can find some other cool uses for this!

NOTE: I’ve just found / reported a bug where using 513+ Particle Meshes causes an error in Indexing that results in a change to Particles.Positions. The result is that lerping positions will cause jitter. My suggestion? Use 512 or fewer Particle Meshes :wink:

UPDATE 1: Wow, that was fast! Epic already took a look at the bug report and confirmed that it is fixed internally. So there should be no problem in the 4.20 release.

UPDATE 2: Ok, so it’s come to my attention that it’d probably be way better to create the Curve in Emitter Spawn rather than Particle Spawn. That way it’s only called once rather than once per Particle. Also, as @3DVFX kindly pointed out, using a modulo after the “Floor” would be optimal :sweat_smile:

LINK: Easing Curves by Ash Oakenfold

Coooool! This is great, thank you!

If anyone else finds a better way to do things, please don’t be shy and post your solution. We’re all learning this new system together. I feel we’re just scratching the surface of Niagara’s potential.

I opened up all my tutorials on Patreon.

Cheers!

4 Likes

This is great, thanks KMG. :+1:
You could modulo that floored # btw.

1 Like

Is it possible yet to use a color value in a material or texture to use as a spawn point location and/or color for particles?

3 Likes

I will try this tomorrow for sure! I owe you (and many others) a beer!

1 Like

Hey y’all, I’ve been messing with niagara and I’ve hit a bit of a snag. I’ve been trying to do rain drops for a bit now, and i cant seem to get it to spawn a second emmiter’s particle. i don’t know if I’m using the collision query and events wrong or what but the best thing i got is the particle to stop with the dampen velocity in the collision linear velocity.

i did try to make my own module but looking at the included ones, it will probably take a while for me to make heads or tails of. (why u no have docs yet Epic!)

its basically this in cascade, but for niagara

Any help would be much appreciated! Thank you!

2 Likes