Hi guys! Mederic here, former VFX Tech Director on Skull&Bones.
A few months ago we’ve discussed clouds lighting and normal maps and a bunch of techniques like DLUT and 6D Lightmaps. Since I’ve then I’ve gotten a bunch of email regarding that so I’ll try to answer a few questions and give an overview of the technique we’ve been using on Skull & Bones. Major props and thanks to @sethhall for the original ideas!
As you all know, better looking explosions is a forever quest in our field and a popular method of making it possible in games is through usage of animated textures, aka flipbooks. There is a few problems with that…
Problem #1: Memory, Resolution and Variety
Using an animated texture mean we’re seeing 1/64th of the resolution at any point (for an 8x8 frames texture) . This is a sacrifice we’re used to make by now and it leaves us with a 256x256 pixel reso for what is a 64 frames, 2k x 2k texture. Traditionally, you need a RGBA texture for colors and alpha and a 2nd one for normals and emissive mask. So we’re two 2k textures deep already, for 1 effect. Adding more pair of texture like this to prevent always getting the same explosions over and over again will quickly run your memory budget down. So usually, we’d slash down on quality (down size texture) or quantity (less variety in explosions).
Problem #2: Lighting
With normal maps, lighting never really looks good in non-fully baked out scenarios where the Time of day is not constant, or in fully gameplay situation where you don’t control the camera view angle vs the sun direction etc. With that in mind….
Our current solution: Making textures more flexible and using lightmaps instead of Normals.
In order to get variety without exploding the texture counts. What we’ve started doing was splitting form and function. So instead of using texture for colors and normal, we’ve started to pack in our texture entirely different information. Here’s our current setup of 2 texture masks. Mask1 is uncompressed (Haven’t found a suitable compression since the data on each channels differ too greatly), mask2 is DXT1.
Part #1: Making the animated texture flexible.
Mask1 RGB: Tangent Lightmaps Top, Left, Right. (1k, 8x8 @128x128 per frame)
Mask1_A: Tangent Lightmap Bottom


Mask2_R: Color Key (1k, 8x8 @128x128 per frame) for us, in explosion it’s the render of the heat / emissive pseudo mix we “artistically” render in Houdini while doing
Mask2_G: Alpha
Mask2_B: Free (unused currently)
R:

G:

From there, we use 2 ramp textures. Very small ones. The first ramp is an albedo ramp and the 2nd one an emissive ramp. For an explosion it would look like this:
Albedo Ramp: DXT1, 16x16 px
![]()
The reason this is not a simple vector color picker in material is so we can easily edit the tone of the smoke in our explosions across the game by opening this small texture in photoshop and changing the level of gray. This way, we don’t have to edit each effect individually and we maintain uniformity of colors when using more than 1 animated texture in a given fx, so they blend better together. A very small cost to pay to keep an easy pipeline.
Emissive ramp: BC7 128x16 px
RGB: Emissive Color
![]()
A: Emissive Pre Multiply
![]()
Basically, we directly assign the albedo ramp into the albedo term, but for the emissive ramp, we sample it using: UV = float2( 1.0 + (-animatedTextureMask2.r), 0.5); So the Mask2’s animated R channel animates the balance of smoke and fire.
Result:
By changing the albedo or the emissive ramps we can achieve different looks re-using the expensive part (the animated textures)

Part #2: 4Direction Lightmaps.
While the best would be 6Direction, we want to save memory / performance so we only encode 4, and math out an approxiamation for front/back.
As seen above, here’s the Mask1 (Lightmaps) setup.
Mask1 RGB: Tangent Lightmaps Top, Left, Right. (1k, 8x8 @128x128 per frame)
Mask1_A: Tangent Lightmap Bottom

To render this we simply render lights and shadows from a Light that’s tangently positioned to the camera. You can do it all in 1 pass if you are a Houdini guru but to put it simply you can do it in 2 passes: Red Light Top + Green Light Bottom, render. Red light Right + Green Light Left, render. Combine them in photoshop in a single RGBA texture. From there, all you need is to unpack it and mix it in the shader. Here’s the shader code I am currently using:
First I pack the lighting information I am going to need in a struct:
struct LightingInfo
{
            float4 rawLightMap;
            float4 lightDir;
            float frontMap;
            float backMap;
};
Here’s how the struct is filled up:
 LightingInfo L1;             // L# Because L1 is sunlight and Ln for n number of point light you wanna support.
 L1.rawLightMap = lightMap;
 L1.lightDir = lightDirPS;    // we have Tangent Light Direction in lightDirPS, this needs to be tangent space.

 // If you find better approximations for front and back map using the 4channel we have… I am all ears.
 L1.frontMap = 0.25f * (lightMap.x+lightMap.y+lightMap.z+lightMap.w);
 L1.frontMap = pow(L1.frontMap, 0.625);
 L1.backMap =  1.0f - L1.frontMap;
 L1.backMap = saturate(0.25*(1.0-normals.x) + 0.5*(L1.backMap*L1.backMap*L1.backMap*L1.backMap));
Then we just call the following function using the struct as param.
float ComputeLightMap(LightingInfo L)
{
    float hMap = (L.lightDir.x > 0.0f) ? (L.rawLightMap.x) : (L.rawLightMap.y);   // Picks the correct horizontal side.
    float vMap = (L.lightDir.y > 0.0f) ? (L.rawLightMap.w) : (L.rawLightMap.z);   // Picks the correct Vertical side.
    float dMap = (L.lightDir.z > 0.0f) ? (L.frontMap) : (L.backMap);              // Picks the correct Front/back Pseudo Map
    float lightMap = hMap*L.lightDir.x*L.lightDir.x + vMap*L.lightDir.y*L.lightDir.y + dMap*L.lightDir.z*L.lightDir.z; // Pythagoras!
            return lightMap;
}
Currently, we decided to support the sunlight + 1 point light.
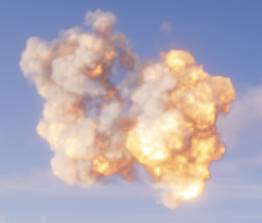
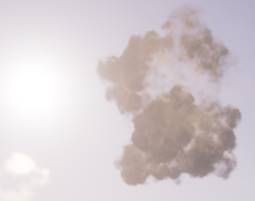
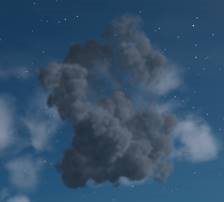
Result using the same animated texture from the explosion in the example above:
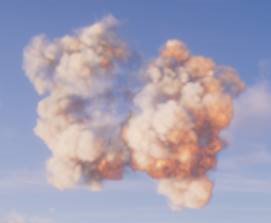
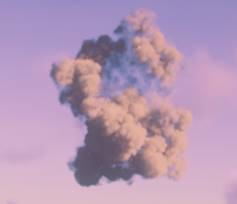
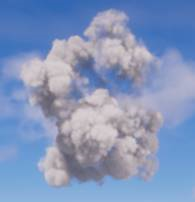
In action:
Using 1k per 1k animated texture (128px squared per frame)

Here is a few snaps of different Times of Day and different orientations of the particle:
All in all, it makes for a flexible system where we can leverage the same animated texture for a variety of applications. Best part, the lighting is still done in vertex shader. All we need is not to collapse the light color, ambient color in VS into 1 and instead pass both colors to PS individually so we can multiply the light map on the light color before adding it to the ambient color. So the lighting equation looks something like:
Lighting = lightColor*lightmap + ambientColor;
The total texture memory used for everything in this post comes to a total of 8.06MB.
I hope this helps you guys out!
Cheers,