Hello ! Since I am allowed to share my work and how we’ve done it in Season : A letter to the future, I thought it can be nice to share the process of making our waterfall, from ref to result, with some technical tips, it can be nice information for students ! Let’s start
SEASON : A LETTER TO THE FUTURE ART DIRECTION
What is Season : A letter to the future?
Season: A letter to the future - Launch Trailer | PS5 & PS4 Games - YouTube
Season is a narrative game released in early 2023 where you explore the world to record what you can. It’s a peaceful game, where you can bike, record sound and photograph the environment, people, and life.
On the art side, Season has a strong illustrative art direction, mainly inspired by traditional art like painting, with two-tone shading.
VFX wise, it was mainly environmental, so we had to emphasize this art direction with less transparency and strong color.
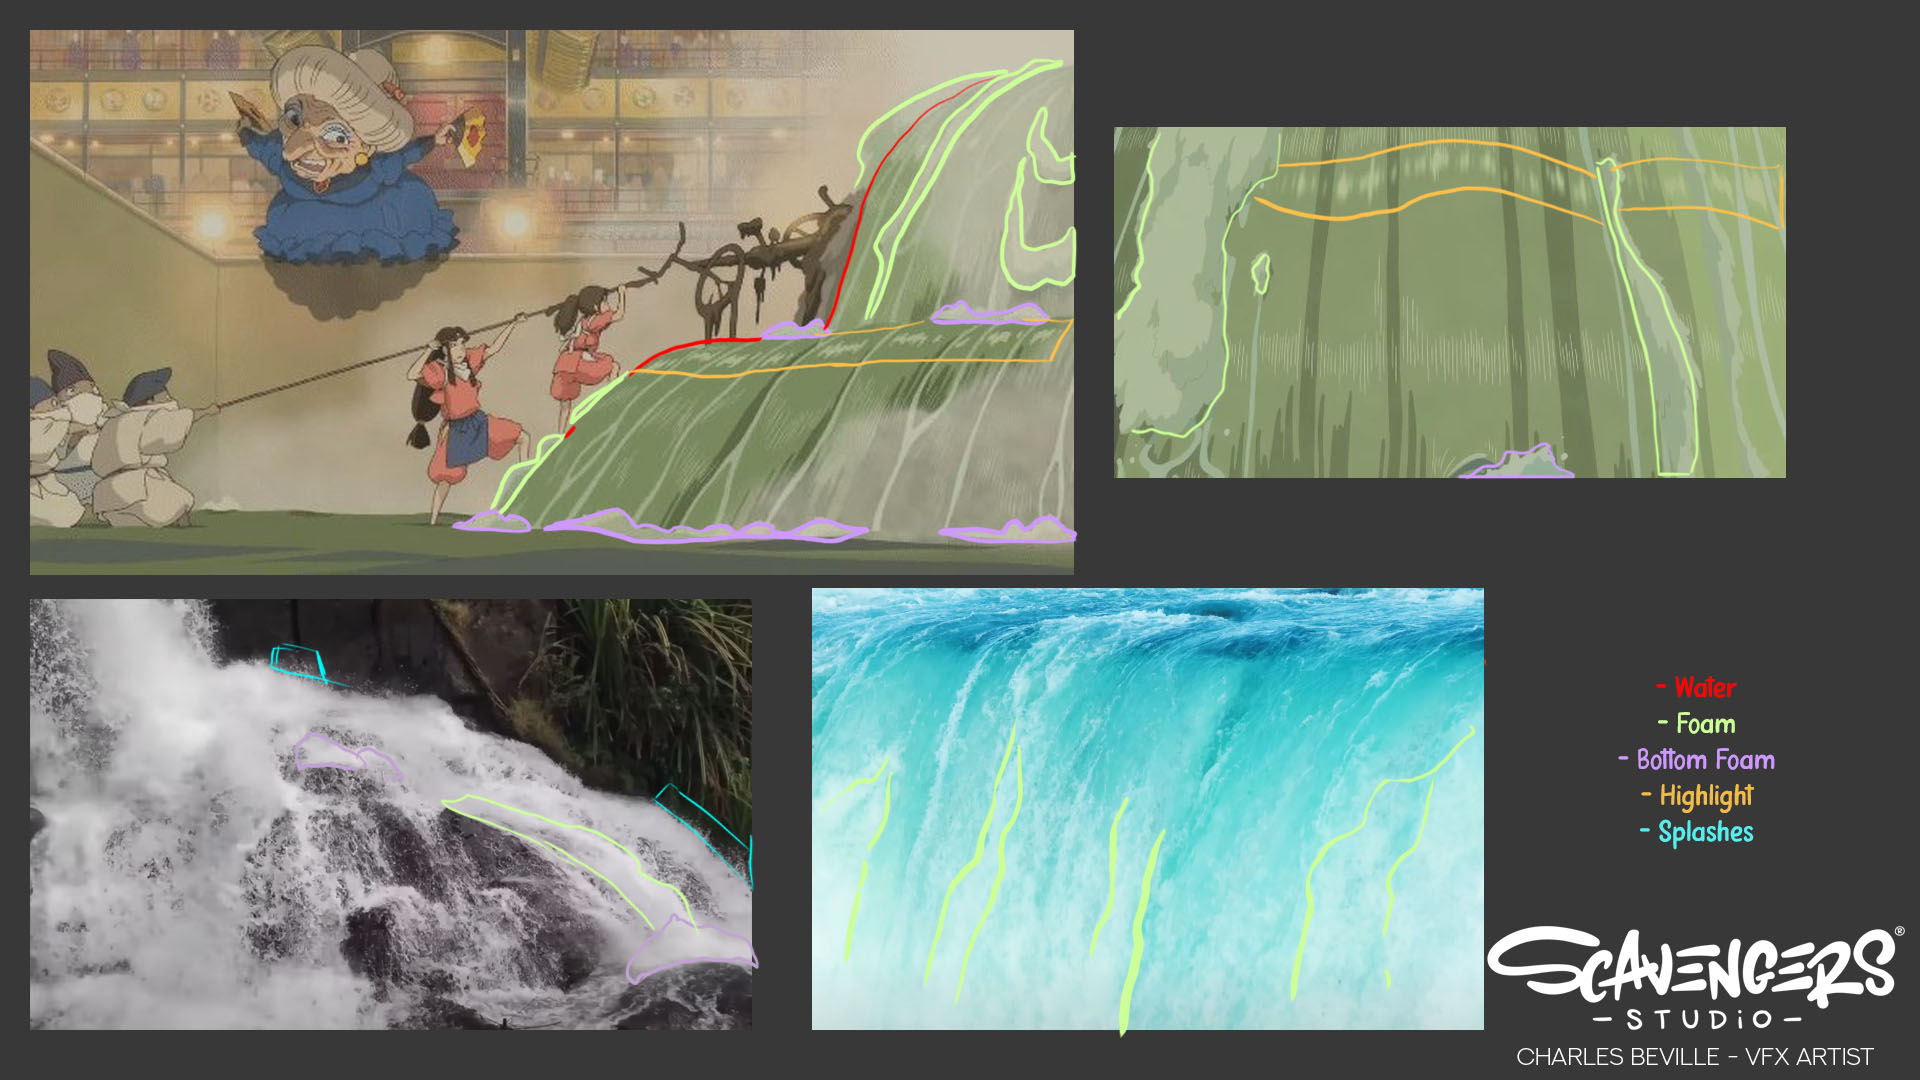
What about the waterfall then ? Well, our refs were real-life, painting, but also anime movies like Ghibli. Combining real life and the artist’s vision helped us to come up with our own stylization and vision of the waterfall. Let’s take a look at our refs :
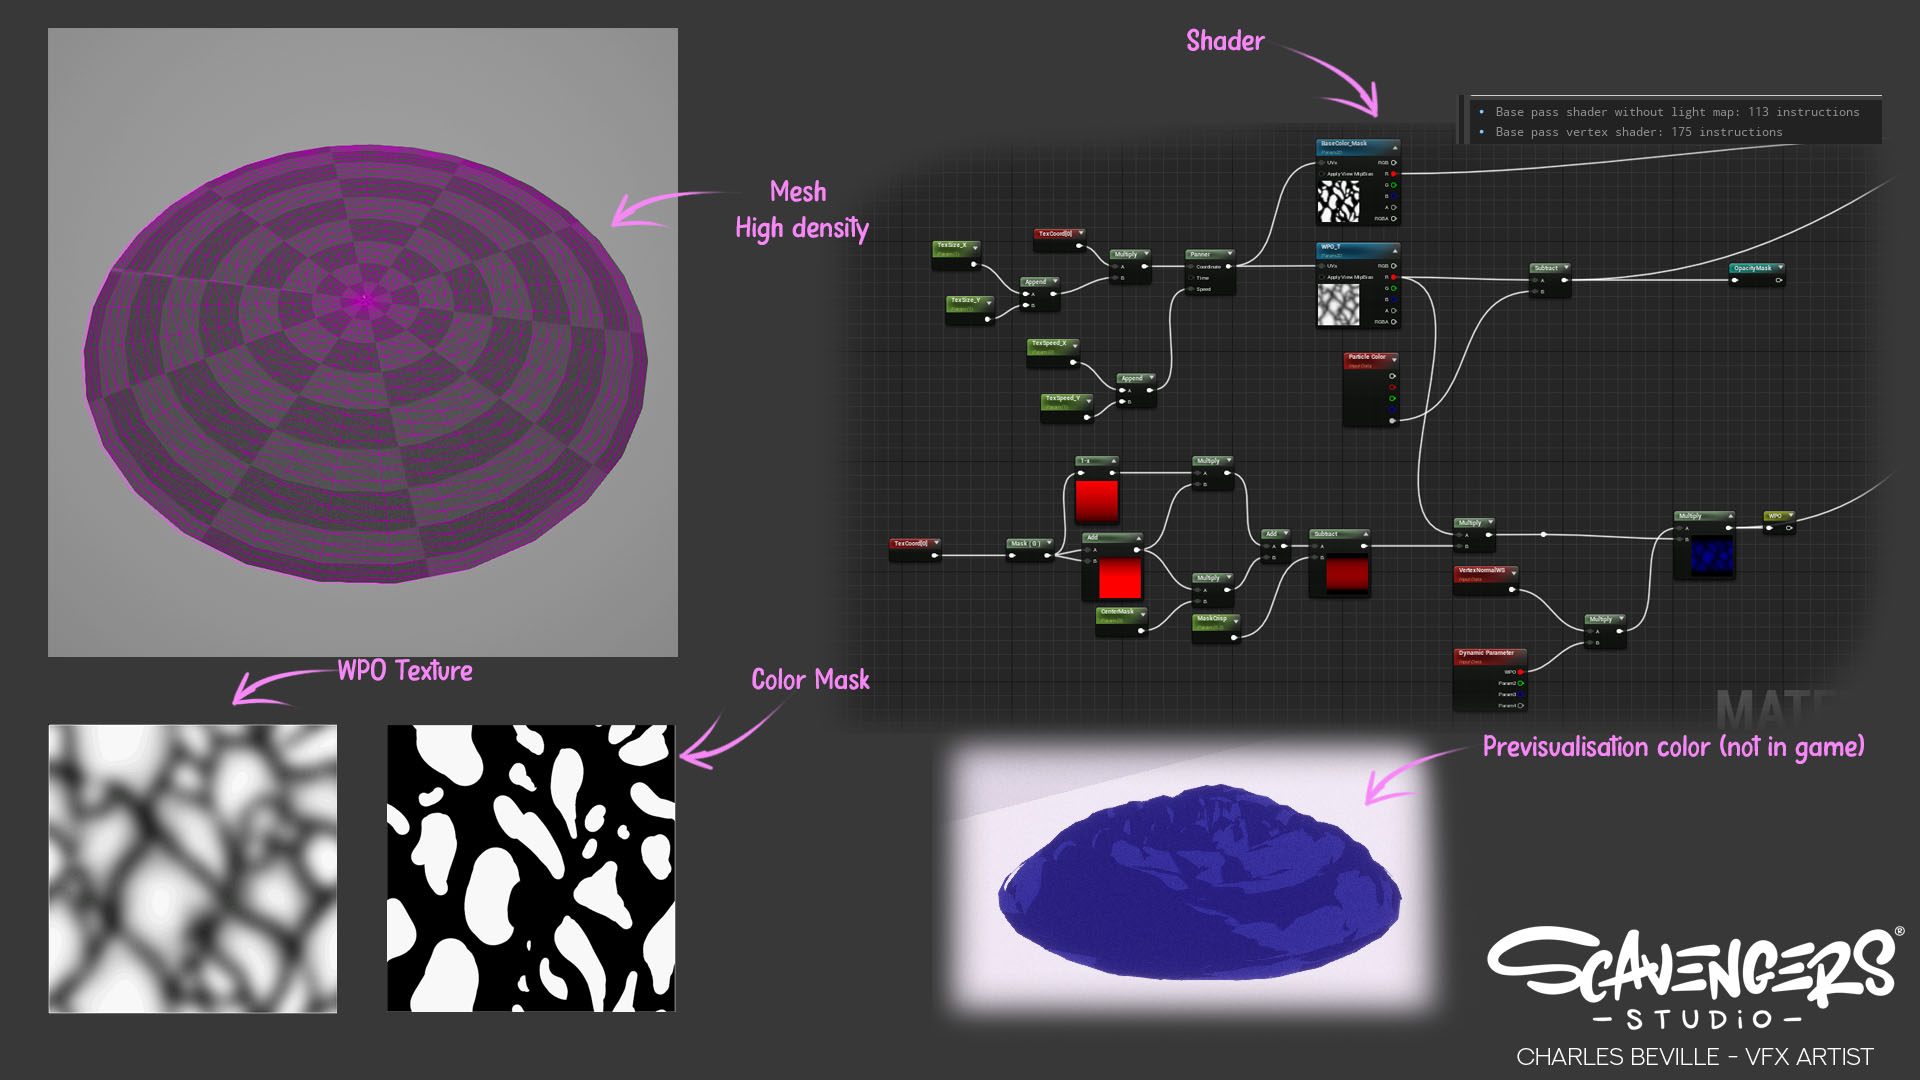
Now that we have determined our part, how do we do it? Well, after a few quick tests on different methods, the easier and more interesting was to break those parts into different meshes. It allows us a better control, it’s easier to work in shader, we want to avoid transparency as much as we can so we will make it either opaque or masked. But one important point : we can think about poly density for WPO, depending on the effect. Highlight and water body, for example, don’t need to add WPO on it, since we have a Foam layer to hide edges. so we can have lower density on it, and higher density on the foam part. That being said, let’s take a look at this part first :
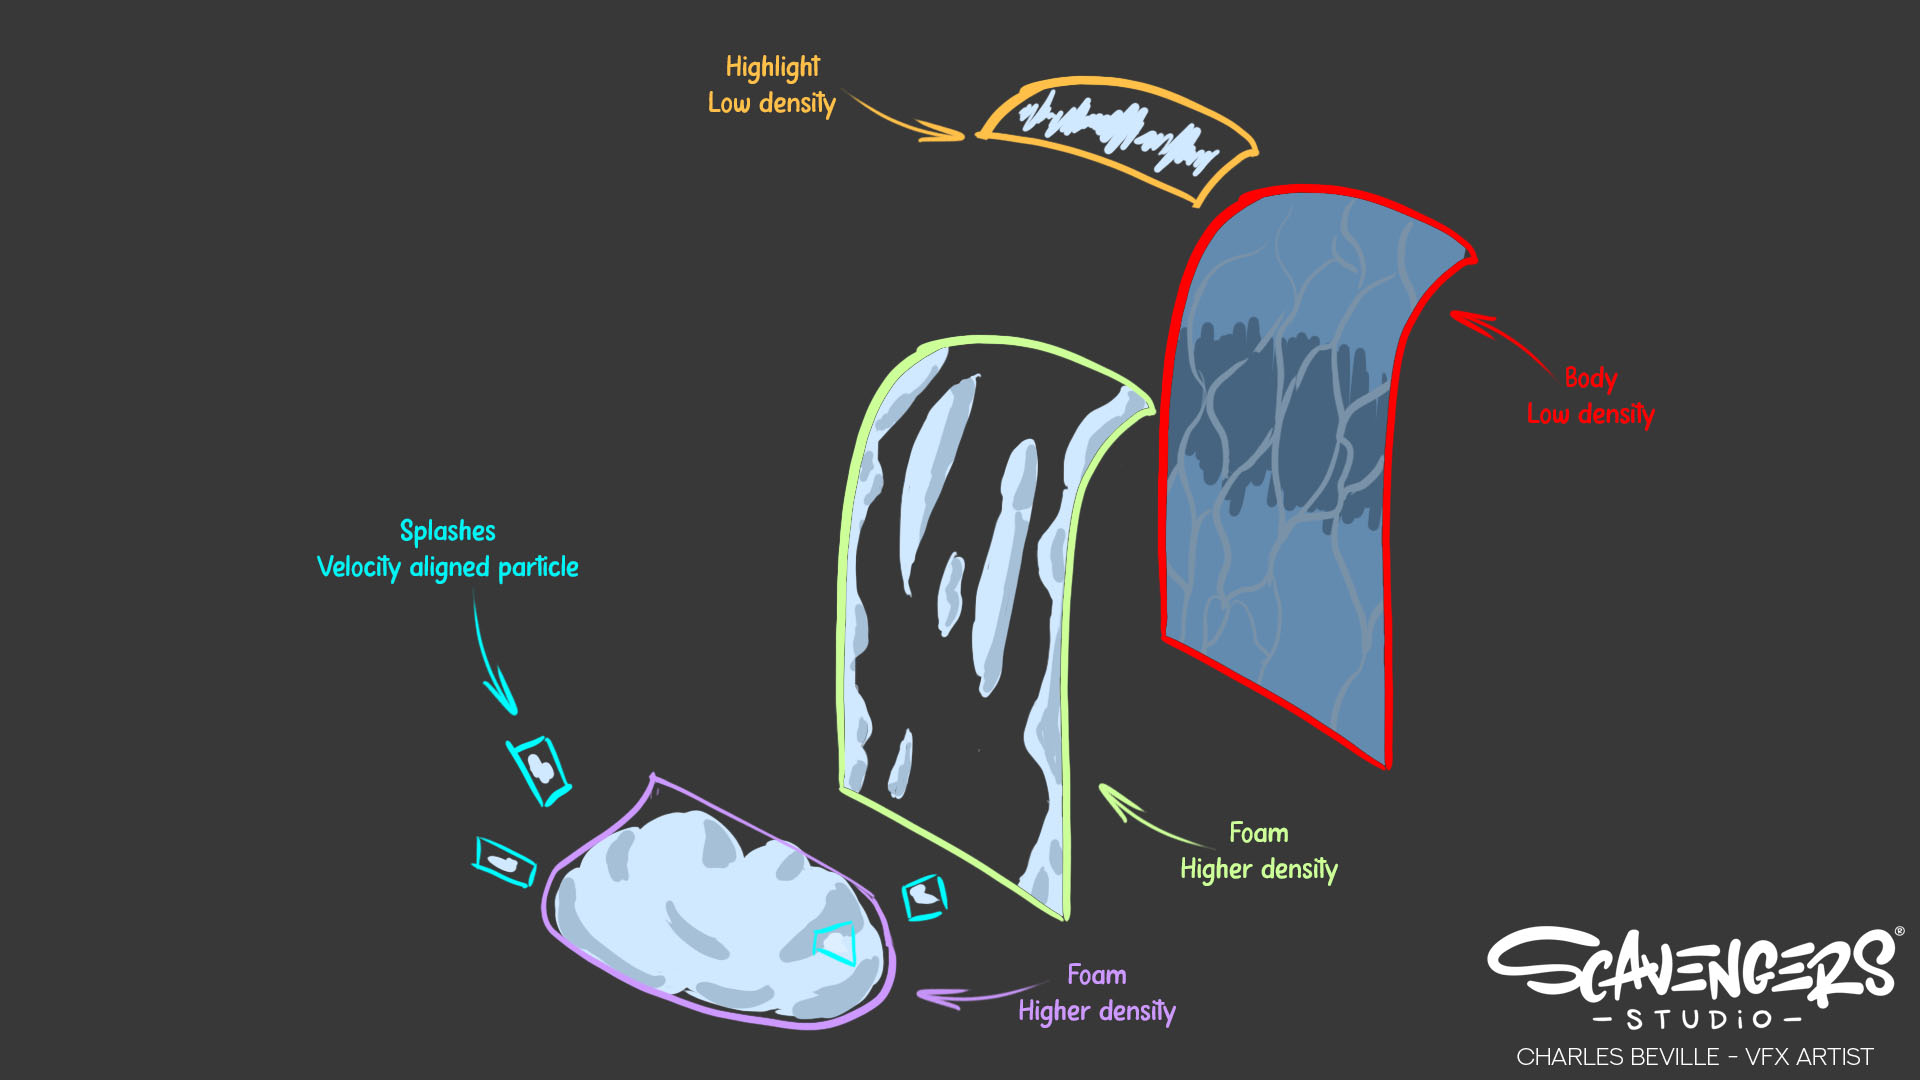
BREAKING DOWN THE FOAM
First and foremost, I can’t recommend enough to watch Simon’s talk on RiME effect ( 'Stylized VFX in RiME' by Simon Trümpler | Unreal Fest Europe 2018 | Unreal Engine - YouTube ). It was a starting point for our thinking process.
Our waterfalls are smaller, so the bottom foam has to be smaller too, and we wanted to keep a less spiky-shape, something rounder, softer. For that, I handpainted a tiled texture with round shape (technique learned in VFX Apprentice, similar to the texture you can find here https://www.artstation.com/artwork/Krnwno) and applied blur. The idea is to have the softest gradient possible while keeping clear shape. This is the one for WPO. And then, I’ve made a mask to allow me to “cheat” the two tone shapes in the material. Nothing crazy in the shader, though due to the way we controlled our different times of day in the game, the color is controlled by a MaterialParameterCollection. We could optimize it a bit by having the mask in Vertex Color, but I wanted to be able to control it.
In niagara, I’m controlling the spawn rate, box location to make it more or less wider depending on our Waterfall size, and with Particle Alpha value subtracting to the opacity mask, I’m adding a nice dissolve. The overlay of multiple particles gives this soft effect, without much overdraw because it’s a masked particle!
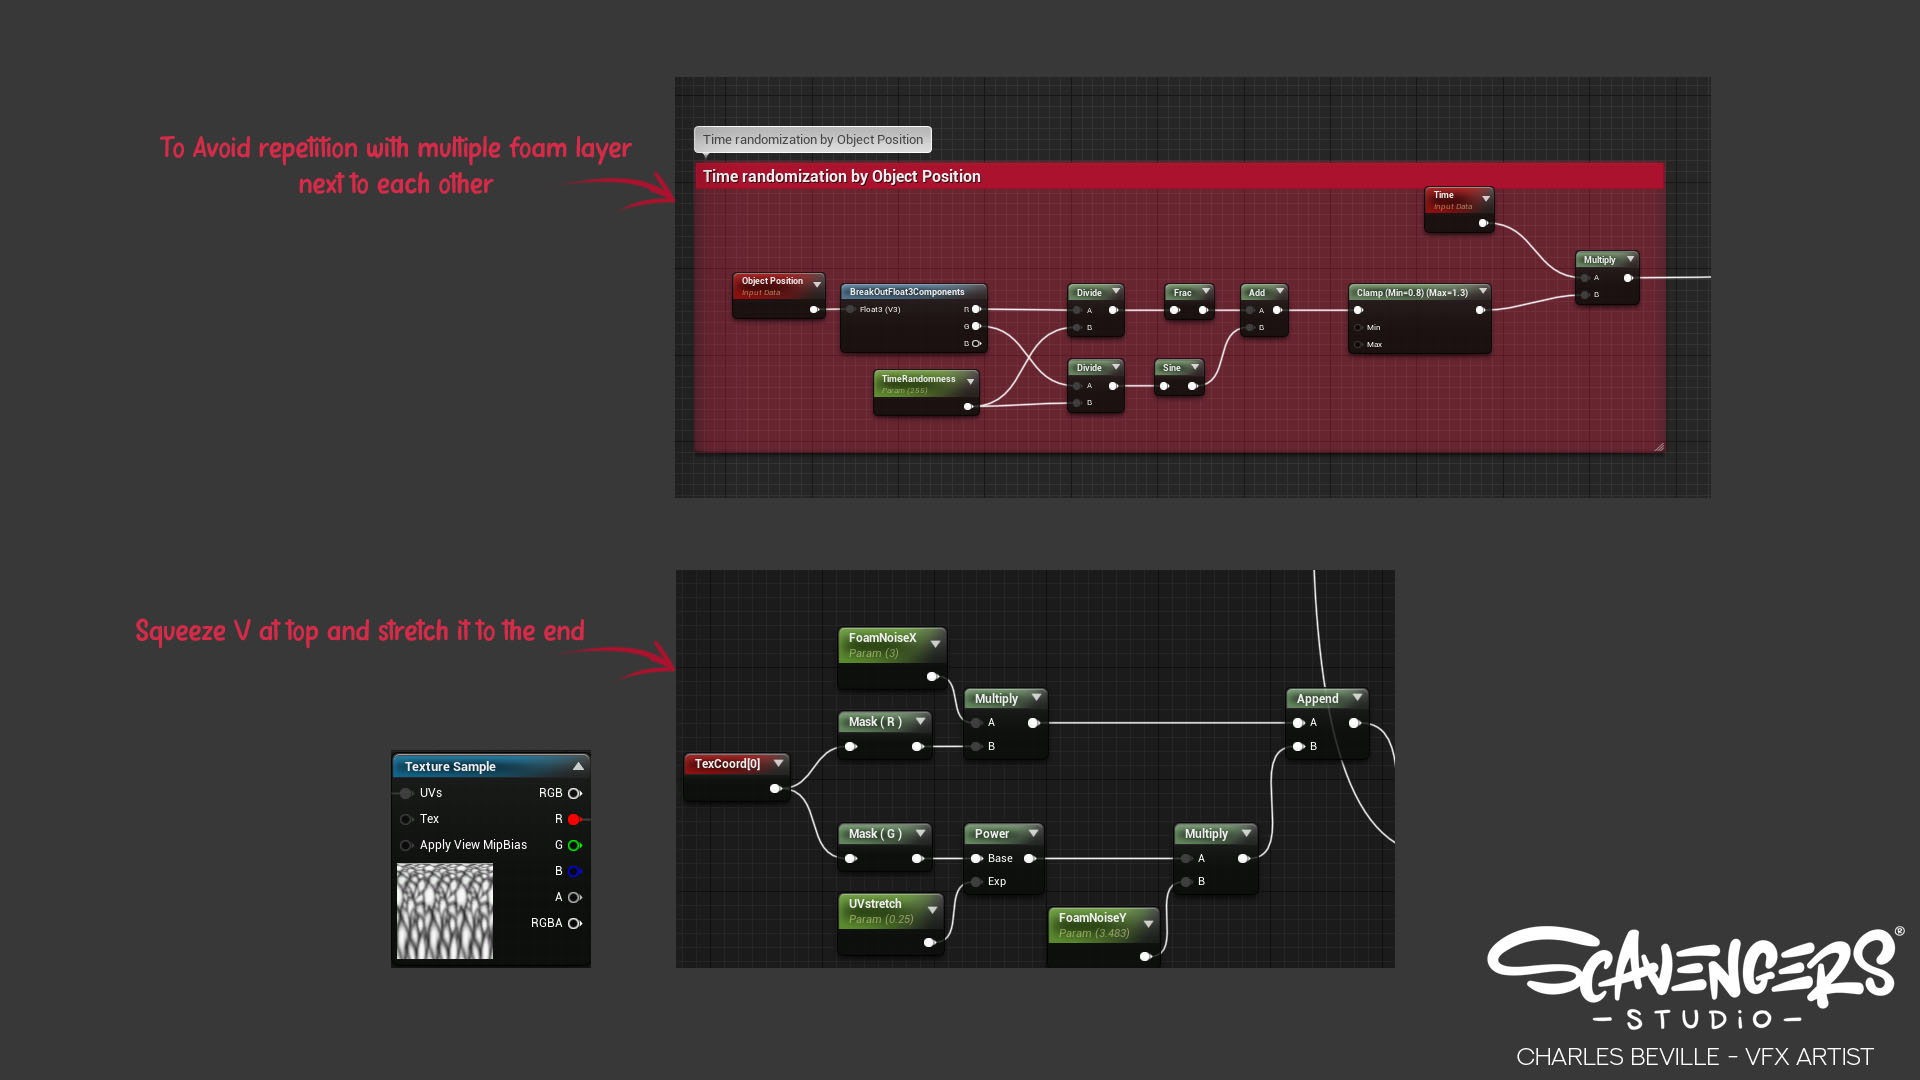
For the foam layer, the same technique was used. I used some noise and tiled texture to create a mask with this shape. First I worked on the outer shape, and then added an inner noise to add a few foam elements going down the water. To help sell the accelerated movement of the water, you can do a power on the V axis of the UV, with a value lower than 1. it will deform your UV to stretch part of it and squeeze the top. Since our waterfalls are divided into multiple waterfalls, we had to break the repetition of the material. you can use the object position to control a parameter so each instance will be unique. if you divide it by a scalar you can adjust how fast the value changes while moving. The mesh is created depending on the waterfall’s shape, with high poly density to have a smooth WPO, but with a LOD system. We tone down WPO with camera distance so it doesn’t look weird with less poly, the idea is to not see any transition.
BREAKING DOWN THE WATERBODY
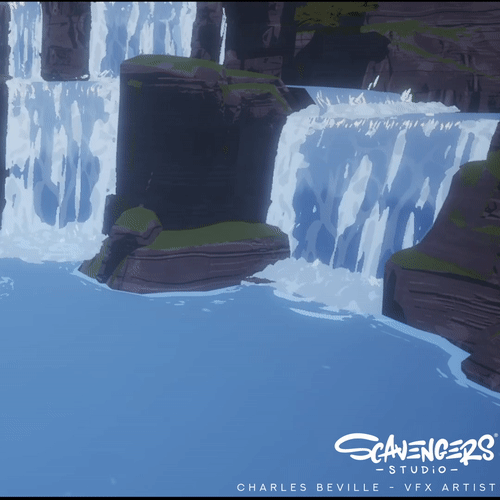
Alongside the foam, the water bodyis obviously one of the most important parts. After all, it’s called a waterfall !
We had to make it match our water shader, so a lot of the material is re-use. What’s interesting to us here is how we decided to bring back our references. In anime movies like “Spirited Away” we can see darker water tint and whiter texture going down (we can also find the same pattern in a lot of cartoon refs).
For the darker tint, we just make a mask multiplied by a noise, and this mask allow us to control color variation

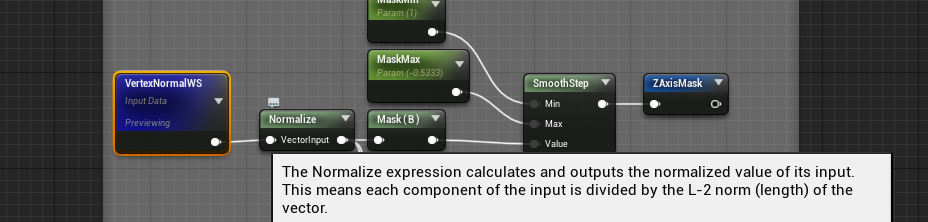
For the pattern moving down, we actually use a sharper version of the foam’s WPO texture, without the blur step. we stretch it with a power, as we did in foam shader, we simply mask the top of the waterfall by using the Vertex normal. To avoid a lot of repetition and UV issues, the texture is world aligned, so each instance is offset a bit, and we can have more control on the size of the pattern without thinking about UV.
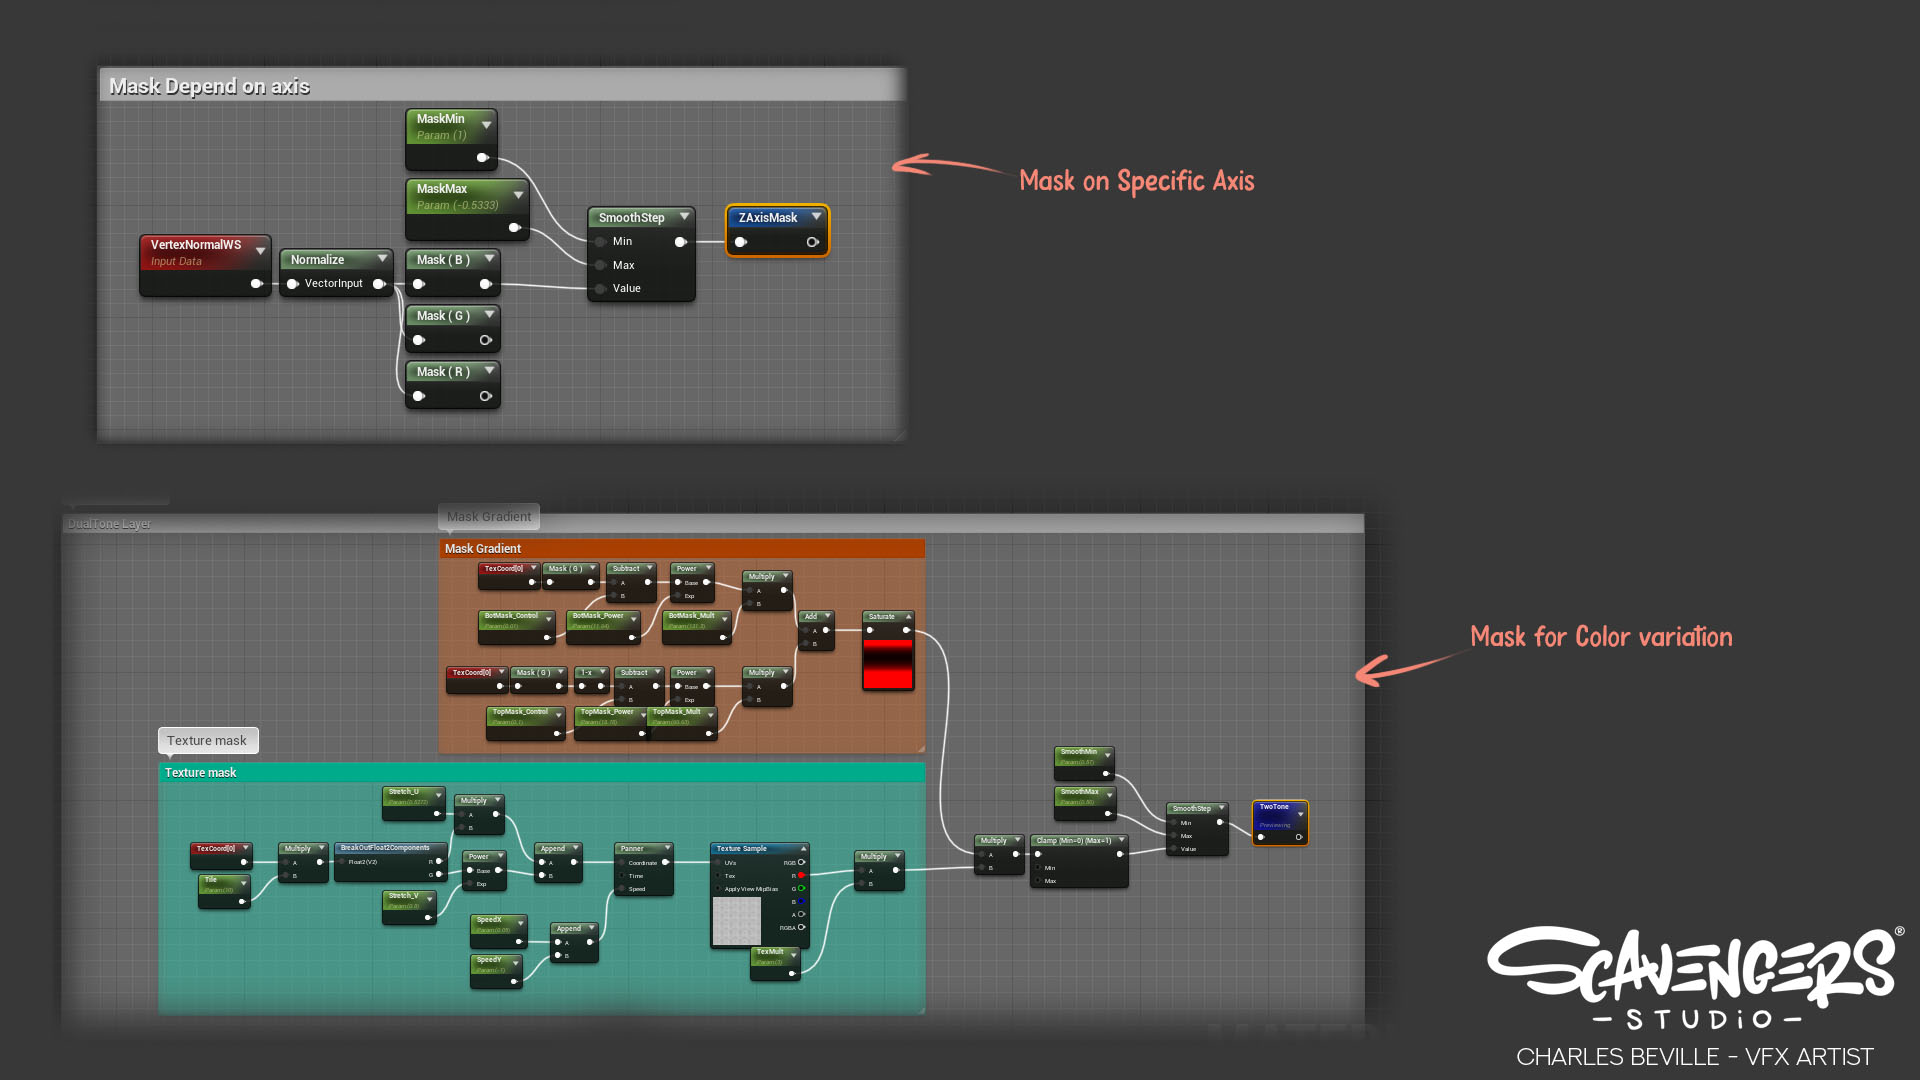
EDIT : As simon told me, i left a useless node in the ZAxisMask logic : VertexNormalWS is already normalized, you don’t have to put a normalize node after. Sorry for this inconvenience
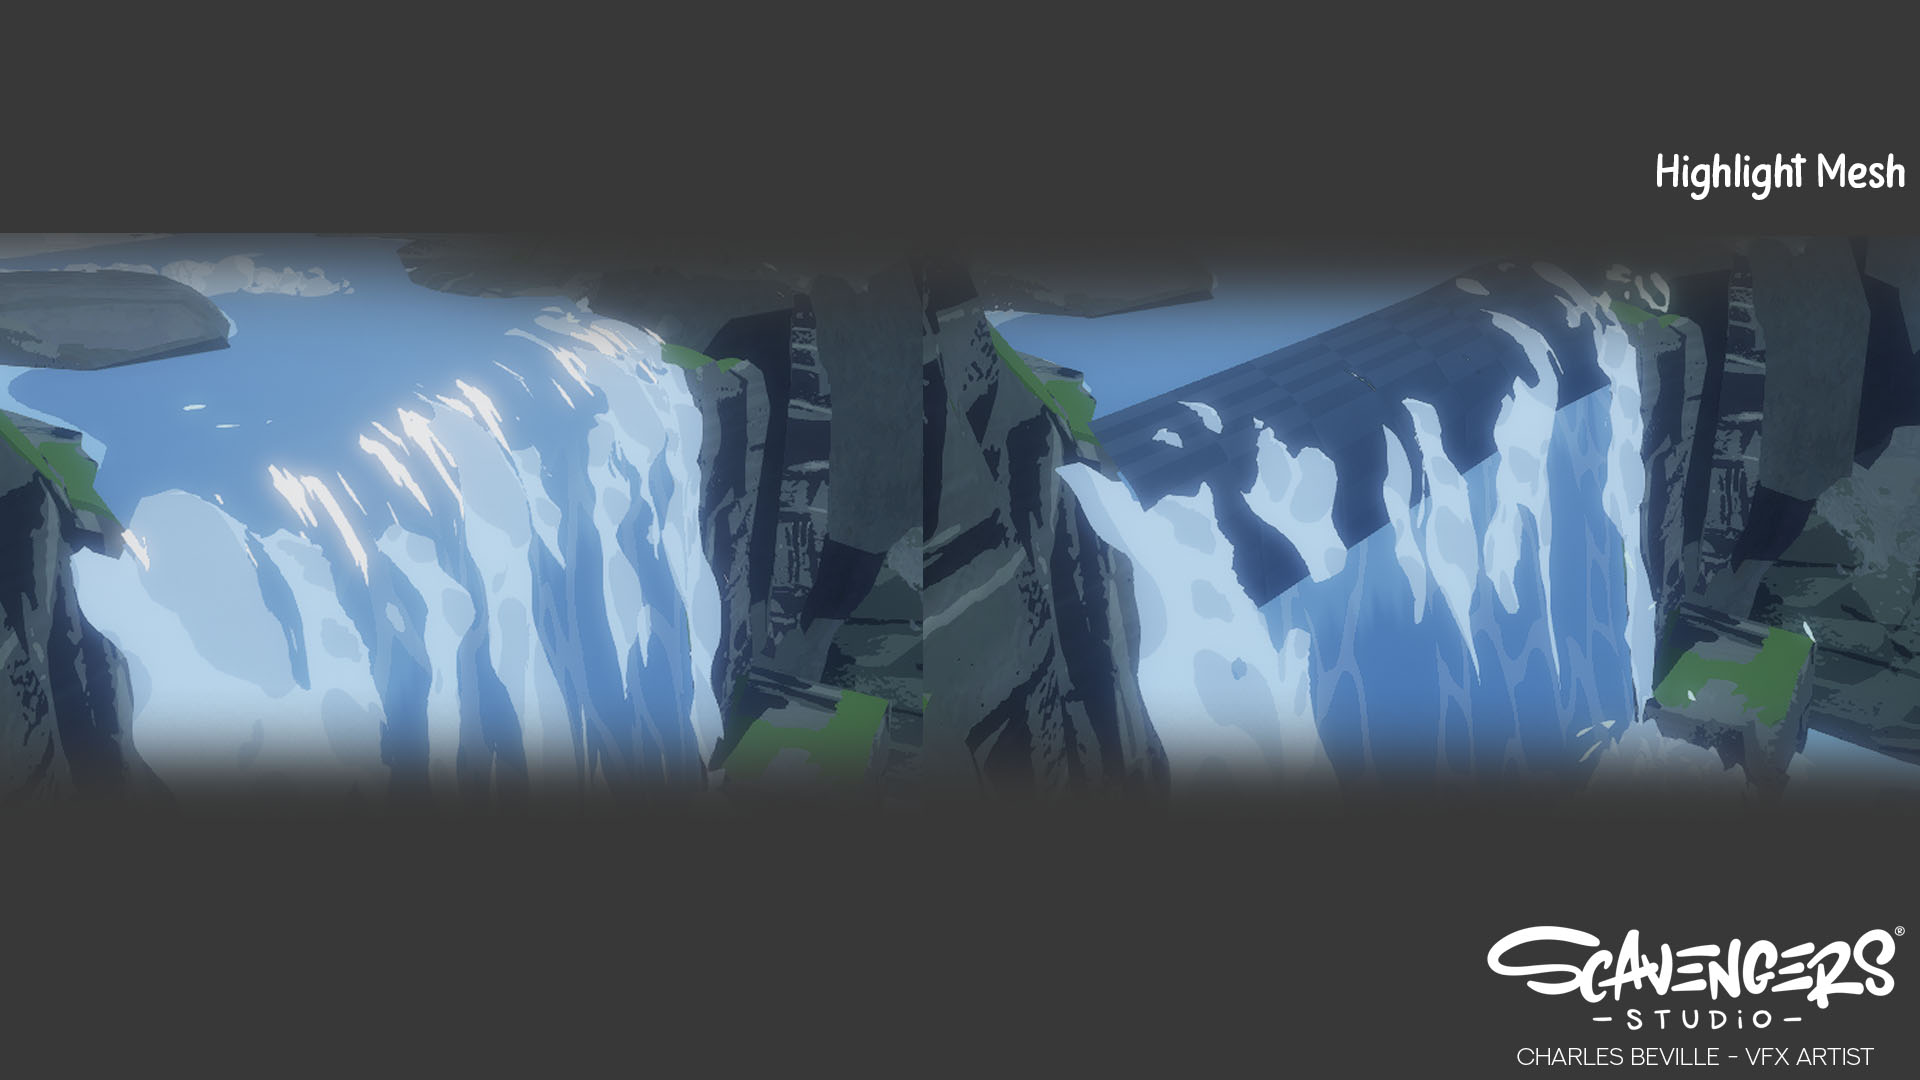
BREAKING DOWN THE HIGHLIGHTS
For the highlight, I want to thank Filo Filo: Sketch #9 WIP - #4 by Filo , I used the technique I learned from this sketch. As shown earlier, on the waterbody, We did a mask multiplied by a stretched noise, on a masked material, with brighter color than the waterfall on a separate mesh with lower density.
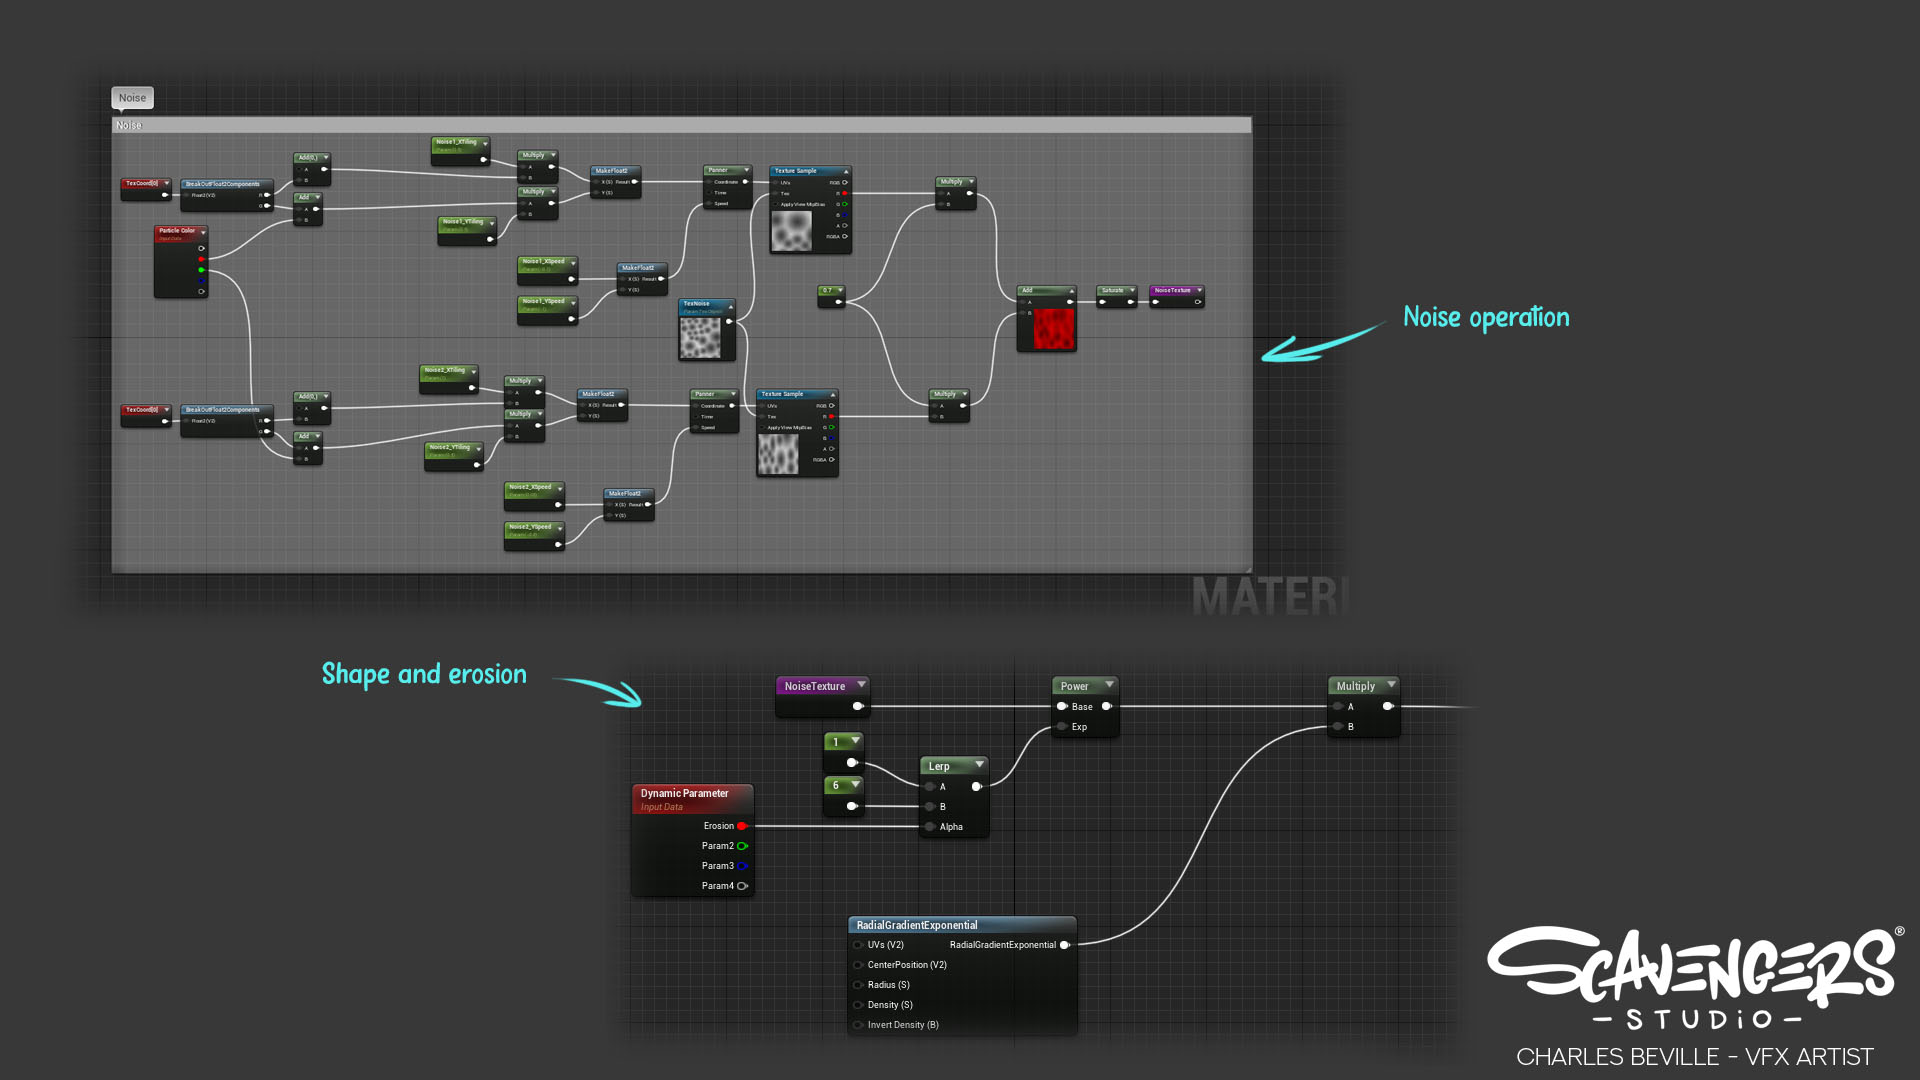
BREAKING DOWN THE SPLASHES PARTICLE
Nothing fancy here : 2 cell noise with different size and speed added together to give a more complex shape multiplied by a RadialGradientExponential to limit it to a round shape and erosion controlled in Niagara. We use the same function on all our water shaders to control color depending on the time of day.
MY TAKEAWAY

Time to wrap this up. So, what can we learn from this ?
- First thing of importance : This is the result of a looooot of back and forth to get what we want. I feel like it’s important to remember that we have to fail, learn, repeat, see with our lead or concept artist, get other’s point of view, at the end it’s still a team work. The most important thing to keep in mind is to work toward your art direction, and look at your refs a lot.
-
Re-usability is key ! Lot of texture has been shared between all those different shaders, it’s a great way to save time and perf too. There’s a step before the polish where you’re in your shader with existing textures, it’s time to make test with what you have in texture. There’s an awesome talk about this step in texture from Simon (again ! ) : How to (Not) Create Textures for VFX - YouTube (This is aGDC talk but if I remember right , Simon did another one with more explanation, feel free to share it please !) . But also a lot of shader parts, that we can collapse to a function, have been re-used. and this is so much of a time saver. Time is our most precious resource, so if you see you’re using the same group of node inside your shader, do a function, expose it to library, comment it (always comment your work) and voila, you can reuse it faster and with just one node.
-
Optimize when it’s time to optimize. Don’t go crazy in your shader thinking “I will do it later” of course, but don’t restrict creativity with optimization at first. You’ll find your way. It’s easier to cut/reduce scope than to add something with a short deadline. Make it look good.
-
The RTVFX community is a gem. Even if you don’t talk that much, be sure to lurk. Everyone’s willing to share their knowledge, I was able to achieve that because I learned from others.
It was long, let me know any feedback, thought on this breakdown, if you have any question I’ll try to answer it
Good time to thank my lead Stephen Tucker, and everyone here who shares information, I recommend you to watch Simon’s talk a lot.
If you want to see others Season’s VFX you can find them here : https://www.artstation.com/kalomnia and there’s also smaller breakdown for 2 other effect !