VFX For Games Tutorial 03 - Realistic Fireball Projectiles - 3 Part Series

Hey there!

Our third tutorial set is up showing how to create realistic fireballs as seen here in one of my promotional videos:

Part 1:
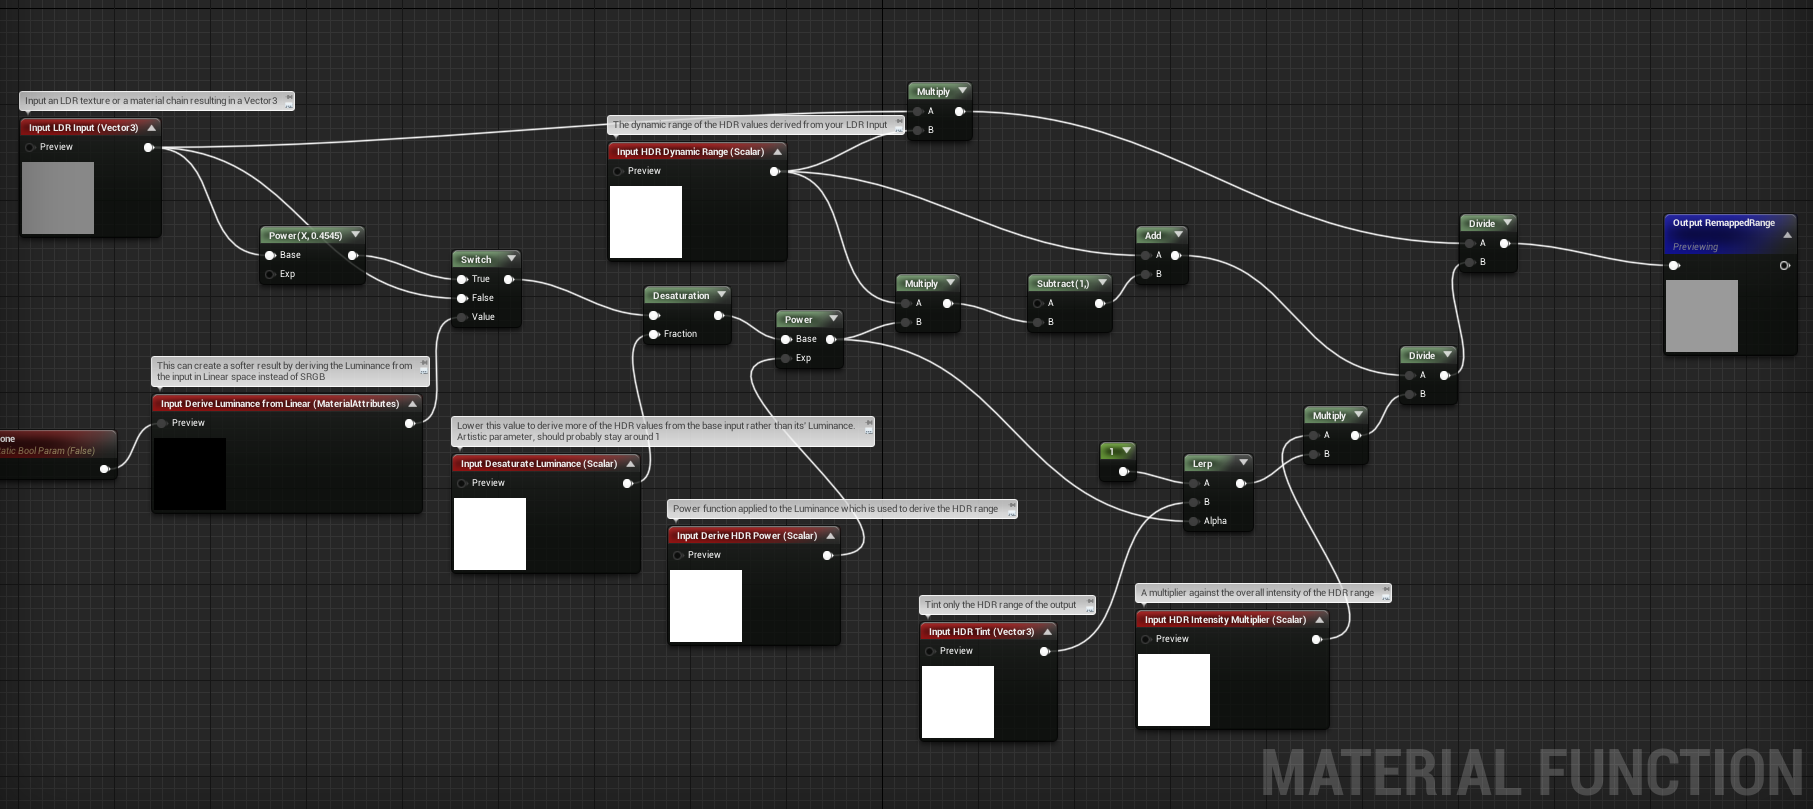
This details the base shader creation, one of the base fire textures (great for fire on the ground and such too), and then the projectiles base motion to go from the spawner to the target of choice with seeking abilities.

Part 2:
This details creating the rest of the VFX portion of this fireball. Smoke, fire trail (ribbon), sparks, leading projectile, etc.

Part 3:
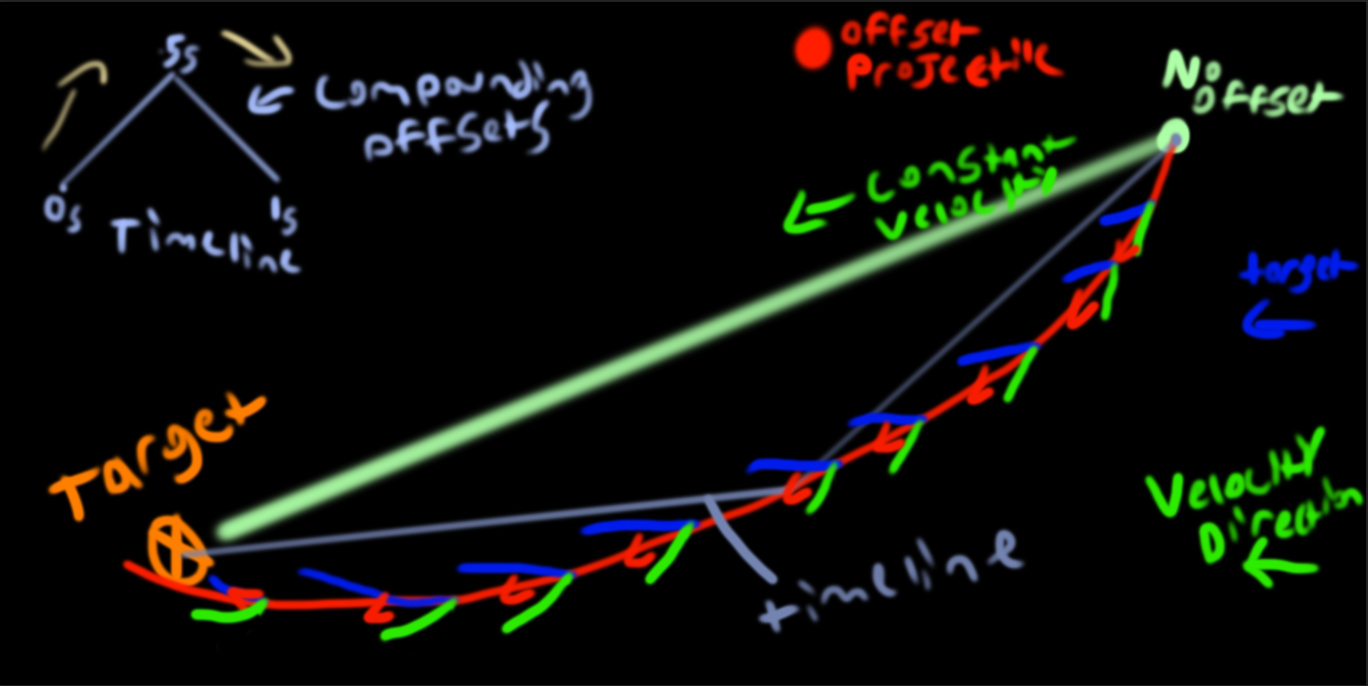
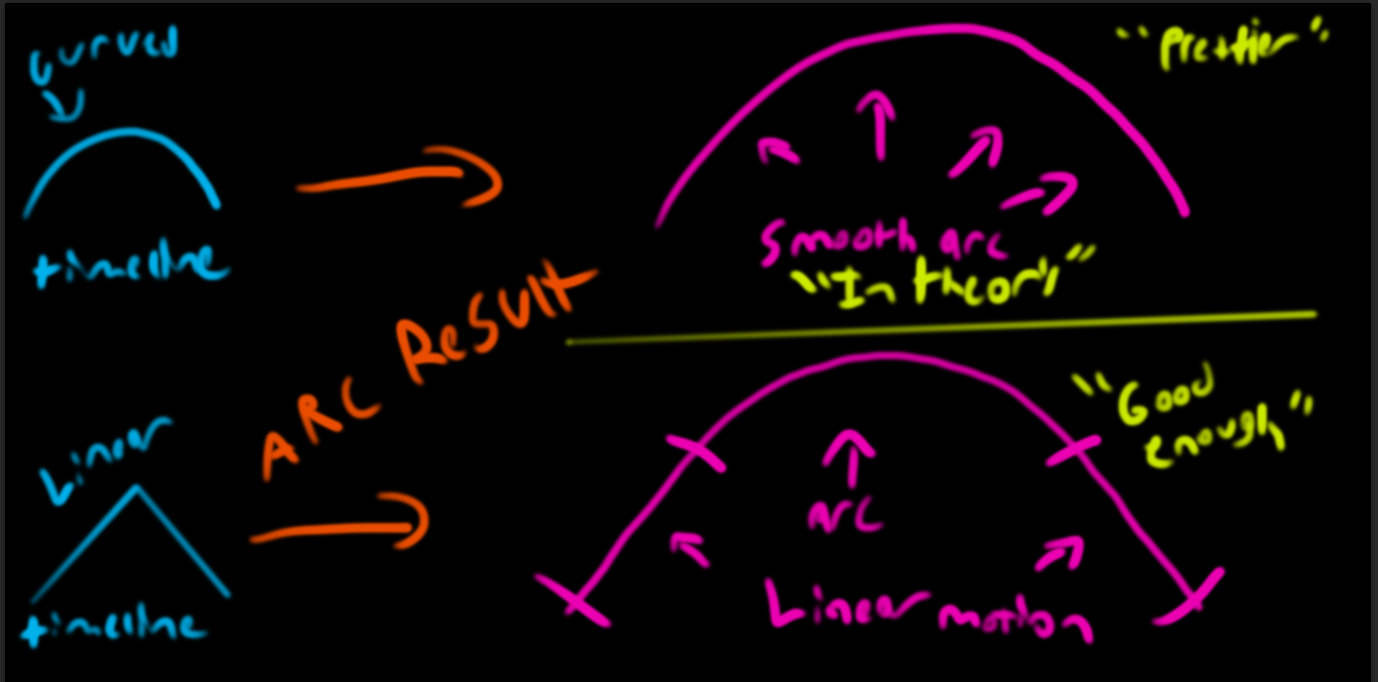
I wish this one was done within part 1 of the video, but alas I didn’t think of it. This just shows how easily add arcing motion to your projectiles and it’s certainly the shortest portion of the series.

So there you go! Creating everything you need for some basic fireball projectiles. I will cover cast effects and impacts in a separate series.

I will note that I probably should have used curve atlases or gradient mapping to colorize my textures consistently rather than colorizing them within photoshop. I chose not to do this for the sake of time, though I’d have to recommend that you colorize your textures with those methods.

Please give me your feedback on these tutorials, I tried to leave out as much fumbling + mistakes as I could. If you feel that I should’ve explained something better, please let me know that as well. Based on a poll that I did last week, I received a lot of valuable feedback and tried to implement the best of both worlds while creating this tutorial series. These tutorials cannot be compressed into 10 minutes and they shouldn’t have to be. Learning takes time and effort.

I’d love to see what you guys come up with.

Cheers!
Nick S.

42 Likes

Thank you for such a detailed tutorial. I have seen part 3 (I was interested in the programing side) and I’ve already put the 3 videos on my pending list.
I’ll watch them all, give it a try and show what i’ve got!

1 Like

Janga, well execution on this tutorial, the flow on your steps reads quite well. Keep up the great work.

1 Like

They day you get a patreon, consider me COMMITTED . Great stuff as always Jangafx

1 Like

Thanks! I’m just watching the videos and I was wondering: I never saw that DeriveHDRfromLDR-Node and can’t find anything about it on google. Do you know what exactly it does? I had the impression that boosting the emissive values to >1.0 with a multiply node would bring everything in HDR already but I guess there’s some more things going on under the hood?

Open this image in a new tab to see it in full. This is the deriveHDRfromLDR node.

I’m not sure what makes the function special honestly, as I don’t understand it for the most part. I saw them using it in paragon and liked the way that it helped boost a materials emissive colors and feels a bit more on the realistic side to me. High emissive values will result in a blackened texture, so you’ve gotta be careful with it.

I’ve also noticed that you may get more lens flare effects when using higher HDR intensity values than your typical emissive texture, but I could be wrong about that.

Overall, not sure how the node works, but I like its results.

I’m sure there is some sort of HDR from LDR equation out there that they pulled from.

Thanks for the picture. Interesting… need to investigate that at some point.

Just finished watching the tutorial. Really good works, thank again!

Another question I have: I’m not understanding why the timeline (ranging from 0-1s) is changing the path of the projectiles so perfectly well. Am I understanding it right, that the origin of the fireball is virtually move over 1s? So that if the target is far far away, the fireball would only make a little curve at the beginning of the lifetime and after 1s would go back to it’s linear flight path?

I’m glad you liked the tutorial :slight_smile:

The timeline creating perfect arcs makes sense when you think about it in the form of vectors and the strength of them.

First, we are interpolating the world position of the fireball where it currently is in the world, to the targets location. That target can be moving, and as long as the fireballs speed is faster than that object can move, it’ll eventually catch up and die when it reaches its target position as we set it to in the blueprint.

That creates a straight path as long as there are no offsets added to it, and as long as the target isn’t moving.

Once you start adding an offset to the fireballs location, you are moving it away from its current path. As our values go up in a straight line over the timelines life, the arc gets bigger. The vinterptoconstant node is trying its best at all times to get that fireball to the target at a constant speed.

This additive offset is progressively intensifying over the timelines short life. So at a time of 0s its adding zero, but at a time of .2s+.5 in x, then maybe +.52 at .22s in the timeline. So these numbers compound in offset as the timeline progresses. At lower values/times the fireball is alive (closer the target is), the interpolation node can properly compensate for the lower values, thus no large arcs occur.

As the values get larger in the timeline and compound more, the interp node can’t compensate fast enough so the fireball is driven away from the target. As our timeline goes back down from our highest offset value to zero, the interp node is able to overpower these lower offsets and go back towards the target.

Also instead of these offsets being in one axis, like X, we can do these offsets in all axis’ to create arcs in all dimensions.

Hopefully this helped you understand it a bit better.

1 Like

Thanks for the explanation! Am I understanding it correctly, that the offet only happens during the first second of the fireballs lifetime?

1 Like

And yes, if the fireball lives longer than 1 second, then the arc no longer applies after that.

In the example above, imagine that fireball will live exactly 1 second.

Green is the direction the offset is taking it, while blue is the direction of the target. If you get the length of that vector, it points right along the arc’s path, hence why it arcs.

3 Likes

@simonschreibt

I also want to mention that the arc that we see here isn’t truly an “arc” its more of a linear line with a smoothed transition like so (I think).

By curving the timeline, you’d likely affect the arc motion.

This theory is up for debate as as it’s hard to tell what’s actually happening. Curving your arc will offset the fireball more and faster since the effect is compounding. I’d like to see tests done with different timeline curve types to see how it really affects the projectiles path.

1 Like

I’m quite new to Vfx and take any help I can get but I have to say your tutorial is just awesome!!!
It was my first self drawn texture and your videos really helped. In the most tutorials they skip that part. :slight_smile:
I had some problems with the fade out of the texture. I’m getting a big chunk in the middle of the texture that is not fading out. I think that’s because the portion is to bright. Do you have any advice on how to tone that down?
Do I have to use more darker colors and only use white for highlights?
Thank you again and keep up the good work!

Hey Hank,

By pressing CTRL + L in photoshop you can adjust the slider that is all the way on the left. By moving that to the right you will be able to preview the fade like so:

And if you have a big chunk or something, just go over it with a grey color, or with black and a low opacity until it looks like you’d like. :slight_smile: Using CTRL + L while dissolving the texture will show you what will show up last and you can use that to pinpoint exactly where the dissolve is messing up.

Glad you liked the tutorial. Keep an eye out for more in the near future!

2 Likes

Thanks! That helped a lot. :smiley:
One more thing, could you upload the Photoshop brushes, that you used for the smoke texture? Or did one of you find a good source?
I can find something about them but all download sides are looking quite shady and I don’t really trust them.
Thank you again and I’m looking forward to your next Video!

Sure, here’s the brush set. I’m pretty sure it works with both CS6 and CC.

https://jangafx.com/downloads/blurs-good-brush-7.abr

Just load that up in photoshop and you’ll have 90% of the brushes I use.

3 Likes

@JangaFX Hi Nick, is this brush pack free for commercial use, or is it your personal collection made out of many brushes from different artists with unclear licensing state?

From what I remember a LONG time ago it was a free pack for commercial use made by that single artist.

Edit: There used to be a site up for them which Blur (artist) hosted but i can’t find it. Here’s the original posting from 2008 on cgsociety: CGTalk | Blur's Good Brush for all digital painters!

I’ve been using the brushes commercially for years at this point.

1 Like