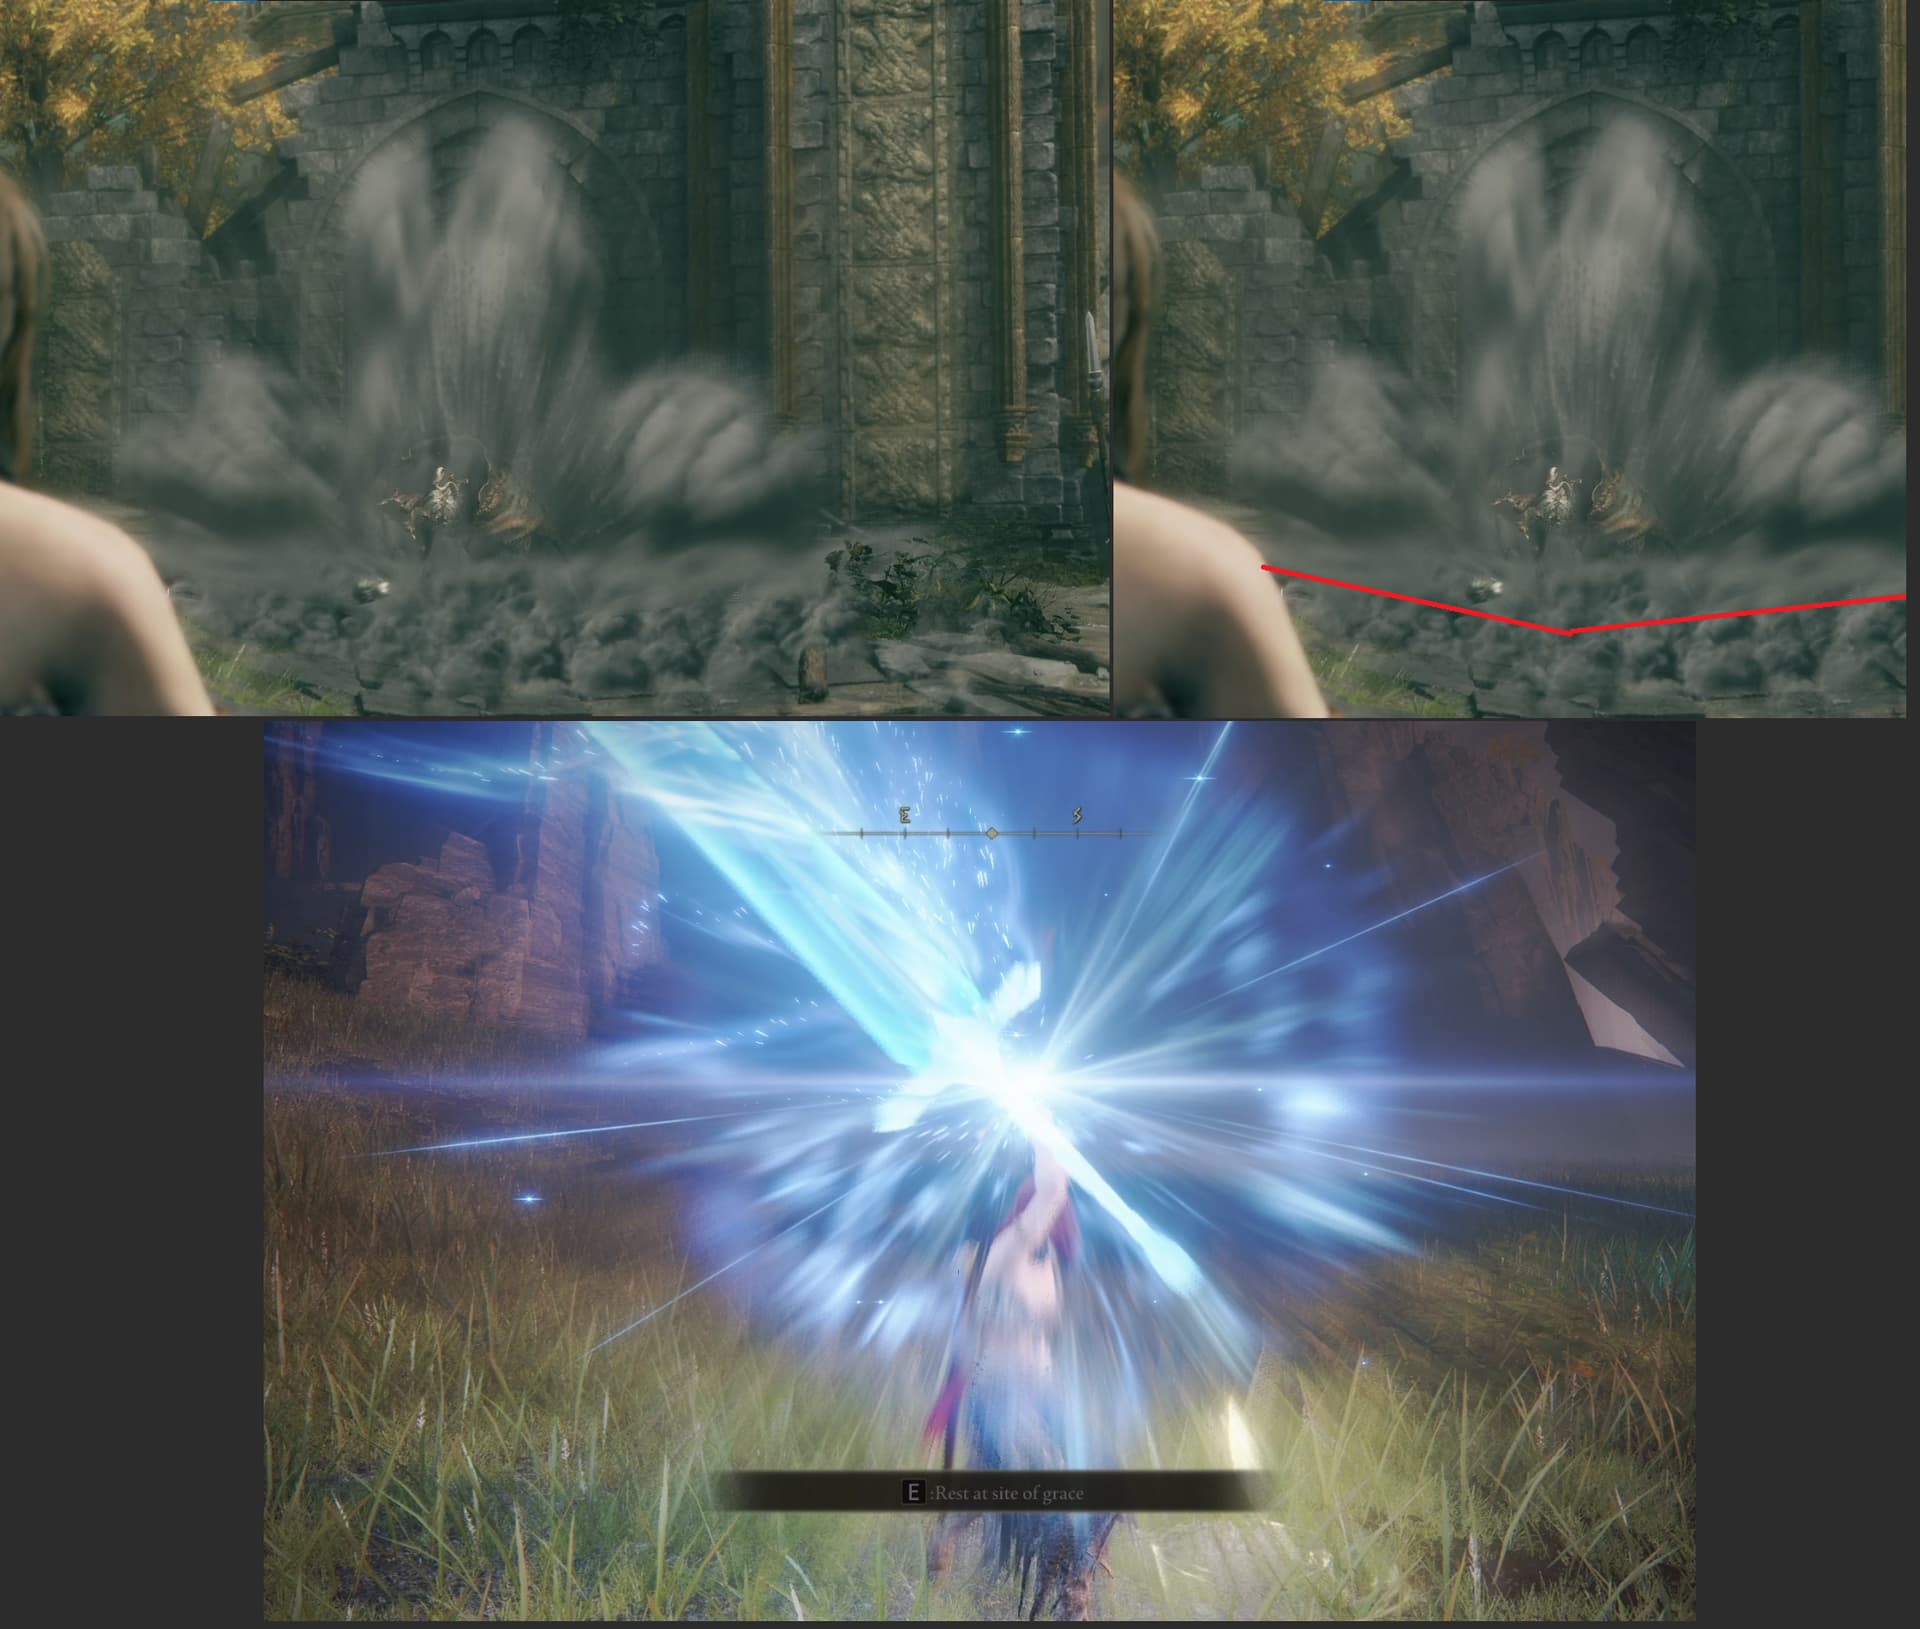
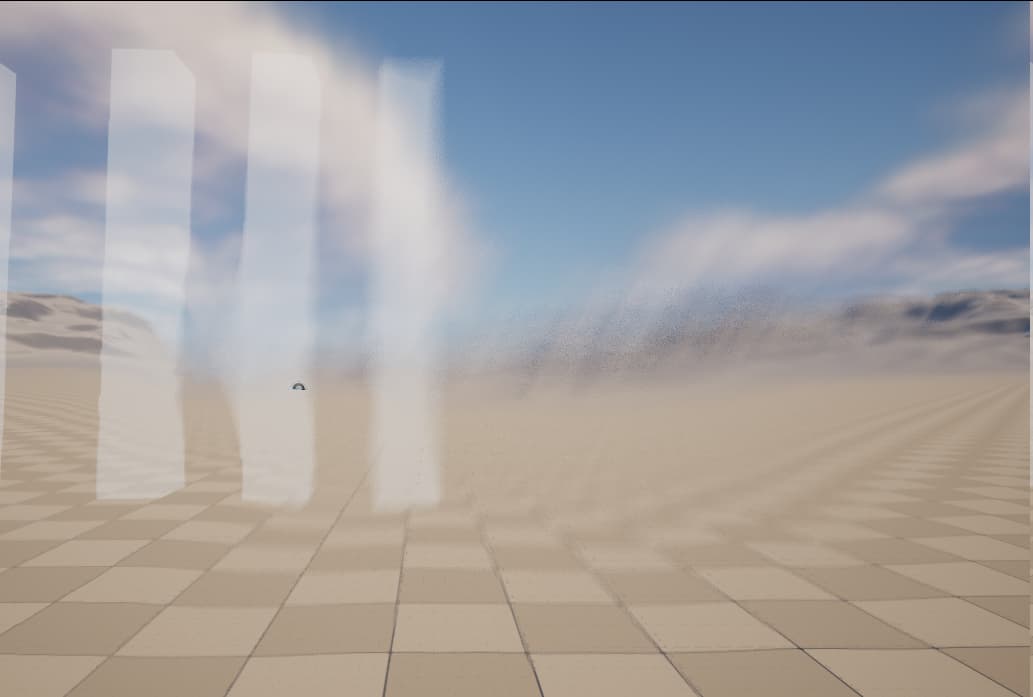
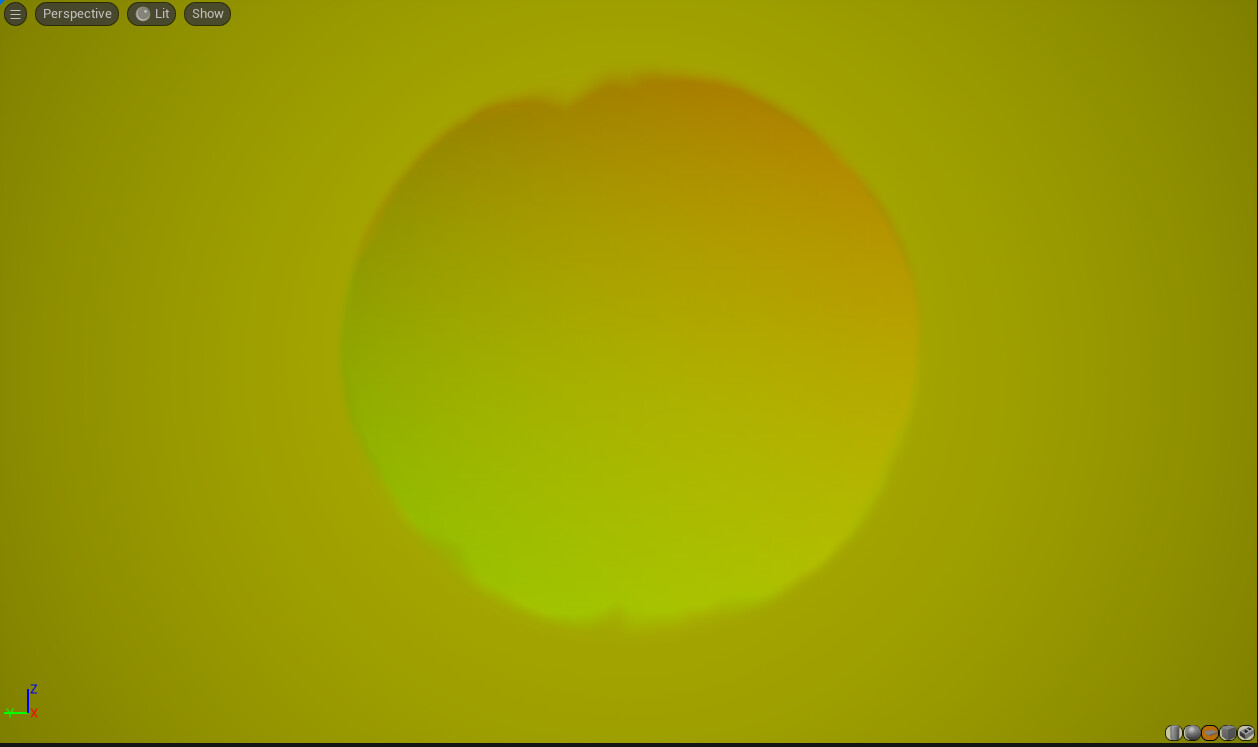
I’m assuming this is done on translucent shader used on a sprite (red line marks the sprite colliding with the geometry on first image).
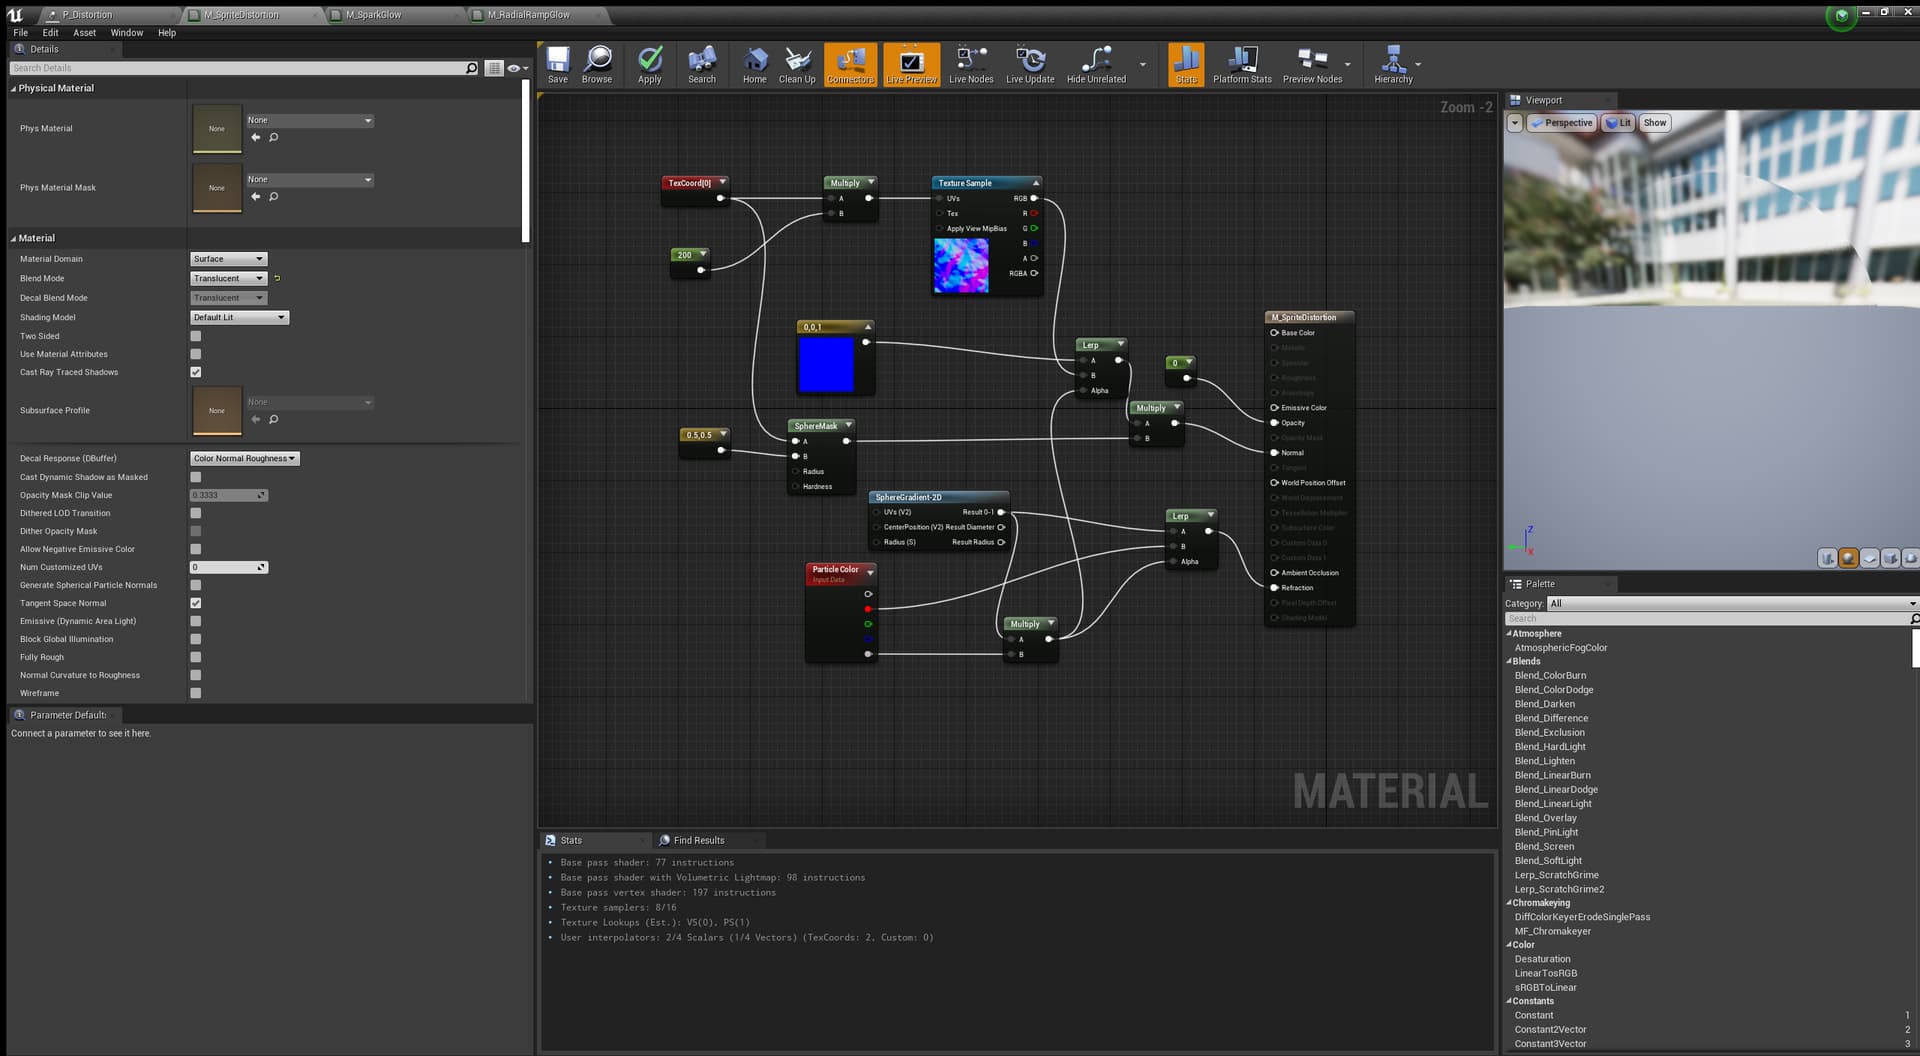
Based on this thread I made a material which uses SceneColor node instead of SceneTexture to create this radial blur.
Well, it… works. But it doesn’t allow me to blur any translucent objects (SceneColor doesn’t seem to see them) and isn’t nearly as smooth as it is in the reference (maybe increasing samples amount could fix it).
At this point I’m out of ideas. I don’t think this can be done with refraction but maybe I’m just using it wrong.
Scene Color has only Opaque data. You can’t sample transparent pass while you are drawing a transparent pass.
I have two ideas either they apply blur on opaques as you did and then apply the same blur directly in particle material or they are using some sort of masked post process which is rendered after a transparency.
But keep in mind that Elden Ring is made on custom engine so their rendering pipeline looks diiferent than Unreal’s. They can have some custom solution for this.
The idea of blurring the opaques and particles separately popped into my head after i posted this. I tried it, the result wasn’t exactly satisfying and I ended up with tons of texture samplers in the particle shaders to achieve the blur - it’s probably not worth it this way.
Other than that I just don’t know. Maybe it just isn’t doable in unreal
This code sample that you showed (if I understand it correctly) is making 11 Texture Samples of Scene Color. That’s the basic way of doing blur, probably not the most efficient.
If it’s not the engine’s built in motion blur you could blur the sprite sheets themselves on their fast movement frames.
Actually looking at the video, the whole sprite blurs the background even where there is no smoke in the area so that’s a hint. Now you’ve got me curious about how they are implementing that blur effect.
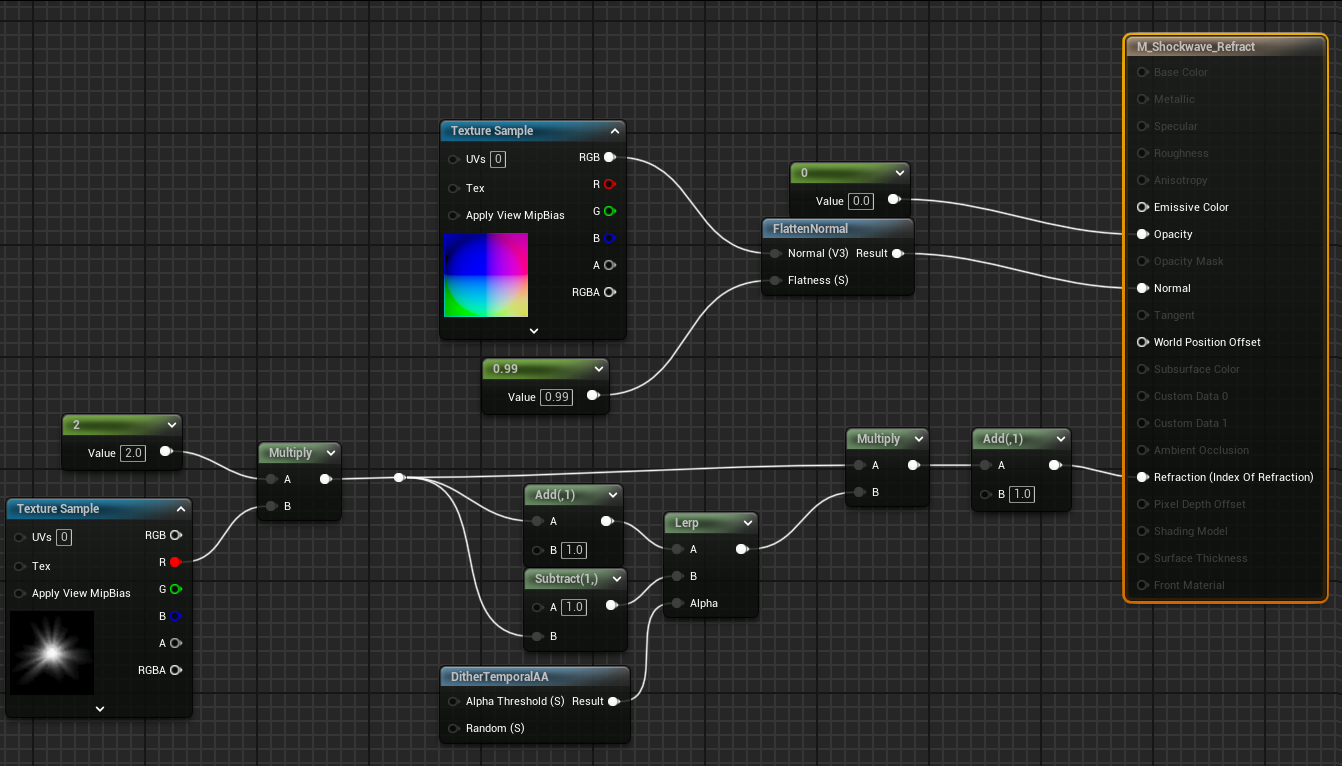
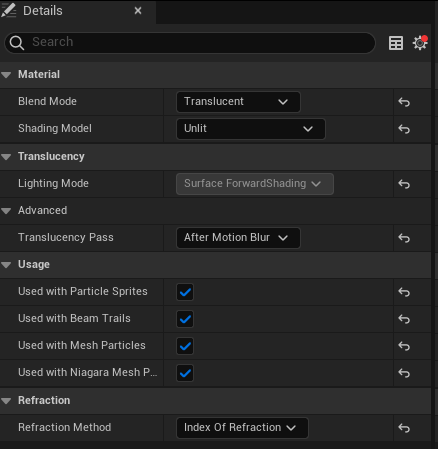
Ok I got the idea that it’s kind of like shockwave distortion without movement so I threw something together. Ideally you would use a better normal map so the blur is not as grainy - I just multiplied the tex coords as a temp fix. Anyway here’s a link: https://imgur.com/a/xWnCe3f
There is no way to get Scene Color include translucent objects. Some game with engine programmer would customize the unreal engine to achieve this.
As for non-programmer, our best bet is to use post-process material just as the blur material shared by Tomura on UE forum. To limit the area of the blur by a scene object and occlude the blur by other scene objects, you can use any mesh invisible from the main pass, with Custom Depth enabled and set a specific Custom Stencil ID (preferably uncheck “cast shadow”), then do a depth test between Custom Depth (minus a very small number) and Scene Depth in the blur material. Finally multiply the manual depth test with the blur result.
Admittedly this method is quite messy and inconvenient to utilize, but maybe we can petition Epic to return the “scene color with translucent objects” back to UE5. (Scene Color did include translucent objects in the earlier version of UE4 but made obsolete due to “performance concern”.)
I don’t think distortion is the way to go. It is nice to get a shockwave effect in some explosions, I’ve done that. But it won’t result in anything similar to this motion
Well, I suppose that’s the only solution and I agree it’s very messy. It seems like they got rid of translucent objects in scene color in 4.17. It would be very nice to have it back in UE5 as an optional feature.
Yeahhh I did some further experiments using different normal maps (blurred starburst looking flares) thinking I could get something closer to the image, inadvertently created a cool effect but none of it was getting the desired blur as I imagined it would. So you’re probably right it doesn’t seem like distortion is the way to go.
Hi,
I was looking for a similar solution and came across this post. I came from Unity, where its super easy to get blurred scene color from G-Buffer, but in UE…
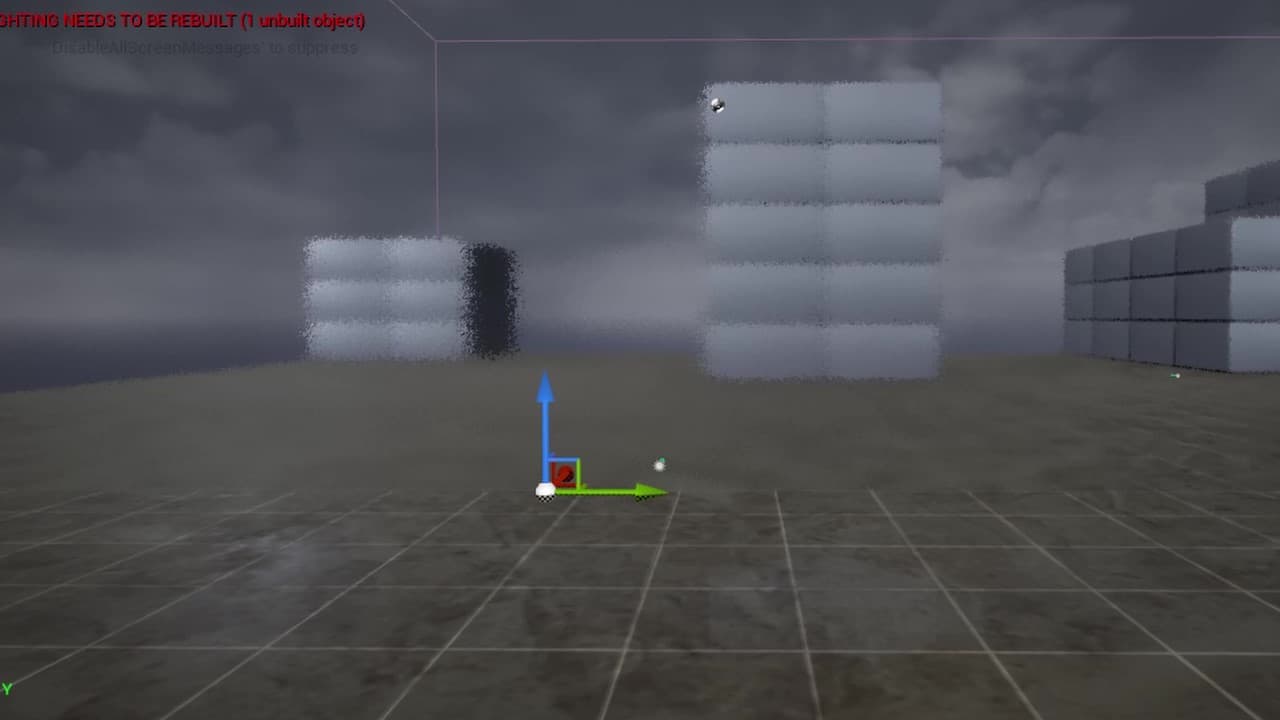
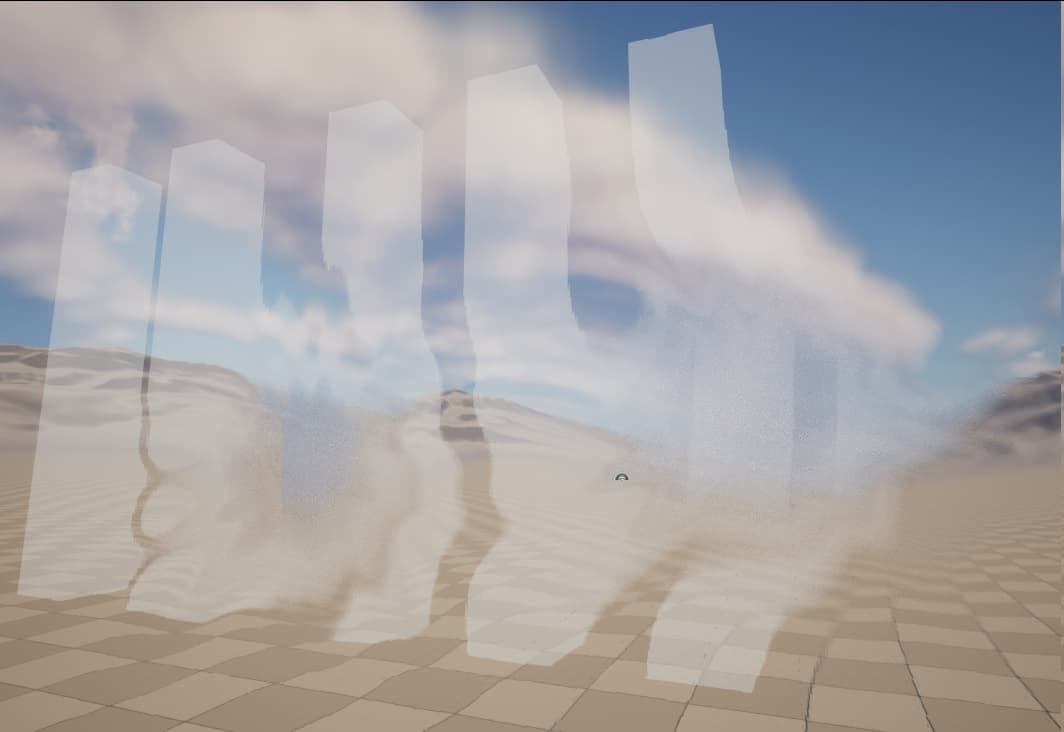
Elden Ring G-Buffer heavily relies on dithering (almost everything here have it! crazy) and have TAA so I assumed that they used it also to blur stuff (they have DOF so there is some blurring capabilities in engine, maybe they mix both).
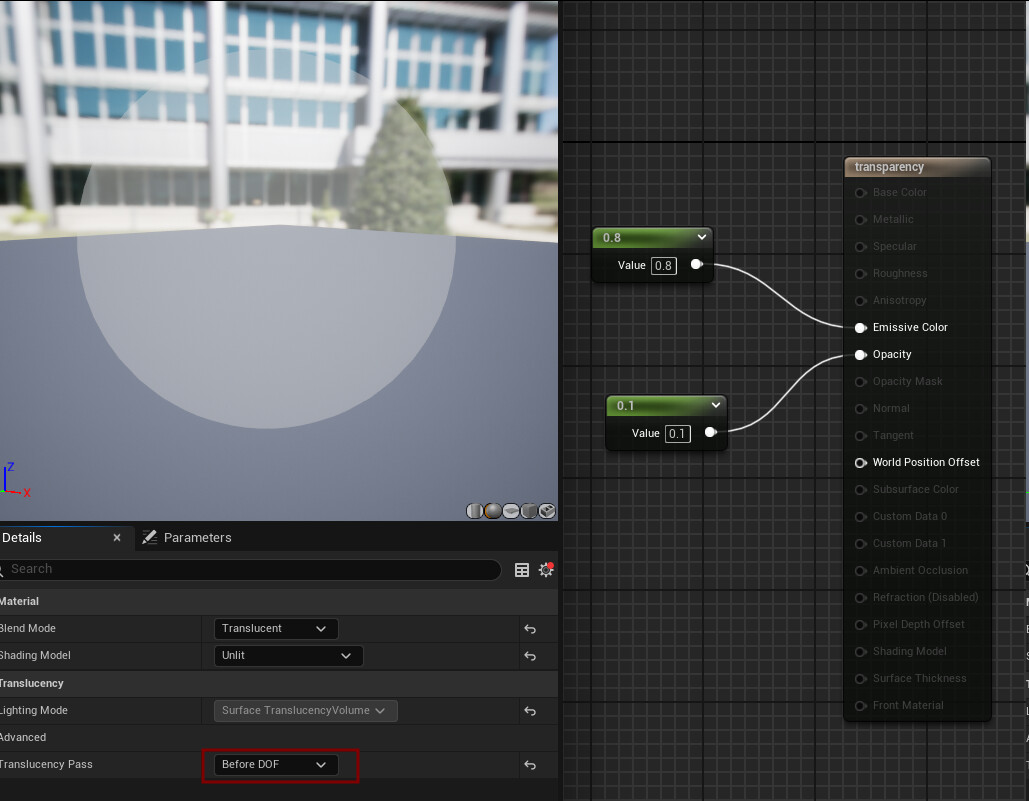
I threw in some super simple transparent boxes in the background to show how it mixes with translucency (don’t forget to set before DOF in shader! it forces sorting before refraction).
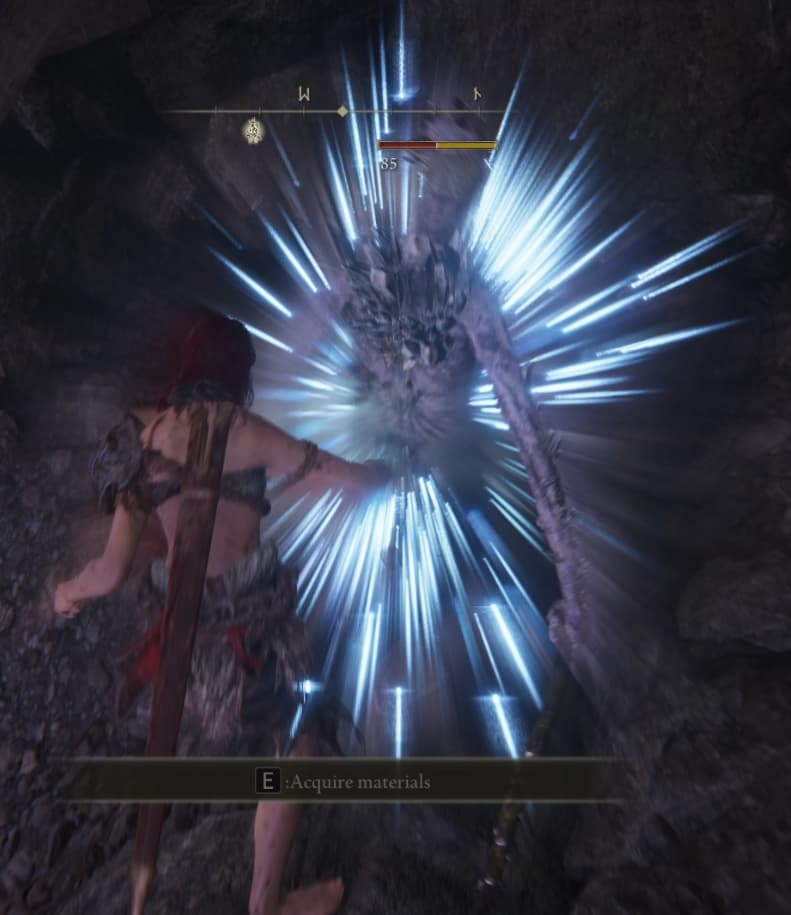
I’ve just been playing around to achieve this same effect and I think I got something .
As you’ve been saying, Scene Color does not include translucent objects, so a way to solve this is to use a Render Target that captures the scene from the camera perspective to fake a new “render pass” which includes all objects.
Then, instead of sampling the Scene Color, just sample the Render Target texture that emulates what it would be the SceneTexture:PostProcessInput0 containing all the scene color (from opaques and translucent objects).
This solution works with a standard material for meshes/sprites so you can have multiple instances on screen. It is not completely straightforward though, as you have to tweak some things to avoid that the Render Target captures the blur sprites themshelves, etc., but it is pretty much isolated from code/blueprints.
Initially, I wanted to solve this as a global postprocess effect, kind of making a custom g-buffer with screen space motion vectors.
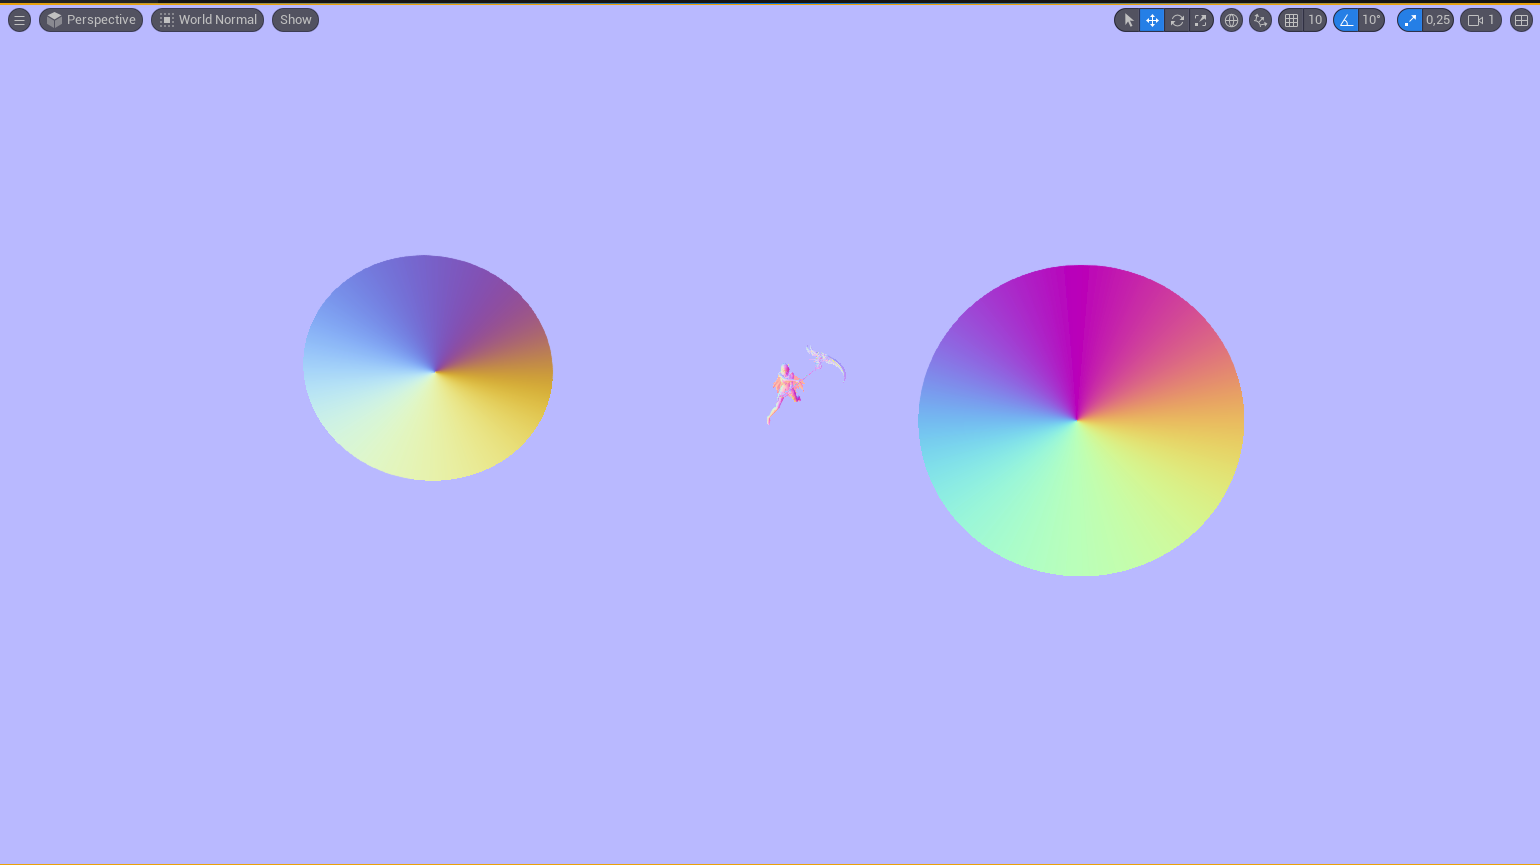
Think of it as if the Render Target just renders the sprites used for the radial blur and masks everything else, then in these sprites you draw the direction of the radial blur for each pixel (similar to a normal map when you make a distortion). The postprocess material then samples this “pass” and makes a global blur using the information of the direction from the sampled pixels.
This is how motion vectors work and what is used to make the standard motion blur. You can look at the ‘Buffer Visualization: Velocity’ in the Viewport to see how it looks when fast movements happen.
I didn’t follow this second approach because you need a way to occlude these objects from the main pass but have this info rendered somehow in the g-buffers. You could use a Render Target the other way around, just capturing these blur objects, but you would need to make some Blueprint work to spawn your Niagara Systems and these objects at the same time.
I just kept with the other approach because I don’t really need to optimize this in any way and it’s a little bit more straightforward, but here you have these ideas for anyone who wants to try!
Yeah, as Niels said this is far from being the most optimal solution, Render Targets are pretty expensive. Of course you could optimize it capturing only when a blur is occuring, reducing the render target resolution, using low samples, instancing with caution, etc., and depending on the production budget it would be a perfectly viable solution. But this is still just a workaround to not being able to get all the scene data from the main pass just straight away.
I’d love to know if anyone is able to get this working without using this “second pass” trick.
I’m confused about the Render Target part. Are you using a scene capture to update it? Cause if so, I can totally see how that’d be rough on performance . There’s a nice video documenting the other process that you mentioned - but yeah, it’s too expensive unfortunately. https://www.youtube.com/watch?v=zCnoLT0TIgk
I tried a lot of things along similar avenues, and it seems like there could be many great solutions to this. But all of them involve heavily modifying the engine. Such a shame that Unreal has like 0 renderer customizability built in. If we could inject an extra render pass, or a new buffer in the G buffer, it would be so much easier to fix…
For now I’m handling radial blur 100% via post processing + blueprint spawning. Really sucks that I can’t spawn these as particles inside Niagara, and I’m paying a very unnecessary cost for it (although it’s super cheap in the end anyway). As a plus, I’m doing the whole thing using sphere intersection math instead of a sprite, so I get very nice fade ins and outs with natural occlusion.
One thing should be clarified that Render Target itself (at least with restrained settings) is not expensive at all. The real killing here is the Scene Capture updating every frame.
Yeah that’s really the main issue with this approach: you use the scene capture every frame (or at least whenever a blur is active). As @ifurkend said I can’t tell how killing this would be in a real scenario with a tight budget + every optimization you can apply —pretty sure this could be just viable— but it’s still kinda annoying anyways there’s no clean, proper way to do this without modifiying the engine, which I guess is what 99% of people won’t be willing to do.
And I totally agree, I really hope they make it much more easy to build your own custom systems, whether it is custom shading models, g-buffers or at least easier ways to pass custom data to the existing ones. I may end up doing it just for the shake of it, but I’ll still feel a bit disappointed for not solving this with just the standard tools.
I’m glad you got it working, even if not the most ideal method either! Let’s hope it’ll become easier to do such things in future versions of the engine
I wanted to share an update on this topic since I’ve managed to come up with a much more efficient and scalable solution than the one I originally posted, also fully decoupled from Blueprints, for anyone interested.
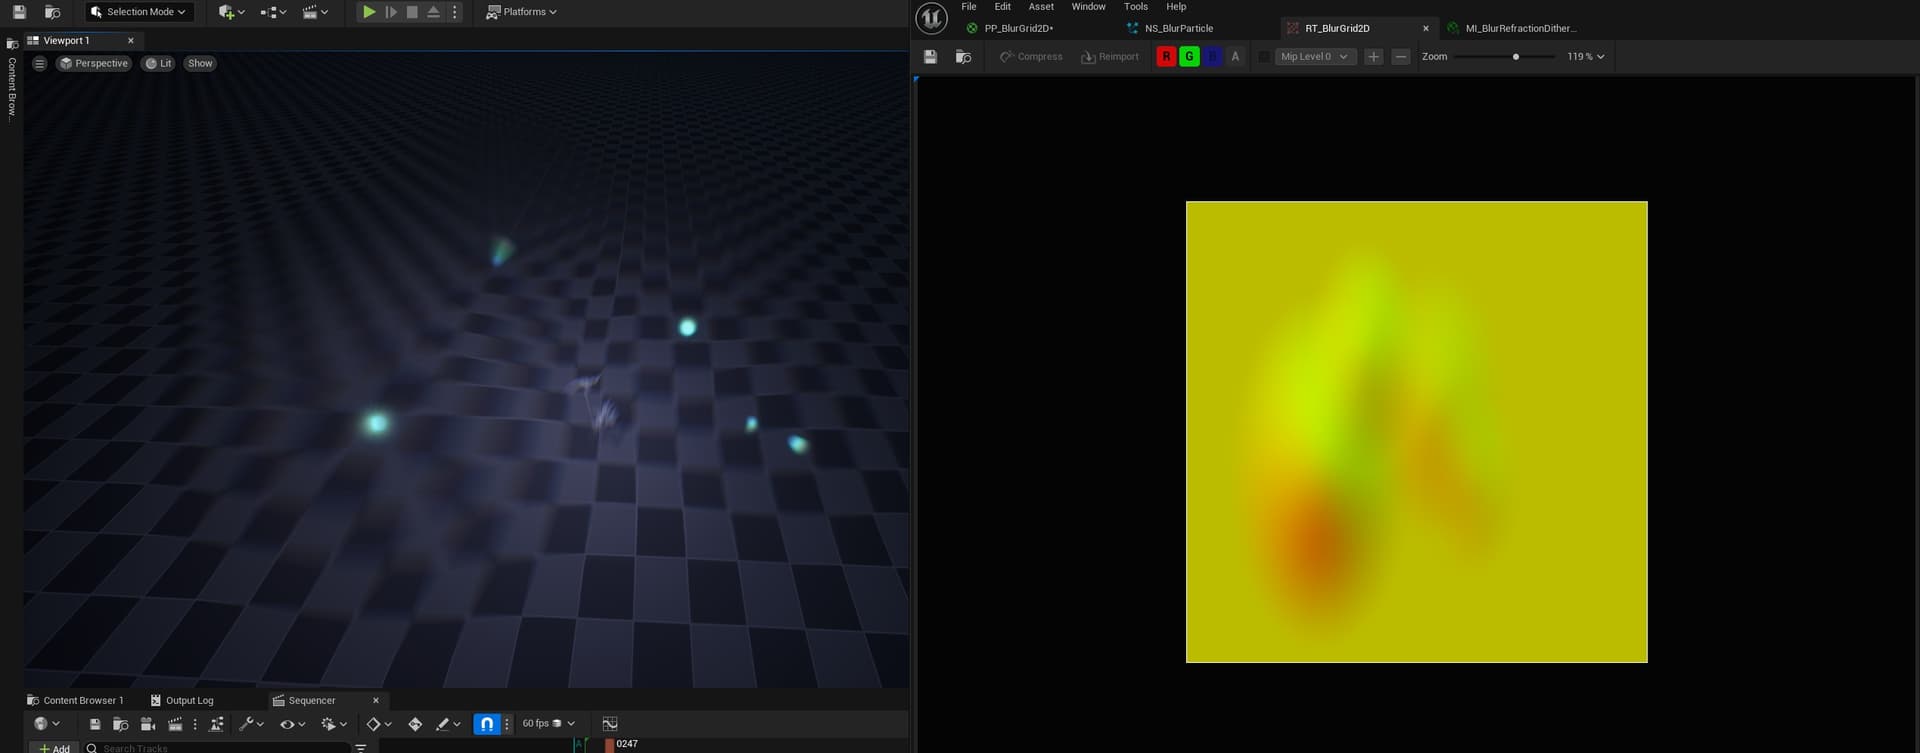
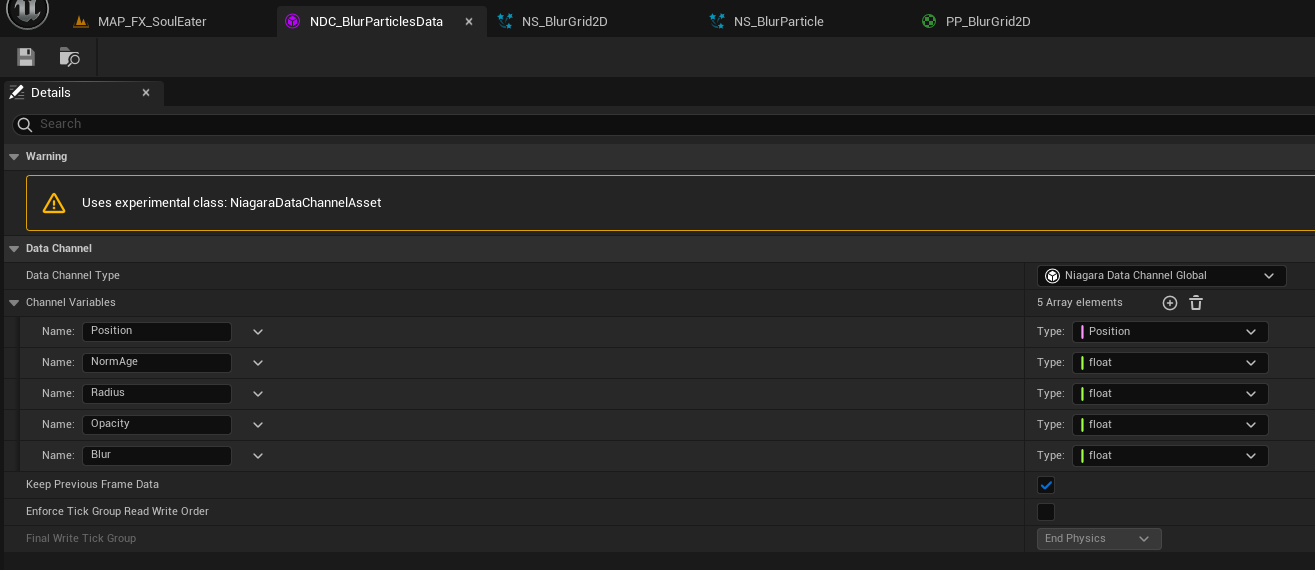
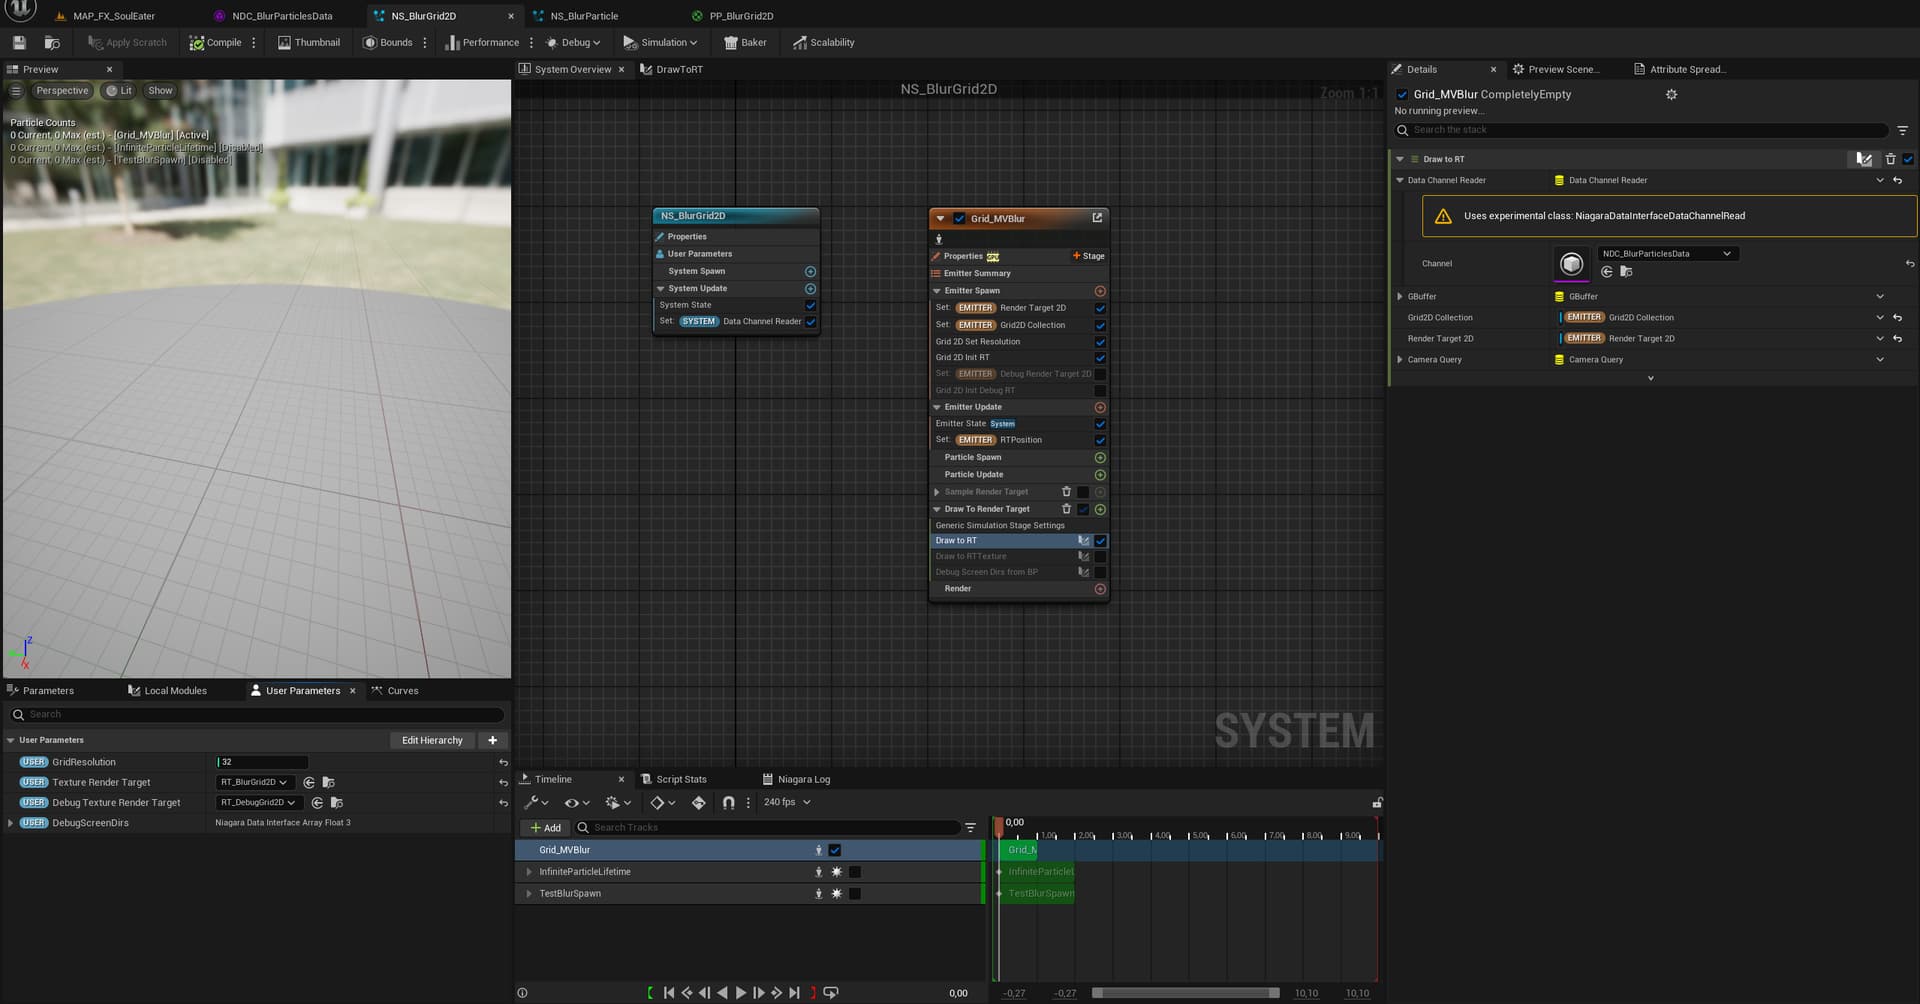
This new approach makes use of Niagara Grid2D and the new Niagara Data Channels (NDC). The idea is to recreate a Motion Vector Render Target using a Grid2D by reading particle data (position, radius, blur intensity, etc.) and writing it to an actual Render Target texture. This texture is then sampled in a Postprocess Material, where the blur is applied based on the stored vectors and instensities.
It’s essentially the same concept as my first proposal —a custom g-buffer of screen space motion vectors—, but implemented in a far more optimal way, avoiding the overhead of scene capture.
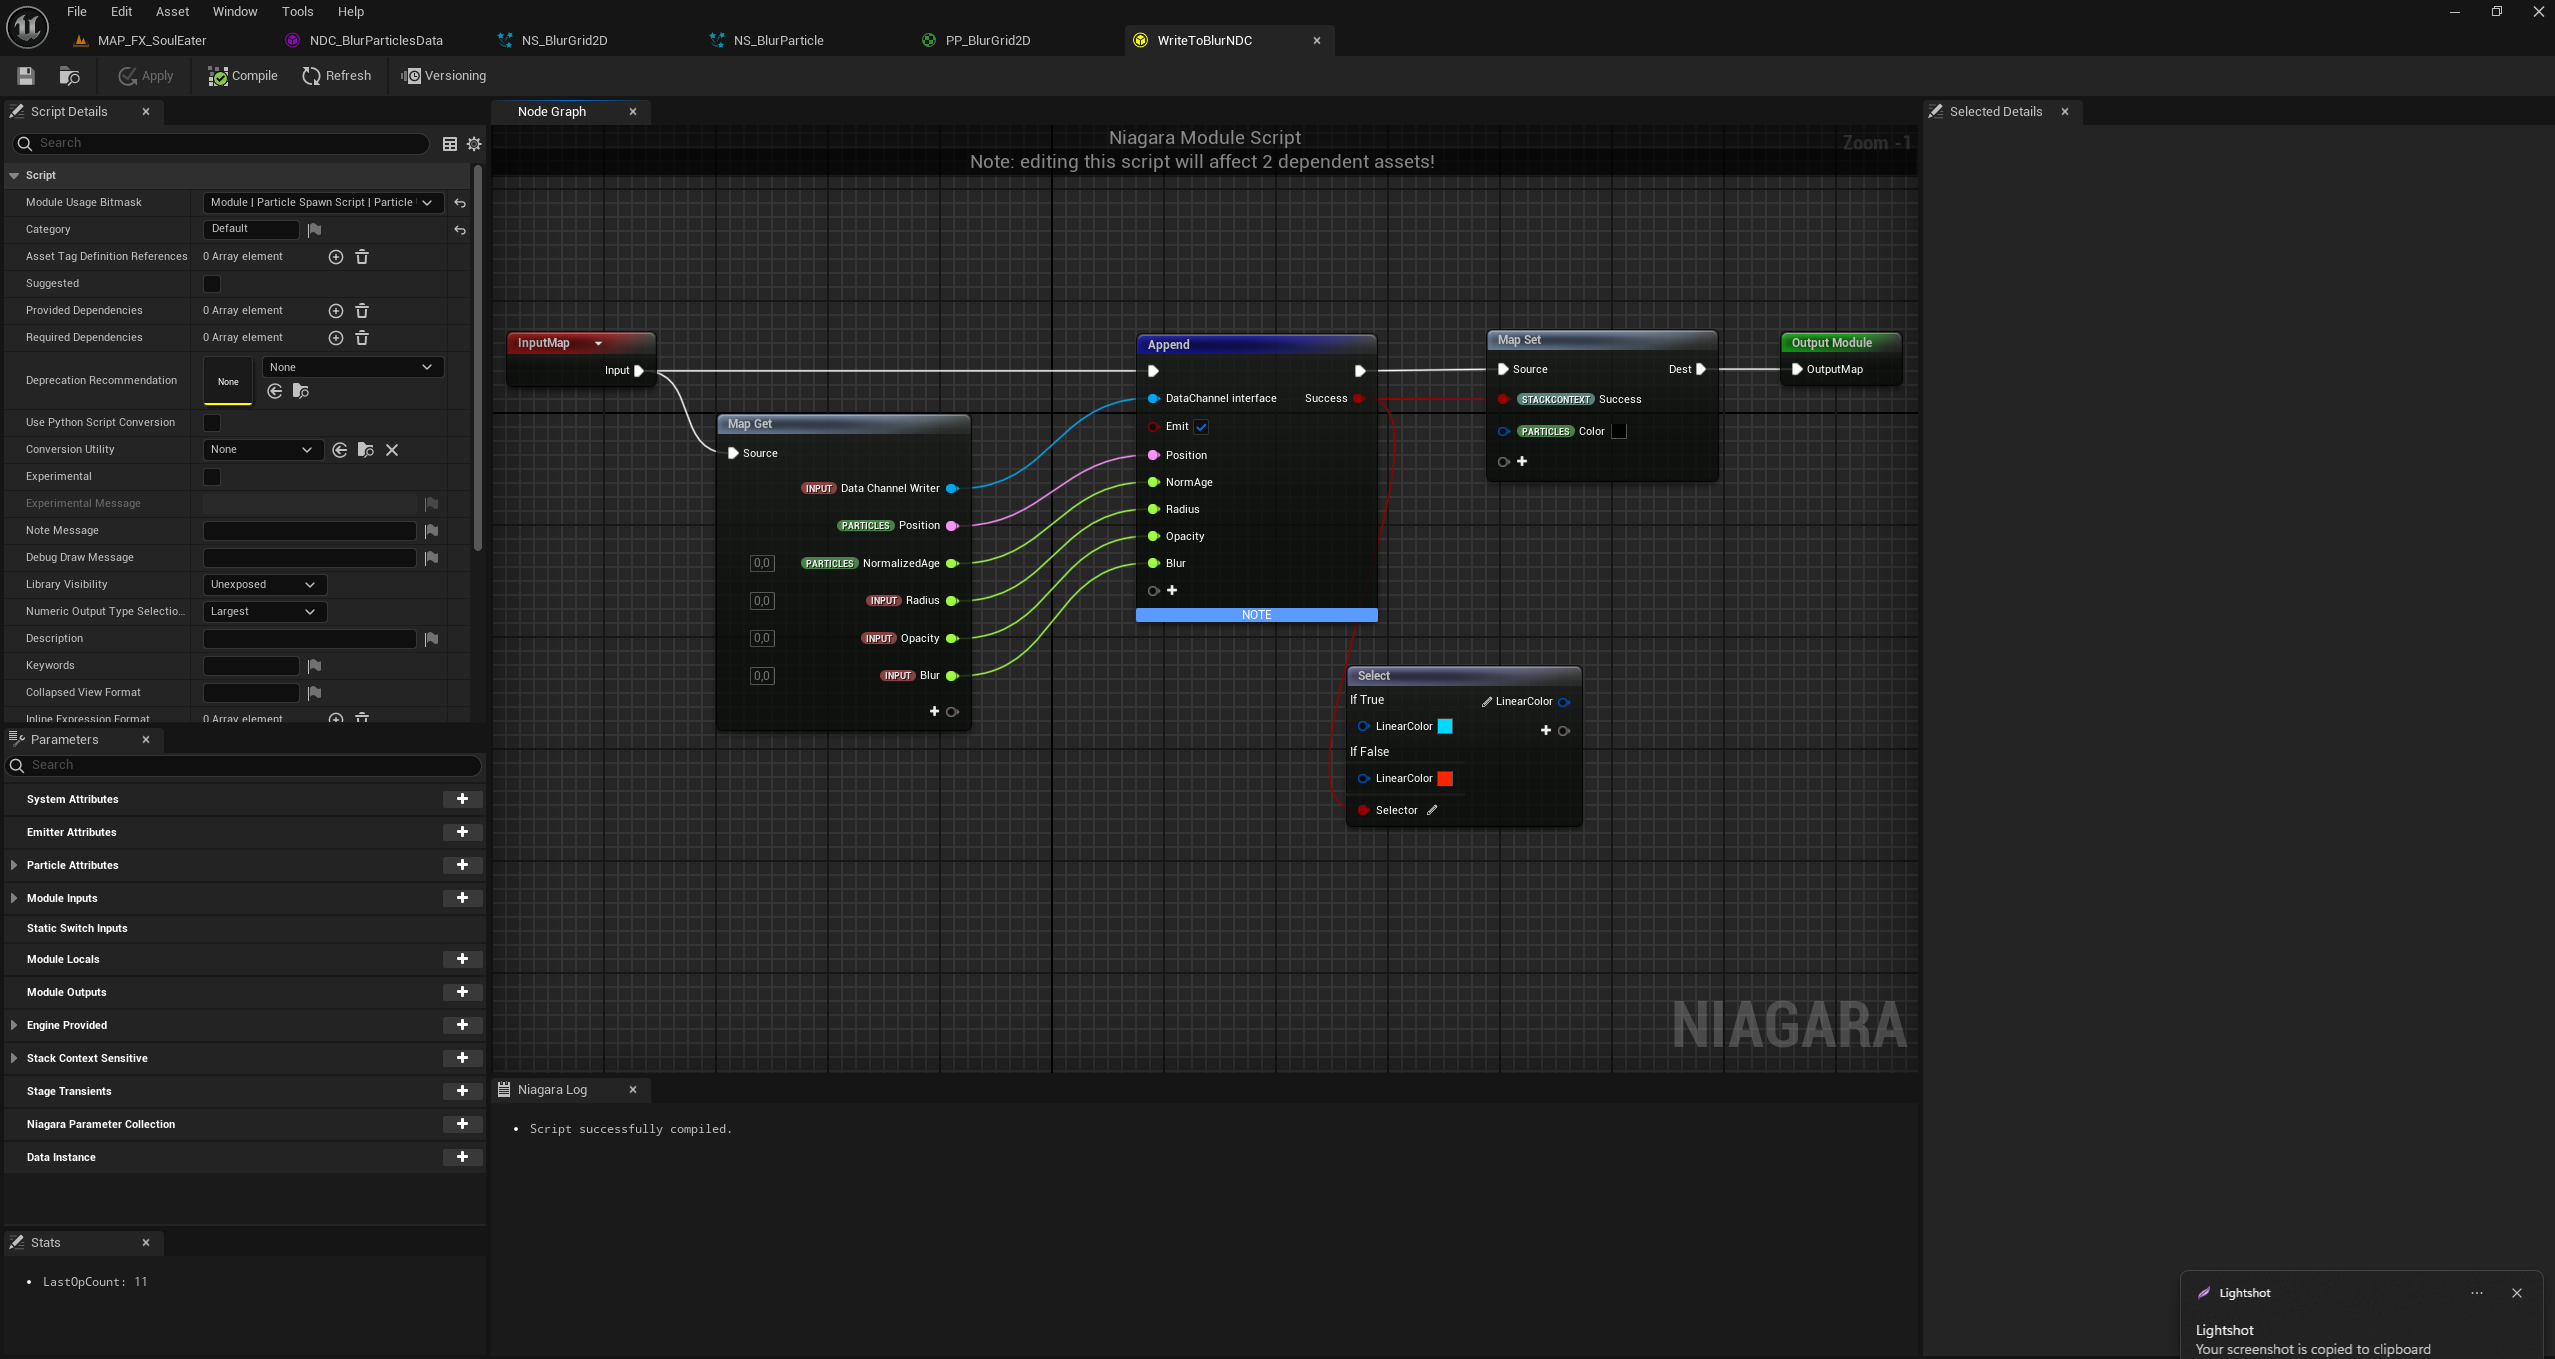
Set up a Manager Niagara System that acts as your Blur Manager. This system contains the Grid2D, receives the NDC Data, and writes to the Render Target texture.
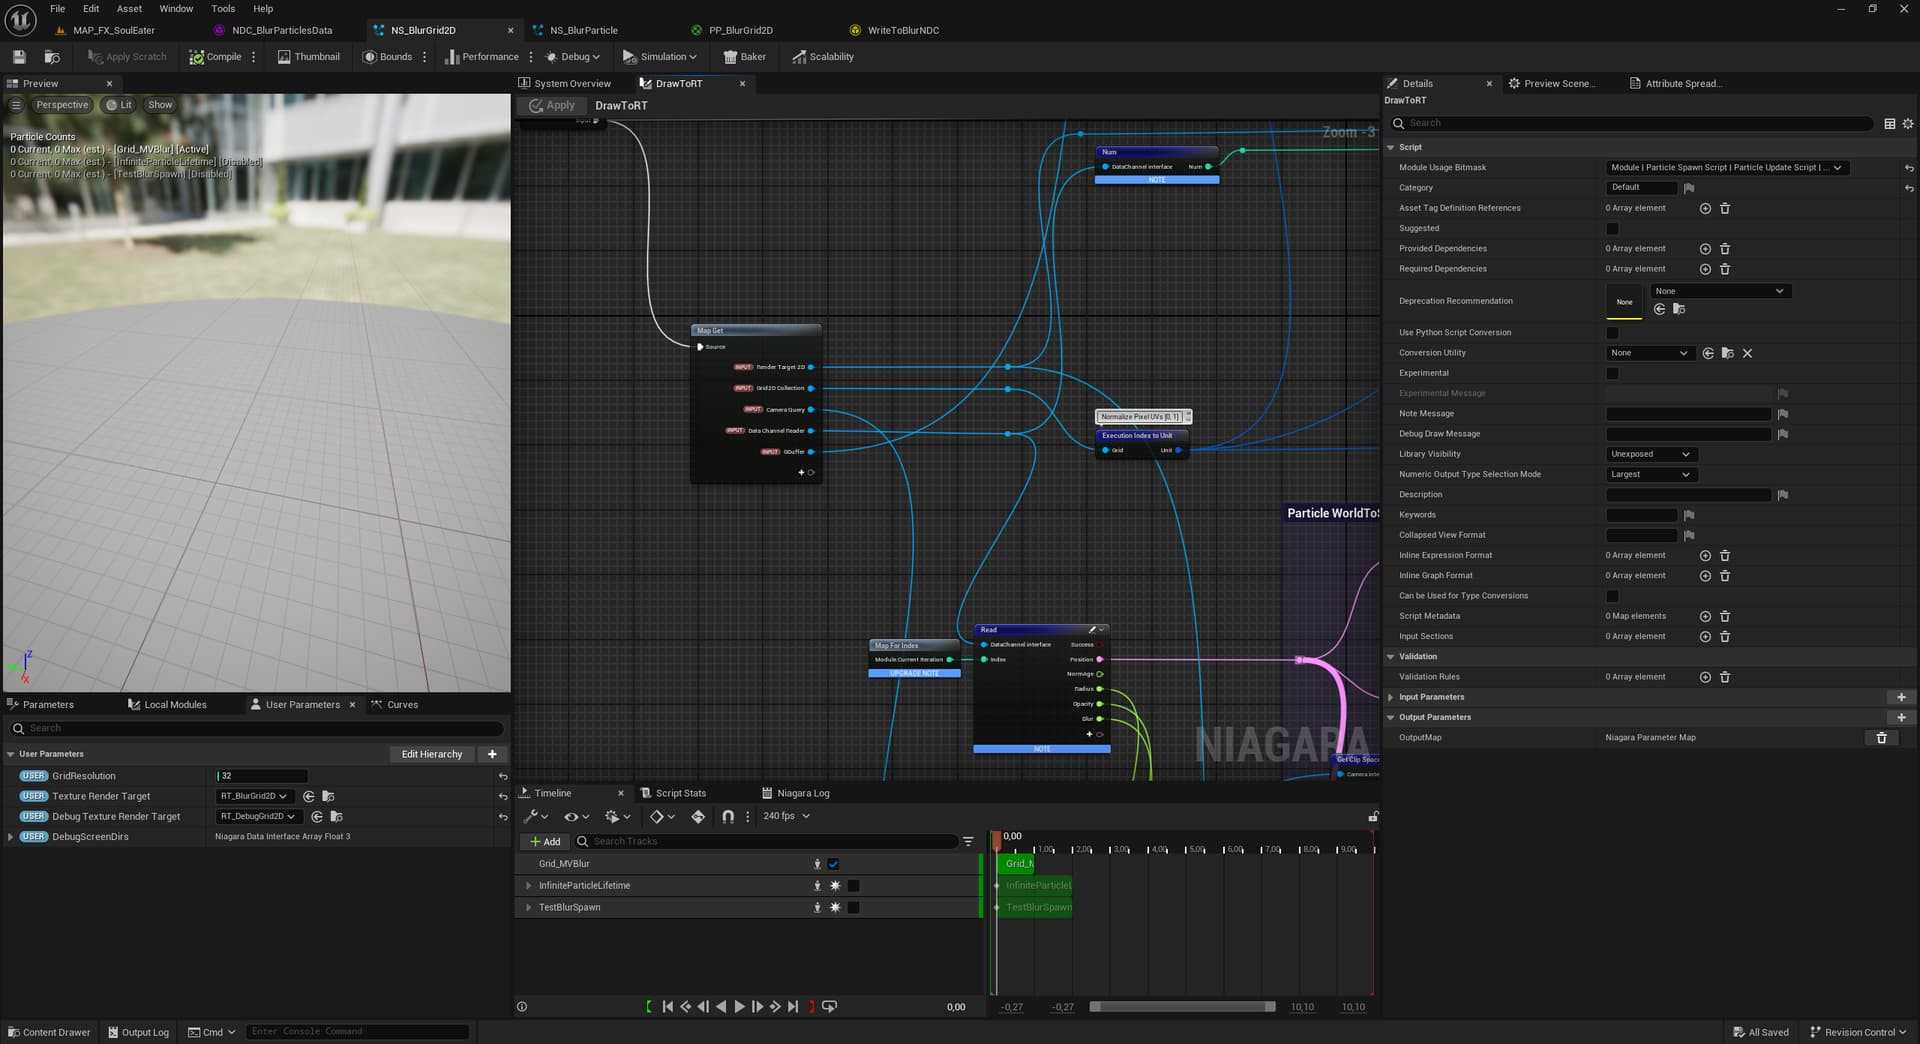
All the core logic is done here. Each Grid cell corresponds to a pixel in the Render Target, so you operate within the grid as if you were in screen space.
And what do you write? You can go simple —transform particle world position to Grid UVs, create a radial mask and output that—, or more polished —fit radius with aspect ratio, distance and FOV, project sprite location and orientation to recreate it in 2D space with perspective, etc.—
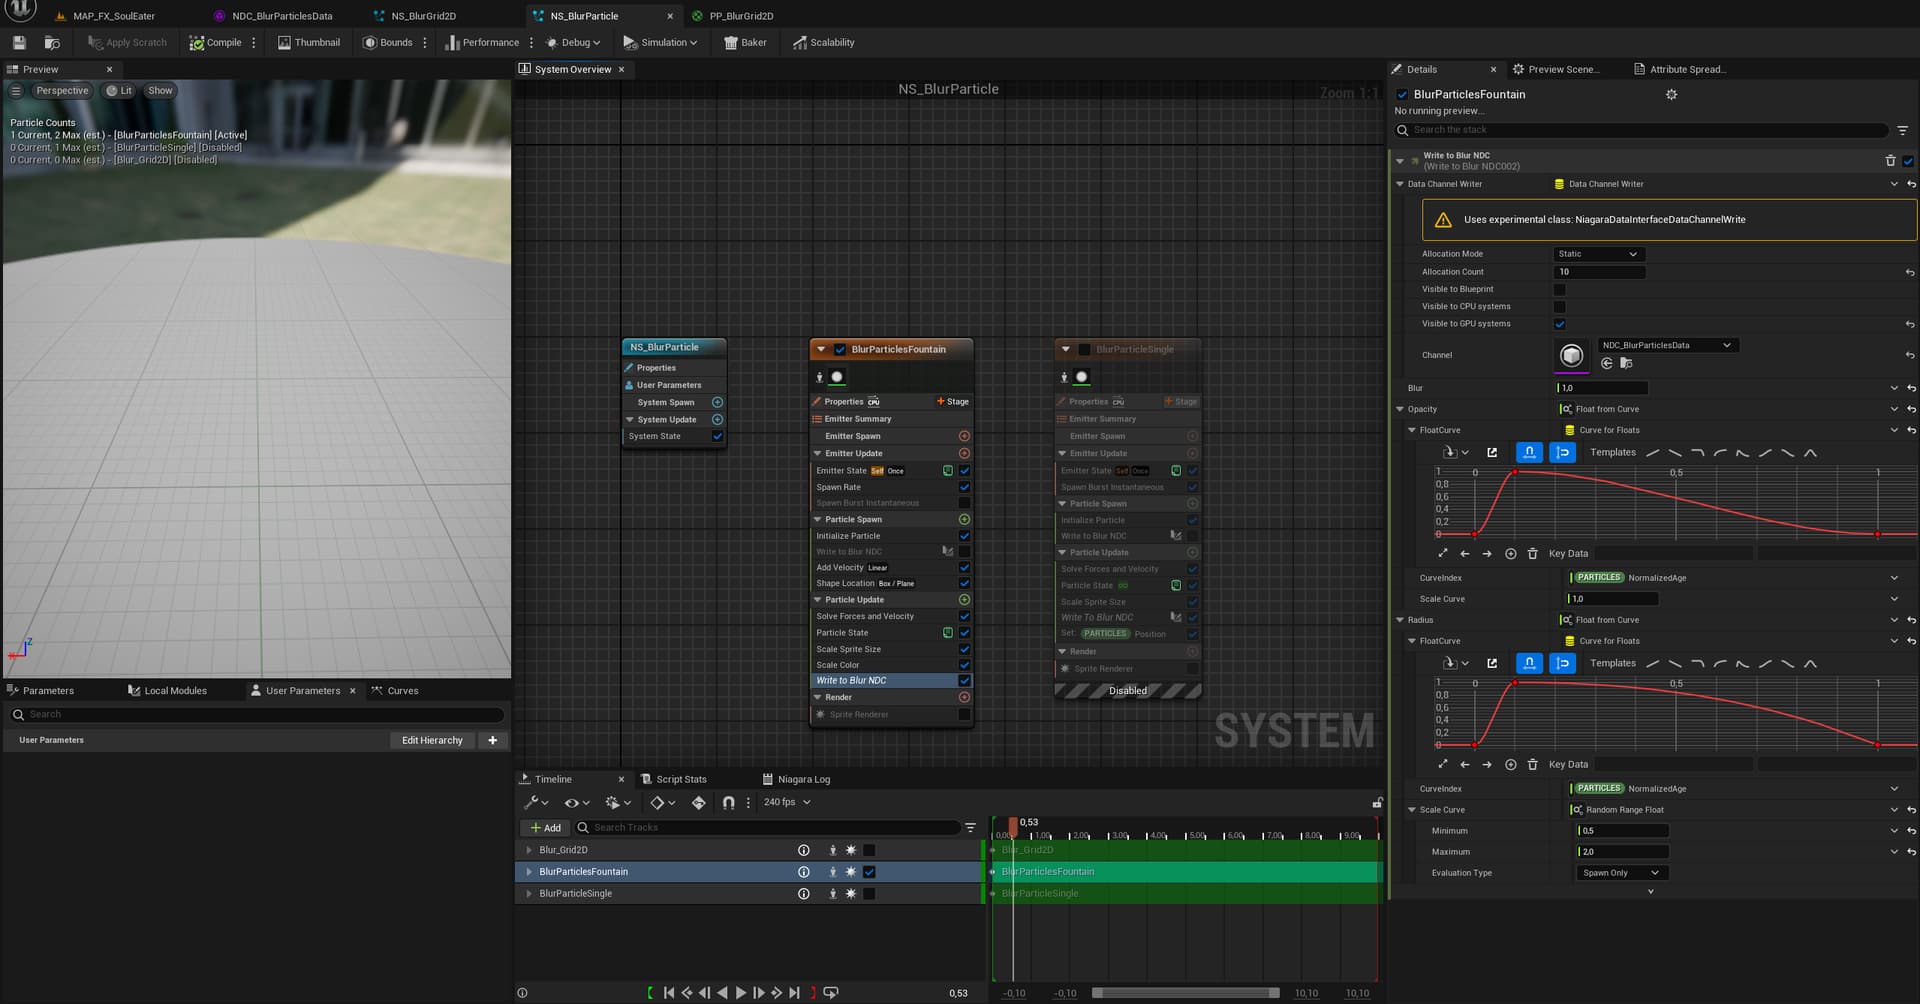
Emit blur particles from any system (e.g. an impact effect) and have them write to the NDC.
One cool thing about these NDCs is you don’t need to manage the data pool manually. A new Data Channel is appended whenever a new particle is spawned and removed automatically when it dies.
Sample the Render Target texture in a Postprocess Material, using this MV data as the blur directions.
Some insights on this new method:
Massively faster. Niagara Grid2D runs internally as a GPU compute shader, so is very convenient for tasks like this where you emulate a texture space. Also, since the blur runs in postprocess you avoid translucency and overdraw issues when spawning multiple instances —though it’s not sometihng you’d tipically spam. Still, you can add early-outs to skip processing pixels with no blur.
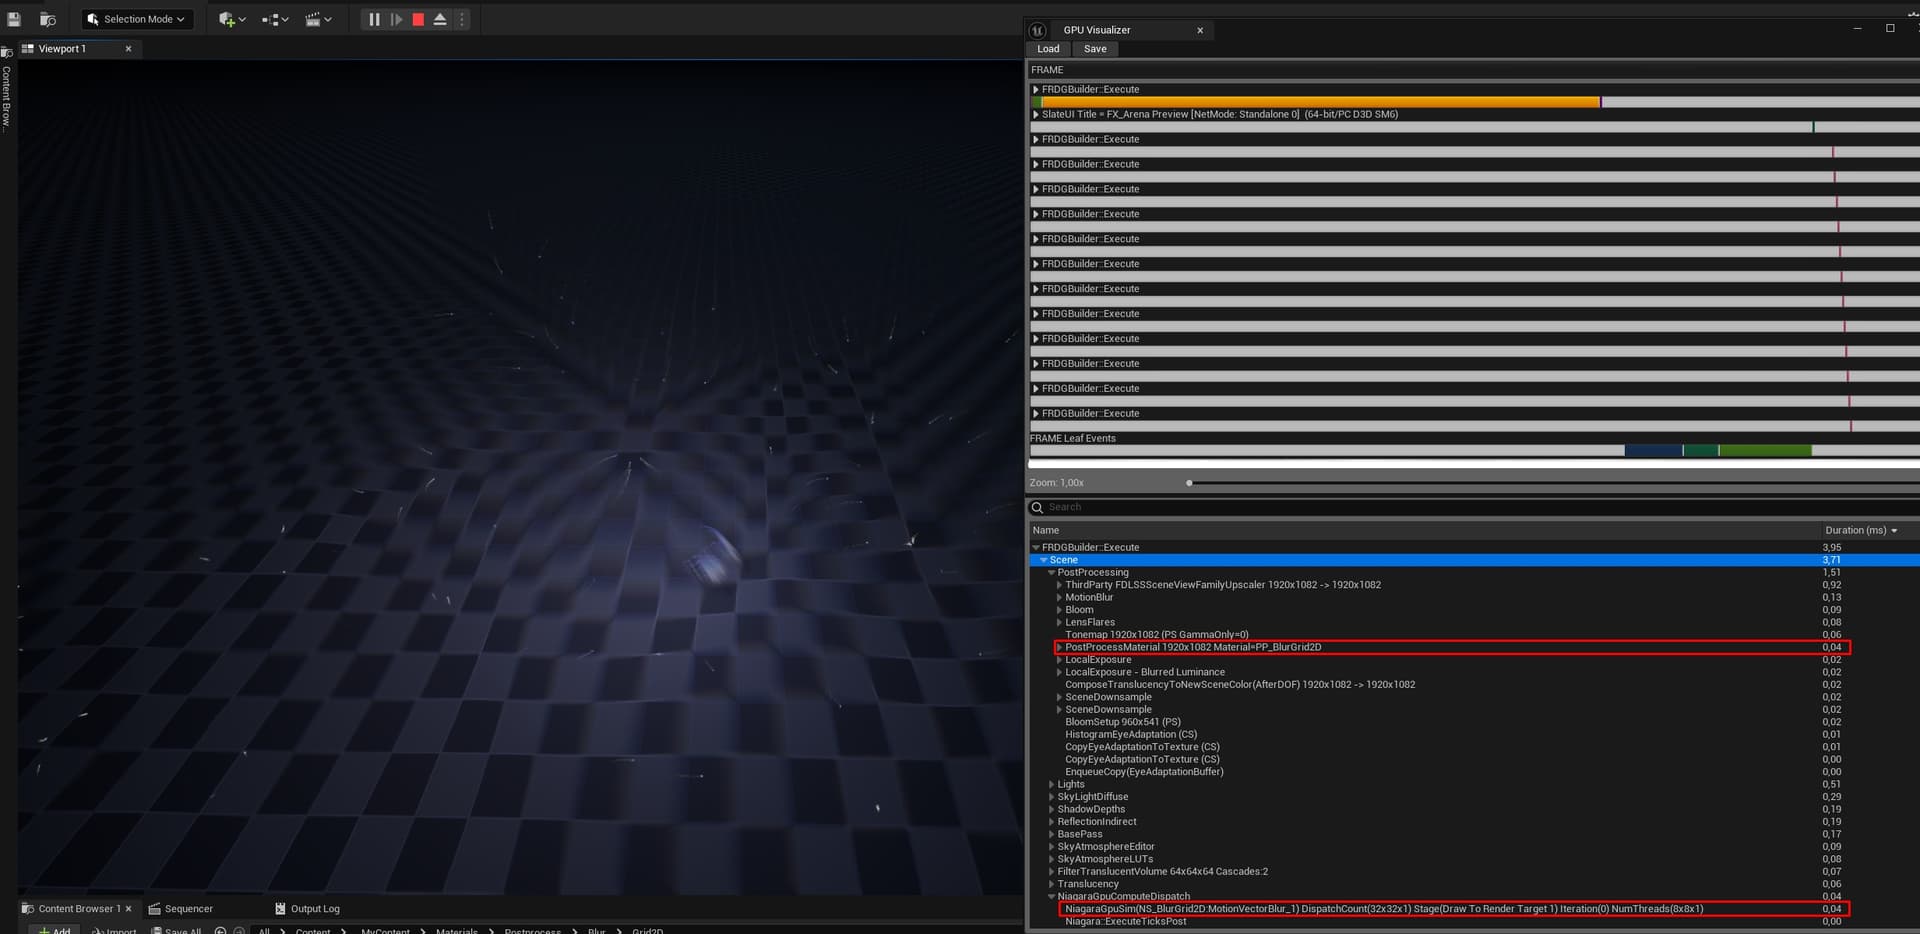
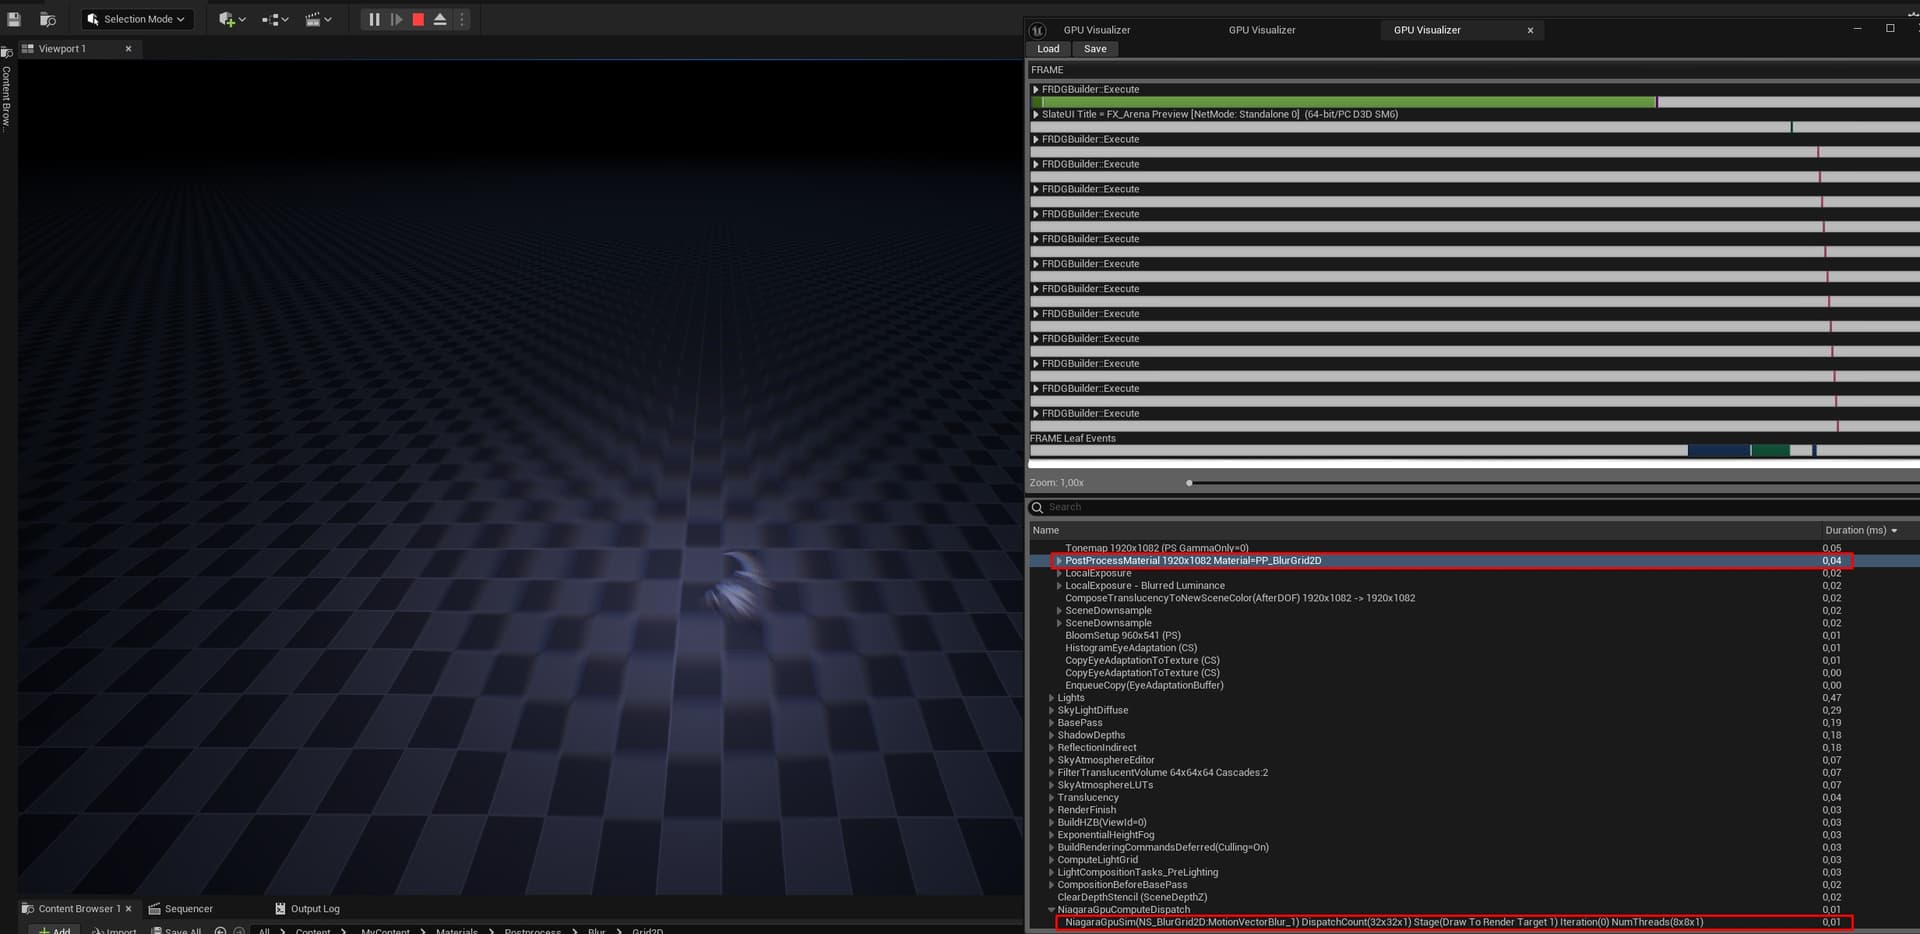
In my tests (1920x1080, 8 blur steps, 10 concurrent blurs covering the full screen) the overall cost was ~0.08ms. For reference, that’s 1% of a 120 FPS frame time budget.
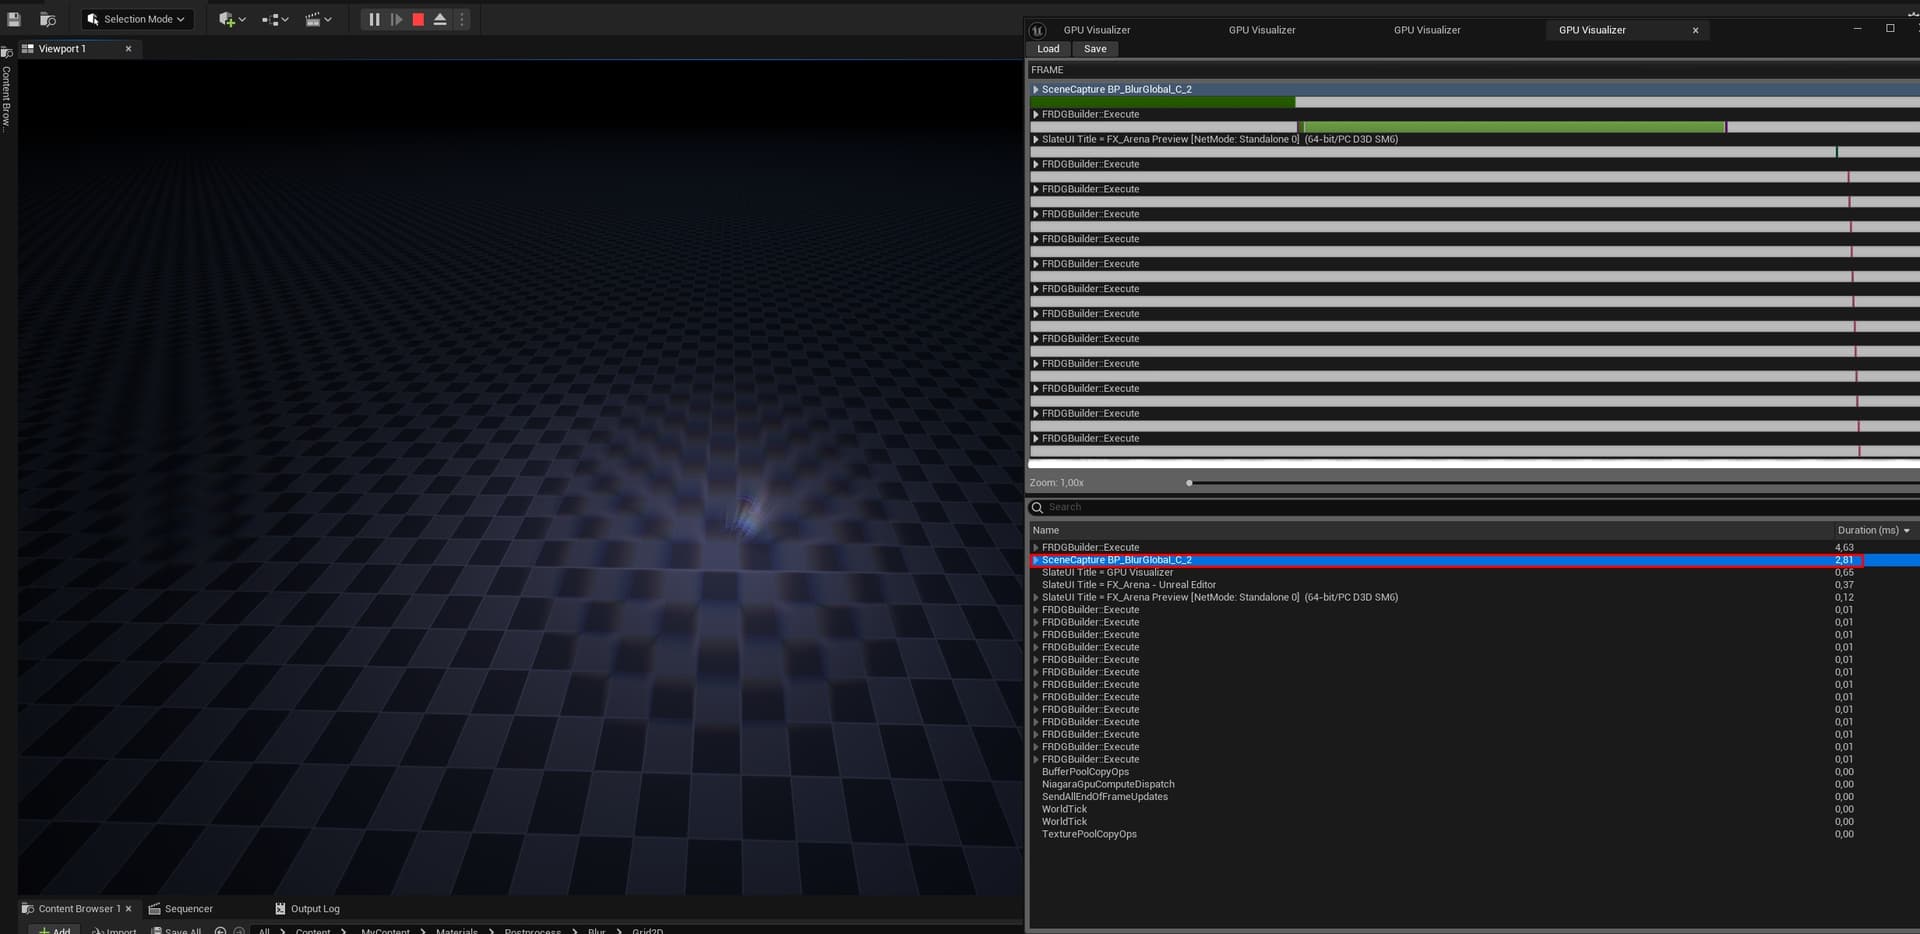
In constrast, Scene Capture alone can cost 2-3ms (!!!), not adding up the additional texture sampling+translucency cost.
Lower memory usage. The required Render Target resolution is very low. I used 32x32 with no visible differences. Since you only encode motion data, there’s no need for higher res. Also, masked radial shapes are pretty much well covered with any resolution.
Fully within Niagara. Once the system is in place, you can emit ‘blur particles’ from any other Niagara system. You could even write or read data from Blueprints if needed (I did for testing), NDCs look really powerful.
For anyone interested, here are some of the profiling stats I gathered to compare GPU times:
I haven’t touched Niagara Data Channel until now, so this idea didn’t come to me immediately when Data Channel was initially implemented. Still it’s a pity that this method is in essence “per particle”, so this is still kinda limiting if we want to attempt the more complicated directional blur like that in FF7R. Technically achievable with Data Channel/Grid2D but can get quite messy. (Edit for clarity: “messy” for more complicated blur like the helix blur of FF7R Bahamut thrusting move. For simple radial blur flow map, your method is quite neat.)
Also this might have been mentioned before, but writing DC data with GPU particles at Particle Update is quite unstable and always causes serious flickering for the reading/listening end. I guess that’s why your DC writer emitter uses CPU simulation instead.
Another issue with DC is that, if the DC writer emitter lacks a valid renderer, the DC writer will stop functioning. I’m not sure if this is by-design for better performance, but I ended up setting a separate zero sprite size parameter for my dummy Sprite Renderer to circumvent this.