M0okA - VFX Sketchbook

Welcome everyone to my personal VFX sketchbook ! :grin: :sparkles:

I will be trying to post here some breakdown of my work from time to time, I hope to find enough time to do it on regular basis.
Please note that all following projects/features will be strictly personal work unless told otherwise explicitly, and shouldnā€™t be related to any game production Iā€™m working on.

Please DO feel free to share your opinion ! Please ask question, ask for additional breakdown, share your ideas to improve the workflow, share your own tests about related subjects, in three words : share you passion !
Hope you will enjoy the read, and may the VFX be with you guys ! :smile:


Hi there VFX people! :slight_smile:

Today I want to share with you all a personal project Iā€™m currently working on when my schedule allows me to do so!
The thing that starts it all was the desire to improve my skills as a 3D game artist using UE4, specifically with technical art (like procedural system & blueprints), shader making, and VFX. To do so, I wanted to create a long-term personal project that could be used as a general guideline and motivation.

I came up with the idea of making Elemental Crystal! I found out this idea was a good way to introduce myself to features I never used before and to practice various visual effects. My goal is to make some magical crystals, mainly focusing on the elemental-based visual (a fire crystal with embers, an ice cristal with frost wind, that kind of thing). I thought that this was a good way to try out different things about VFX production of different elements (fire, smoke, water, solid, lava, wind, etc) and different use-cases (an ice projectile, an ice item to pick up, an ice crystal to be placed on a wizard stick, etc).

Hereā€™s one of the very first visual Iā€™ve made for this project with an early ā€œIce crystalā€ tryout : (video available following this link)
Elemental Crystal - Ice Item (WIP)
IceCrystalA

Iā€™m currently only beginning this project, I have so much to learn and to create from now on!
Thatā€™s it for this short intro to my Elemental Crystal project! From now on, I will be posting in reply from time to time to show you guys how the project is going on, and to share some workflow explanation for those interested. :wink:

Thank you for reading all this long introduction and for your support! Feel free to share your thoughts about this, Iā€™m more than open to feedback of any kind!

Hope all of you enjoy your weekend! :slight_smile:

13 Likes

Beautiful crystal texture! Canā€™t wait to see how this project of yours will pan out!
My personal feedback would be that ice element could have some small sparkles/glitters, but overall I like the ominous vibe it is giving so they are not really necessary. Also the fog vortex seems to be behind the crystal and IMO it looks a bit odd to me, but if itā€™s your intention then itā€™s alright.

Thank you very much for your compliment & feedback! :slight_smile:
I thought about adding some small and soft sparkles particle using a vector field made from smoke ring density map! Itā€™s not already done because I wanted to share this for VFXfriday and had a limited ammount of time to prepare all this. I will make sure to had this kind of thing later, thanks for pointing it out!
Concerning the other feedback youā€™re giving about vortex position, I see what you mean. In the engine, the plane displaying it is at the center of my crystal mesh. But for now I may have to tweak depth fade a little more to obtain a better combined result between mesh and vfx. Thanks again for telling me about it! :wink:

Hi vfx people! :slight_smile:

Today, I wanted to make a quick breakdown of crystal procedural mesh creation within Houdini.
To begin with, it was the first time I got involved with Houdini, and I want to thank Simon Verstraete for all the great tutorials he made about this software, those ones really helped me understand Houdiniā€™s basic features! :pray:
https://www.artstation.com/siver

I chose to work with Houdini for two reasons. First things first, I wanted to try this software for a while now, it was a good opportunity to test it in my free time. Then, it also was a great way to produce many various crystals later in a short range of time. All begin with a base volume or mesh, in this case, a simple stretch sphere :

With this base, Iā€™m mainly using mountain & measure nodes to sculpt out the crystal shape. Then my path is separated between three different measure nodes helping me simulating some basic texture maps: ambient occlusion, thickness, and curvature. Those data are combined in vertex color RGB channels, using the attribute VOP node, for later use within UE4 for the material creation.


For example, I generated this kind of different crystal using only a sphere as base mesh and trying to never spend more than two minutes tweaking parameters.


After those tests, I tried to find out which parameters were really useful to add to my HDA export for Unreal. And I began generating meshes directly within Unreal Engine 4.

Later, I plan to use the same feature with different shapes, even with pre-made meshes coming from Maya (to use this tool on a blade-shaped mesh for example). I also want to add some secondary & tertiary noises to the procedural mesh sculpt, to add some surface details and more control about the wanted final mesh. The goal is to be able to generate whatever I like later for VFX purposes (arrow, sword, bullet, item, armor, etc, etcā€¦). :wink:

Next time, I will probably make a global overview of which features Iā€™m using with the crystal shader creation. Just an early sneak peek before I clean it up and add some more features :

Thatā€™s it for today! Feel free to give your opinion about this, would be a pleasure to discuss it!
See you soon, and may the VFX be with you guys! :slight_smile:

11 Likes

Instant like for Houdini usage)

1 Like

Hi VFX people! :slight_smile:

Just a little update about the ice crystal VFX Iā€™ve shared last week!
As some advised me to, Iā€™ve tried to add some sparkles/snow using a particle system. I chose to use GPU sprite that allows me to work with vector field driving particle velocity. I wanted the particle to have coherent velocity according to flipbooks animations, therefore those homemade vector fields were generated with the help of the smoke ring velocity flipbook to achieve this effect (or at least try).

As usual, feel free to share your opinion about this! :wink:
And may the VFX be with you guys! :slight_smile:

3 Likes

Hi VFX people! :slight_smile:

Today, I wanted to share with you another effect I made this week for my project.
With this one, I had this idea of a ā€œfire black holeā€ that popped into my mind while making some simulation tests with FluidNinja. It was the first time I got involved with a fully homemade fire effect and I had some trouble working with colors and behavior. Hereā€™s a capture of the final effect withing Unreal Engine:

I used the same workflow for this fire effect that the one I used before for the ice one. I plan to make a post soon to explain how those effects really work! :wink:

Feel free to give any feedback, Iā€™m really willing to improve!
And may the VFX be with you guys! :slight_smile:

I liked the smoke. flames could have better.

1 Like

Love the theme on this one! I would suggest adding a little speckle of flame upward? right now it could work as a UI flame outline but not in 3d space yet IMO.

1 Like

Thank you! Thatā€™s great that you mentioned a UI outline usecase, those two effects actually designed to fit with an item viewer UI screen. Thatā€™s why I wanted to make such a ā€œstatic fireā€ with no upward velocity. Now that you say so, I agree with you that some more physically based dynamic (like fire going upward with heat) would be appreciated with this fire hole one!
Iā€™m not finished with this yet, so thank you for the feedback! :slight_smile:

1 Like

Hi VFX people! :slight_smile:

To begin with, I recently changed this topic title to ā€œVFX Sketchbookā€. I honestly donā€™t know when I will have the opportunity to work on my Elemental Crystal project again, so I asked myself: instead of making a new topic to show some of my work, why not simply rename this one and make it my own personal sketchbook? :wink:

Today, I want to share with you an ā€œart testā€ I was asked to make lately for a job offer. I was asked to make a realistic fuel explosion inside UE4 in 28h. It was the very first time I got involved with an explosion effect, therefore I had to learn while working on it. I chose to use Houdini for smoke simulation and Substance Designer for VFX texturing as additional softwares. At last, it took me 26h (3 days) to achieve the following effect.

https://youtu.be/cX_eu5FsQnA
https://youtu.be/hih-P8ZdE64
https://youtu.be/vRy22w3zJdY
I want to thank @Partikel for his Houdiniā€™s pyro simulation to flipbook tutorial on Pluralsight, hope to make good use of this knowledge in the future! :pray:

As usual, feel free to share your thoughts about this, feedbacks are more than welcome!
See you soon I hope! :slight_smile:

4 Likes

Hi everyone, long time no see. Was pretty busy lately, but found the perfect opportunity to get back on track with VFX making in my free time. And this opportunity is called ā€œSwordtemberā€ ! :crossed_swords:
The idea is to follow a chosen prompt list and make some ā€œSword aura VFXā€ each day until the end of September.
The purpose ISNā€™T to stress myself with deadlines, therefore Iā€™ll try to stay in the race but if I have to take more than one month to complete this, I will do so :wink:

Above, the prompt list I will be following for this challenge, starting today with ā€œShadowā€ prompt.
I saw this topic as a perfect opportunity to get back on fluid simulation with FluidNinjaVFX. :sparkles:

I also had to set up all the UE4 project and made some dedicated spawning blueprint to work faster with later effects. (will make some dedicated post later to present my workflow :wink:)
The sword mesh is clearly nothing more than a placeholder for now, it will be rework slowly during September to have some clean render of all effects at the end of the month. :innocent:

See you later for the following prompts, and may the VFX be with you guys! :smile:

3 Likes

Hi everyone,
Itā€™s Day 2 of Swordtember today with ā€œLightā€ as prompt. :sunny:
I tried to play a bit with high color values, perlin noise, and some glitter effect to create some ā€œsparkly rainbow light energyā€ kind of stuff. :sparkles: :rainbow:
I wanted this one to be directly related to the shadow prompt, therefore Iā€™ve kept the same elements than for the shadow yesterday (kind of flare inside the guard + FluidNinja fluid sim for the blade effect).

Feel free to give your thoughts about those sword effects, and see you soon for next prompts! :smile:

2 Likes

Hi everyone,
Day 3 of Swordtember! Todayā€™s prompt was ā€œInsectā€ :mosquito:
I felt it was the perfect time to work a bit on the blade lit shader. It took some time, but I now have a pretty customizable material that I can use later on with any wanted lit surface for the blade. Below, a quick overview of the shader work done over the night: the shader is using combined textures to apply colors / normal / roughness / ect, mainly by using lerp, smooth step and some basic math to control mask intensity / contrast / max.

For the VFX part, I wanted the blade to have this sticky / slimy feeling, quite like honey would be but far less attractive and more toxic alike, to justify the insect being here and flying around the blade. Still using FluidNinjaVFX for the spritesheet making, getting slowly used to it and want to try more specific stuff with it already!

And hereā€™s the result so far! See you soon for the next prompt! :smiley:

Hi everyone,
Day 4 of Swordtember with ā€œGhostā€ as prompt :ghost:
Took some time to improve blade and spirtesheet shader a bit, and made new Niagara emitter for specific behavior I will be using later. But for the most of my time today, Iā€™ve just made some test in FluidNinja to understand more how to use it for various usages.

For the ghost part, Iā€™ve mainly tried to work on colors and timing. Trying to link the shader behavior on the blade to the spritesheet behavior of the aura around it. Love this one, will definitively come back on it later :wink:
See you soon for next prompts! :slight_smile:

2 Likes

Hi everyone,
Day 5 of Swordtember with ā€œLavaā€ as prompt :volcano:
Didnā€™t have much time today, I had to make something very quick and Iā€™m not very satisfied with the result. But the base is here fore some improvement later, here is the result so far:

Thanks for watching, feel free to say your thoughts about this sketchbook, and see you soon for the next prompt. :slight_smile:

Hi everyone,
Day 6 of Swordtember with ā€œSnowā€ as prompt :snowflake:
For this one, I wanted to play with the sword mesh shader a bit and try to use some parallax occlusion mapping to get some kind of ice feeling. Didnā€™t had much time to spend on the fluid simulation though and it could be improved by much with more time.

Above, the result so far for todayā€™s prompt.

Also made a quick record of the attempt of a frozen handle from closer :point_up_2:
Thanks for reading, and see you soon for next prompt! :slight_smile:

Hi everyone,
Day 7 of Swordtember with ā€œStormā€ as prompt :cloud_with_lightning_and_rain:
Tried to quickly make some lighting flipbook texture for this one and applied it to various meshes.

This one mark the end of this first swordy week! I made a little line up of all the swords made so far. Considering Iā€™ve to work all day before I can participate in this challenge, making one effect per day was indeed exausting. Therefore Iā€™ll take some quick break and see after if Iā€™m up to continue this challenge until the end. Still, was fun to do this first week either way ! :slight_smile:

Feel free to comment, give some feedbakc, and thanks you so much for reading. :sparkles:

6 Likes

Hi everyone,

Itā€™s been a while since my last post here, so here I am to change that ! :wink:
I didnā€™t really take time to work on any personal VFX project lately, so Iā€™m afraid I donā€™t have anything visually shiny to share today.
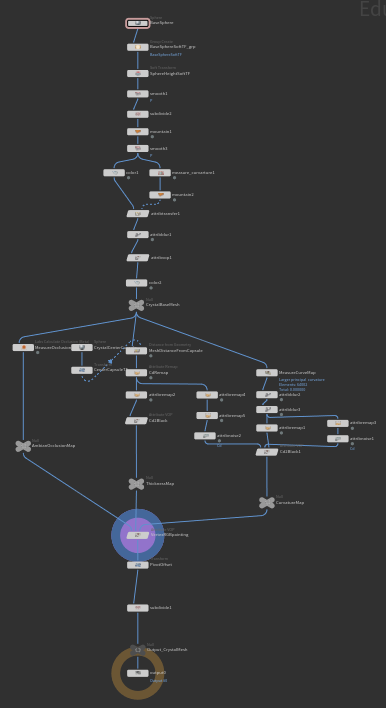
Iā€™ve been working a lot with Niagara inside Unreal, and the one thing that stroke me as a major strengh is how much customizable it can be at any level with the related module / dynamic input / function script. With that said, some of the engine provided Niagara module script looked like they could use some little upgrade, starting with some basic location modules.

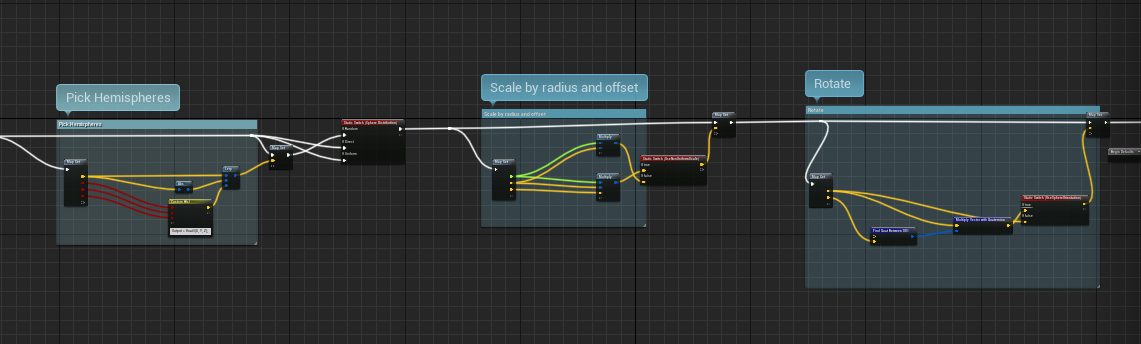
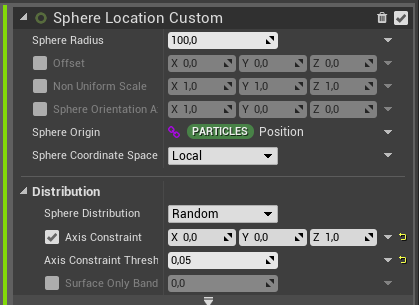
Sphere Location module :
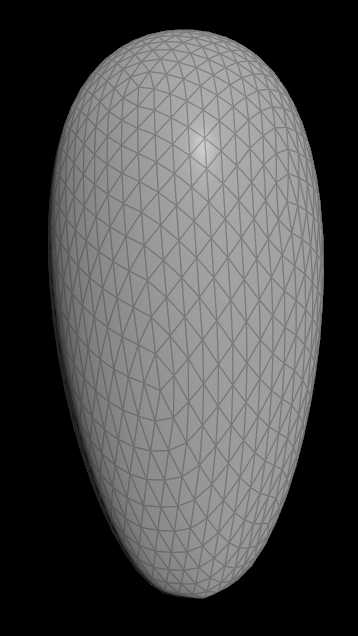
The first one Iā€™ve modified is the cylinder location module. In the default module graph, the ā€œhemisphere pickingā€ feature is happening before the ā€œsphere rotationā€ feature.


Therefore, when you chose some given hemisphere picking and rotate the sphere orientation, the ā€œsideā€ of the sphere picked by the hemisphere will rotate with it since itā€™s happening first in the maths. That could be a wanted thing depending on specific usages, but it seemed very limitated to me when I had to use it.
image
First things first, Iā€™ve changed the order of execution of those two features, so now the sphere will rotate first and then pick a sphere side to spawn upon. For the side picking, Iā€™ve chose to get rid of the simplier hemisphere picking, and replaced it with some sphere normal constraint comparison. The sphere will now compare the sphere normal to a user provided axis using cross product, and then will apply a threshold on that result to obtain the particle spawn location.
All of this above allow me : 1. to have some controll over sphere rotation without it having any influence on the world axis contraint / 2. to controll the axis constraint at runtime in a smooth way using dynamic values for axis direction and threshold (for runtime wind behavior for example, that would make possible to make the particle spawn from the side of the sphere that match wind axis).
Below, Iā€™ve just made some simple debug blueprint. The red square foward vector will be the axis constraint, the green square foward vector will be the sphere orientation. (Think of it like the red one being the wind direction, and the green one being the actor rotation for non-uniform shapes)

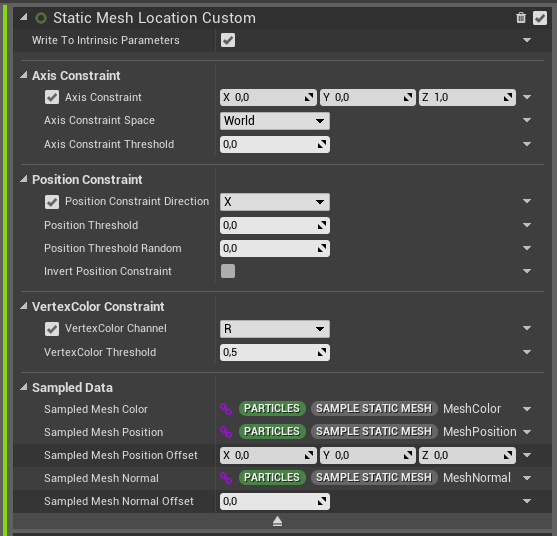
Static Mesh Location module :
Default static mesh location module is featuring some axis constraint similar to the one Iā€™ve added to the cylinder location. While working on some weapon aura effects, Iā€™ve noticed that the axis constraint was taking place in the same coordinate space than the emitter itself. This meant that if you wanted some world space emitter that would leave some particle behind as the actor mooves, the axis contraint will change as the actor rotate and moove in the world.

My idea here was to let the user choose between world and local space for the axis constraint, and do the ā€œdoes it need to be inverted from emitter space ?ā€ trick inside the script.


Doing so, Iā€™m now able to have this axis contraint and the emitter working together in different coordinate space. It allowed me to use new behaviors that wasnā€™t available before :

  1. Emitter = local + Constraint = local : particle stay around the actor when it moove, particles are spawning on the same side of the mesh no matter what.
  2. Emitter = world + Constraint = world : particle stay behind in the world as the actor moove, particles spawning side on the mesh is relative to actor rotation.
  3. (new) Emitter = local + Constraint = world : particle stay around the actor when it moove, particles spawning side on the mesh is relative to actor rotation.
  4. (new) Emitter = world + Contraint = local : particle stay behind in the world as the actor moove, particles are spawning on the same side of the mesh no matter what.
    (see example in video below)

Those new behavior really helped me while working on some weapon/item aura VFX composed with all of those coordinate space combinaison.
The nĀ°3 for example was a really good way to handle smoke spawning on some object. I didnā€™t want my smoke sprite to stay behind if the player move, I prefered it to ā€œstickā€ to the object, so local space was needed for the emitter. But I did want the smoke to always spawn on the side of the mesh that was pointing up, so I needed the axis constraint to be world space.
the nĀ°4 was a really good way to spawn sparks on a given side of a mesh (think about some one sided sword, and you would like the spark to only spawn on the cutting edge of the blade), that would need the axis constraint to be local. But I did want those sparks to be world space and stay around with some curl noise as the player was mooving around.

In addition to this axis contraint improvements, I wanted my mesh location module to have more controll on how particles was spawning.
First thing first Iā€™ve added is some ā€œvertex color constraintā€ that would allow the user to choose a given color channel (R/G/B/A) from the mesh vertex color (that is sampled already by the sample static mesh module). This can be usefull when other ways (like material or axis contraints) are not working for a specific usage.
Then my second idea was to add a ā€œlocal position threshold constraintā€. This one part will let the user choose a given axis, and then allow particle to spawn only if their position value on this axis is above (or below if inverted) than the user provided value. Iā€™ve also added some random range to this threshold, allowing me to create some kind of gradient with particles spawning instead of having particle spawning above a ā€œstraight lineā€. For now, Iā€™ve made this position threshold happening in the mesh space only, because I didnā€™t want the spawning to change if the player crouched while spawning above a given Z value in world space emitter for example.

Making my first steps in module/input scripts for Niagara really made me realise how powerfull this tool is for being as customizable as possible. Donā€™t feel limited by the default modules and emitter, just adapt and create whatever feature you need ! :slight_smile:
I hope this little breakdown has been interesting to you guys, Iā€™d like to find time to make more of those breakdown in the future. :roll_eyes:
As usual, feel free to share your thoughts about what you just red and to ask questions if you have some! :wink:

Thanks for the read, see you soon, and may the VFX be with you as always! :sparkles:

4 Likes

Hi everyone, :slight_smile:

Lately, Iā€™ve been trying to learn how to use render target feature in Unreal. It appeared to me it was a pretty basic knowledge to have as VFX artists, and I was lacking it until now. The purpose was only to grasp what this feature is capable of but I had a lot of fun on the way! Letā€™s start! :slight_smile:

The Topographic map painter: :world_map:
To begin with, Iā€™ve look to the Blueprint_RenderToTarget map in the ContentExample project. I found the heightfield painter was a really interesting and fun example to study, therefore I tried to replicate it ā€œwith a twistā€ to both understand it and try to create something a bit more visually interesting.
The result is some kind of island topograpic map painter at runtime:

I added some ā€œon mouse click releaseā€ brush randomiser within the drawn to target material. The idea is pretty simple, when mouse left click is pressed the ā€œbrushā€ material will be drawn to target, adding a radial shape multiplied with some crossed noise textures. When the mouse click is released, the drawing to target end and the random offset for both noise textures is reset, resulting in some different brush stroke at each click:

A simple camera and related TV screen: :tv:
With a better understanding of render target basics and how to draw material to them at runtime, I wanted to get a first intuition about scene capture at runtime and how to use it in the more simple way.
It resulted in some kind of surveillance camera that will display the result on some giant screen.

The blueprint part of it was pretty simple, but I had some fun trying to make a ā€œrealā€ screen shader. The idea is to begin by pixelating render target UVs coordinate with some basic maths. Then, I tried to separate each channels of the resulting pixel and offset it just a bit to have those 3 RGB line that create the pixel color code.

Still, for now itā€™s just playing around with basics maths for fun, but it was a good training to make it react procedurally to the input pixel amount or other variables.

The Flame flipbook recorder: :fire:
This part get closer to what I was looking for in the first place : how does FluidNinjaVFX (the flipbook baker, not Live) works very basically ? While trying to answer this question, I found the wonderful sketch done by @simonschreibt almost a year ago. This one was more than very helpful to get more into render target and scene capture usages, make sure to check his awesome work. (Thanks Simon ! :sparkling_heart:)

To start the all thing, I chose a very similar structure to the one use by Simonā€™s blueprint for flipbook capture, but with a few twists :wink:
The first thing I did is trying to recreate the same logic, but with a few basic changes for a more procedural result (like changing canvas and/or frames resolution at runtime, or being able to restart the flipbook capture with a single key press). I also added some debug print in the output log with detailed for each event of the graph (resulting in all those line you can see appears on the viewport left side while capturing), this was a very good thing to do to be able to really dive in ā€œwhatā€™s actually really happening ?ā€ when I had some difficulties about making some part work correctly.

After I had the base working as intented, I wanted to add a new layer to the actual overall workflow. In a few words, for now the scene capture is actually writting what it sees inside a render target ā€œAā€, and then draw A at a specific location of another render target ā€œBā€ to create the flipbook current frame. My idea was to begin with same thing (writte scene capture inside A), then use A as texture input inside a shader that will distort and erode it and writte the result inside a render target ā€œCā€, finally draw C at a specific location of B to create the current frame.

This process was really fun to investigate, and Iā€™m really surprised by the final results, that ends being very satisfying with a minimum time effort spent on tweaking materials values and Niagara simulation as inputs. Iā€™d love to spent more time playing with this one, and I hope to find time or opportunity to come back to it later!

Even if it was nearly scratching the surface, those little studies to discover render target feature really helped me to have better intuition about how does a 2D fluid simulation tool can work. :thinking:

I hope you enjoy reading this little learning report, and I hope to make more of those in the future ! Feel free to ask any question you could have or for additional details! :slight_smile:
Thanks for reading, be well and may the VFX be with you guys! :sparkles:

6 Likes