Jordanov : Sketch #26 Vertex Offset

  • Latest Update

Video for better quality :
https://youtu.be/cFyP6uuuYtU

Thumbnail :
https://gph.is/g/4LNmRnQ


Hello there !

It’s been a long time since I post here ! I always took a look of what’s going on in the forum, but it’s rare now for me to post.
BUT !!!
I was playing around with WPO on Unreal, and starting to have an interesting thing, since I notice that this month challenge was about Vertex Offset :sweat_smile:
May be late to the party, but I think I can finish it in time, if I take the time to push forward the idea !

So, this is where I am for now :
https://gph.is/g/aXmW0qn

My first idea was somebody aspired in an other dimension ; may be pixelise in a video game, don’t know yet ! May be it will change on the look, maybe not a pixelisation, I will see where this will bring me :smiley:

22 Likes

I thought it was a pokeball capture effect from the thumbnail, haha. God job, It’s looking awesome!!

3 Likes

Ahah yeah, actually it could be that, depending on the way I will push it ! But not a bad idea at all !

Hey there !

New post here !
Adding a “sine” node turn this into a pretty cool motion, I will tweak it more, but I begin to have a nice thing over here !

https://gph.is/g/4bW1rjv

3 Likes

Well, last update for today I think !

Added secondary motion and secondary colors, and begin to have a nice motion and shape !
I guess I will work more on the context and the secondary elements, like anticipation and finish, polish about the teleportation point, things like that !

https://gph.is/g/Z7Dr9Yp

16 Likes

What kind of sorcery is this ? >:0

1 Like

Vertex Offset :smile:

It’s not very complicated once you know the tricks, I will post a Breakdown when I’ll finish it I guess :thinking:

10 Likes

Amazing work! Hope your breakdown

2 Likes

Looks great dude, hope you"ll finish it !

1 Like

Begin to write the scenario of my effect.
Still a lot to do, but things begin to be connected each others !

https://gph.is/g/ZyPYeWW

4 Likes

I will post a Breakdown when I’ll finish it I guess

I would love to see how this is done, looks absolutely amazing!

I never think this effect could be achieved using vertex offset. You open my eyes, love to see the breakdown. I’m also thinking a solution myself.

Update of the day :
https://gph.is/g/46g6w09

Update the timing, the scenario and the colors.
I will add a kind of ‘aspiration’ effect to link the motion and the vortex, and after that I will create a better scene than this blue sky!

And I currently writting a quick breakdown, as few of you asked me how did I achieve that, as I don’t know if I will have time later ! Stay tuned !

4 Likes

So basicaly, here is the breakdown :

In fact, a lot of things is inspired by this awesome tricks by @DeepSpaceBanana : DeepSpaceBanana Art - Art

If you never heard about him, or what he does, pls leave immediatly my thread and take your night to appreciate what he is doing! Ready now ?
He did an amazing breakdown about how crush the vertices of the mesh into one point. And it’s basically what I’m doing here. But one thing that hurted me, it’s the fact that the crushing vertices was linear, from point A to point B.
So basically, what I did is adding a node called ‘RotateAboutAxis’. And with that, I was able to have more control on my vertices, as they are able to move around an axis, buy adding a custom “Vector 3 Axis” that I can update in the Material Instance.
This is what I had by using just the RotateAboutAxis node :

By adding higher value on my “Axis” vector 3, I just had more control on how far the vertices will go and back of the axis.

So, to correct that, I just add a “sine” node, as this allows me to enter on negative value easily during the motion of my vertices.

After that, I keep using my Vector3 to change the look of my effect, and once I am glad with it, I create a simple Blueprint that change the value of the radius over time, and this is it !
I just use the radius to control the emissive value and the color to had more life to my effect. The soldier asset is from Paragon, and so his Diffuse and Normal.

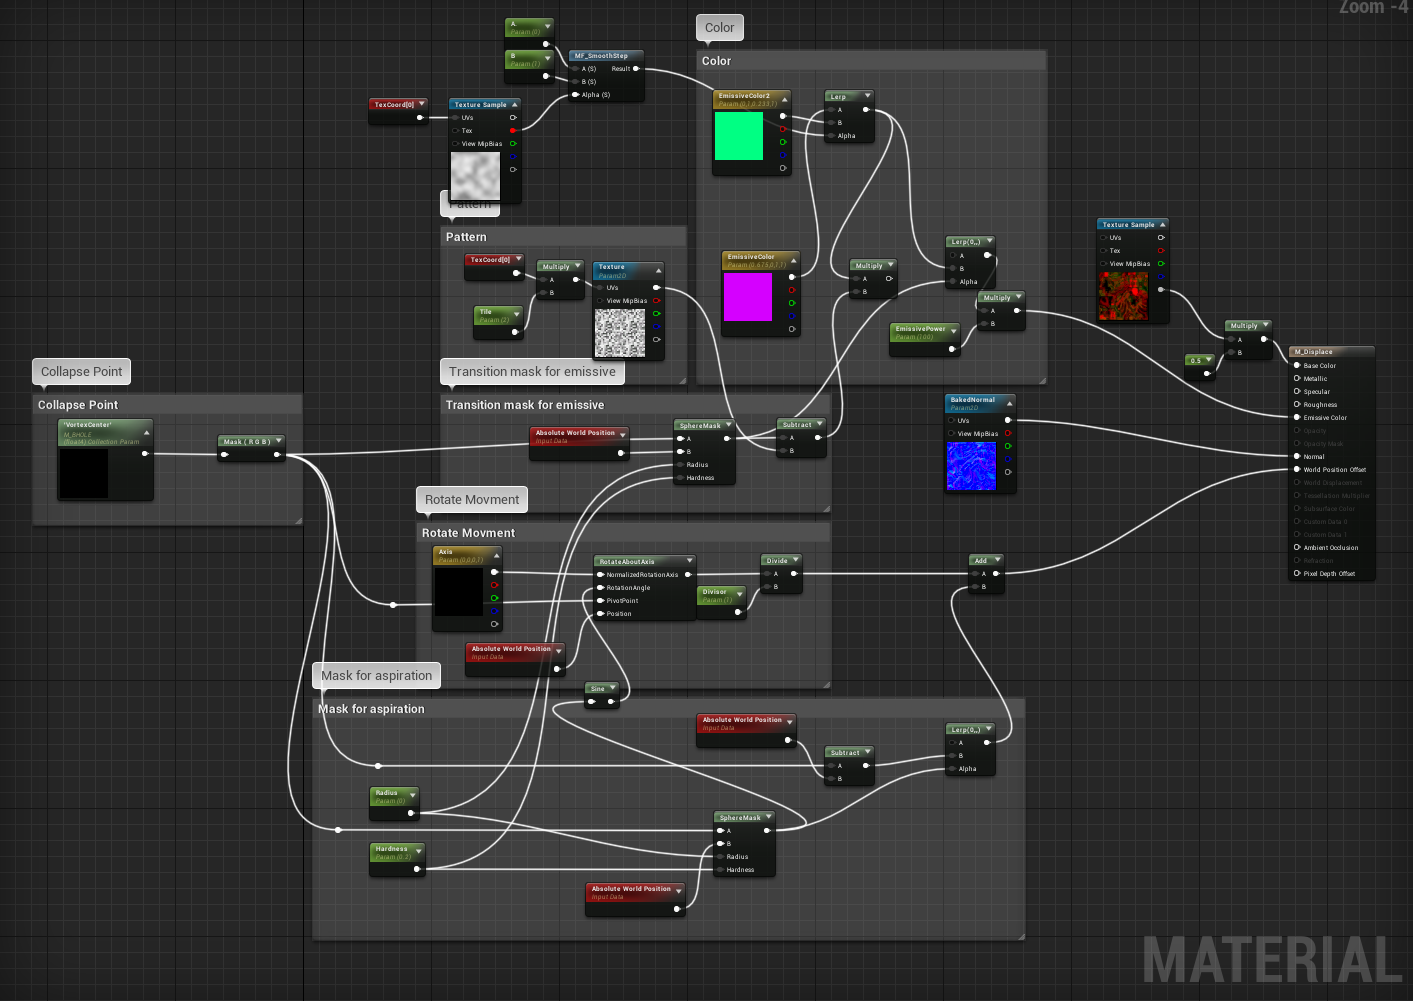
This is the whole graph, tell me if the def is enough :

For the curious : first iteration GIF was adding the RotateAboutAxis, the second GIF is adding the sine node, the third one is adding more control using “Radius” grayscale ! :smiley:

(As you can see, I didn’t connect the Pattern thing to anything. This initialy gave me a way to control the transition of my effect, by adding a pattern, as you can see on the first GIF, little square ; but this added too much details for my effect and was too noisy, so I decided to remove it. But I keep this on the side, could be useful later !)

So this is it :slight_smile:
Tell me if something is missing or misunderstandable, I will try to explain it with more details and screen !
And little disclaimer : As I didn’t added any geometry or Tessalation, to more your Mesh have polygon, the more the effect will be smooth ! It’s not so heavy on his own, but could be dangerous if couple with something else, so keep this in mind :smile:

:arrow_forward: And for the TLDR : Vertices Crushed to a location, add a Rotate About Axis Node, and add a Sine node before the Rotation Axis.

18 Likes

Update of the day (and probably the last ?) :

https://gph.is/g/ZnxNO9A

Pretty glad of the final result !

Just a little update with a video with more quality :
https://youtu.be/cFyP6uuuYtU

7 Likes

I always have problems with the thumbnail T.T I really like your effect ! :smiley: that’s impressive, I like the timing :slight_smile:

1 Like

The anticipation on the character getting sucked in is really great. That nice slowdown in the middle, followed by the fast ending really sells this well

1 Like

Huge thanks for the breakdown Jordanov, very cool stuff!

This is amazing! Thank you so much for the breakdown.

And for two or more collapse points, how would it be done? Thanks