Hello,
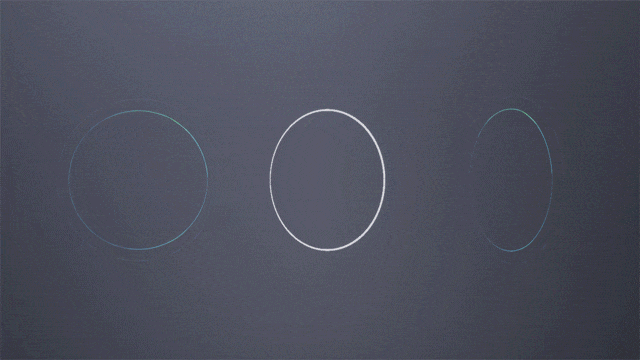
what you see is a result of two things; one is a node inside the Material Editor that tries its best to keep each individual face of the mesh camera facing without “breaking” them, the second one is the vector noise.
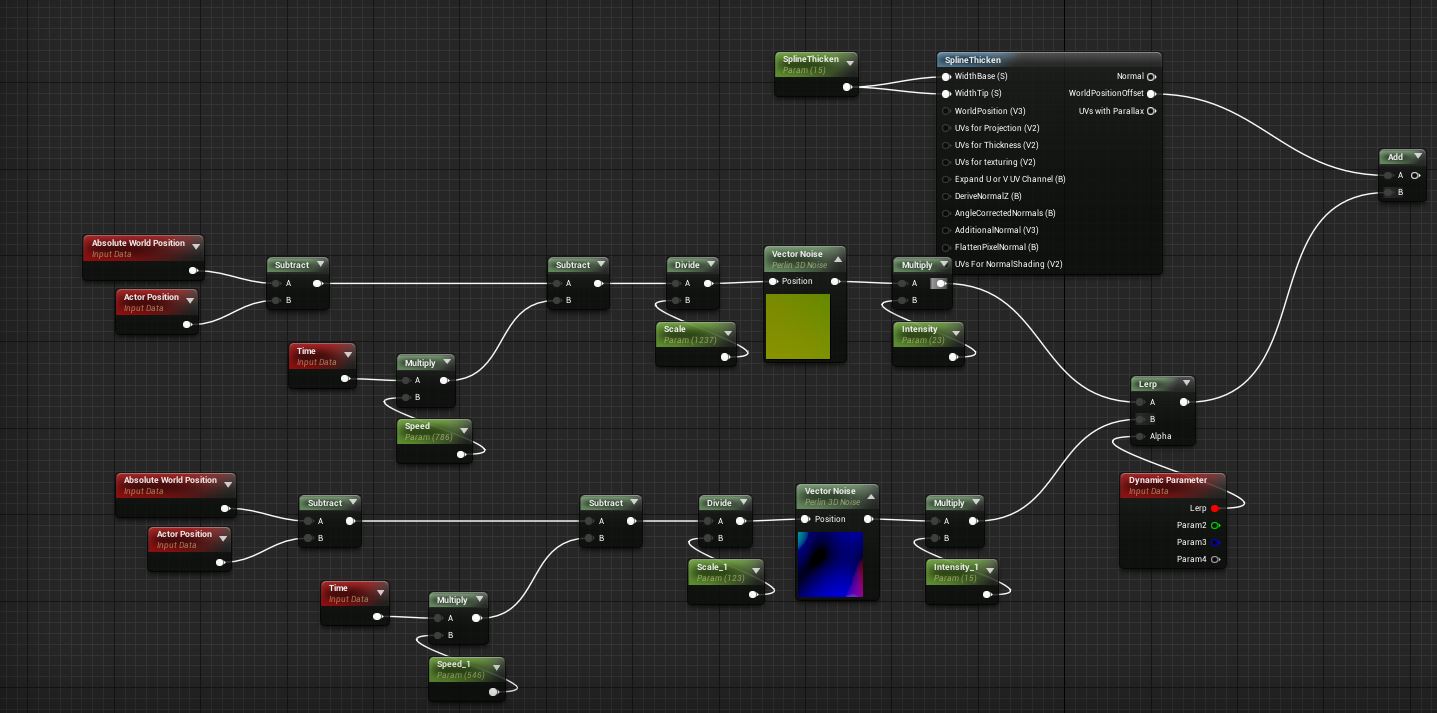
The faces of the circle mesh are actually a few milimeters wide, by using the SplineThicken node you can enlarge each face based on the meshes UVs. To help you visualise it, think of a simple plane that’s 1cm wide and 20cm long and it’s devided into three subdivisions vertically. The node will use the UVs of the plane (to locate the vertexes and) to enlarge the width of those three polies, using a linear gradient between 0 and 1 (zero being the base and one being the tip of the UVs). This is the foundation, you can then use something like Path Deform in Max or Houdini or whatever (align a plane across a path) to create the desired shape, maybe that’s a spiral, or a tech-y 3D line - even 3D electricity. As long as the UVs of the mesh are normalized then SplineThicken will work, the exact shape of the mesh/spline is irrelevant (to an extent). Optionally you can apply masks and have complete control of which polies enlarge when and how much. You can also use Dynamic Parameters and edit those values in particle time in Cascade. Since the node makes the polies camera facing (and does a really good job at it frankly) you no longer have the need of intersecting planes, which practically doubles your vertex count.
In this particular example you could use Initial Scale to scale the particle itself, but I just did it to show you what it does. When you have a complex shape, such as a spiral, scaling the mesh horizontally enlarges the mesh as a whole, rather than its polies. In the example of the circle rune, scaling up the mesh would make the circle bigger rather than widen the polies. Ryan Brucks has had a live stream once explaining how that expression works, I recall it was related to the foliage of Paragon, you should be able to find it in Unreal’s YouTube page.
The second part is the vertex noise. The principle is pretty standard, you use a noise to control the vertexes of the mesh. I chose to use the Vector Noise node to generate the vertex noise. The Vector Noise node, is basically an expression that calculates a noise in realtime, if you’re making a playable game then this will greatly impact performance (for a showreel piece you should be fine). However, should you want, you can render the generated noise from that node within UE4 and use the texture instead. What I like about this node is that, as the name suggests, it gives results for each axis individually.
Below is the basic version of what I mean. Remember that everything before the Vector Noise nodes can be a simple panning texture, also having two Vector Noise nodes has a significant impact in performance. In this example I have a second noise and LERP between them two, it’s not necessary, I just did it to show you what I meant by LERPing between noises. You can also replace the scalar parameters with dynamic parameters and edit the values in Cascade, this is just a quick example. Also you don’t have to use one value for both tip and base.
I hope this message makes sense, let me know if you need more help.