I’ve been working in Unreal for a little while, and optimization remains a bit of a nebulous concept to me. When I was learning Unreal during an internship my mentor stressed the importance of the shader complexity viewmode. However working in UE4 makes me question what really affects performance, since if the shader complexity mode is to be trusted, it seems like it’d be almost impossible to render lit volumes of particles without hurting performance. Are other game engines just better at handling overdraw? Unreal seems to max out with a relatively small number of overlapping particles.
I’ve done some tests, and even when I’m getting mostly red and a little white in shader complexity, I don’t really see much of an impact on performance, unless I really crank up the particle emission to crazy levels. However I know my system isn’t representative of lower end hardware, so I can’t really tell how badly the effects will influence the performance on worse machines.
So what are some good tips to optimize FX in Unreal? Say I wanted to create a smoke grenade effect that had lit soft particles, and I wanted it to have good density and volume, however it needed to run on consoles without a significant performance hit. How would I approach it?
it seems like it’d be almost impossible to render lit volumes of particles without hurting performance.
Correct.
What FPS are you targeting?
What consoles? If you are talking PS4 and Xbone, you have some leeway. If the goddamn PS3 is to be taken into account you should start looking at non particle solutions.
I just wonder how games like Just Cause 3 or Battlefield 1 seem to get away with enormous numbers of lit, soft, animated particles overdrawing. I’m not sure if it’s optimization trickery or just the engines are better at handling large numbers of particles.
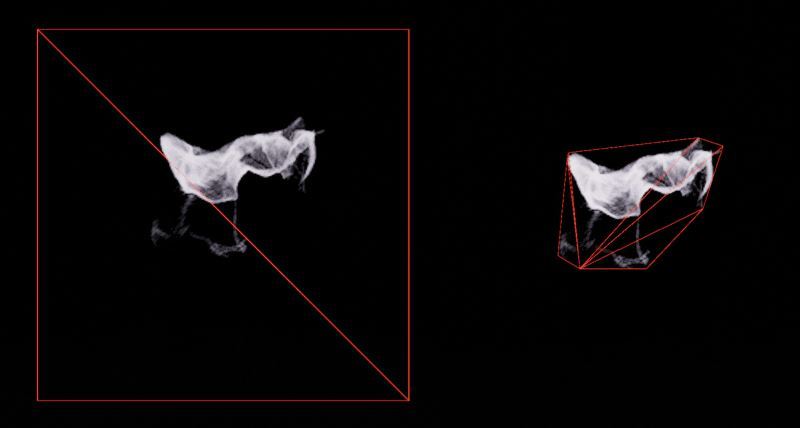
The material uses lighting, frame blending, and soft particles. The particle system maintains 12 smoke particles at once, and even with only 12 particles overlapping it’s already dipping into “extremely bad” white in the shader complexity viewmode. Turning off frame blending and soft particles will improve the complexity only slightly, while turning off lighting gives it the biggest boost.
However, if I look at framerate, there is absolutely no difference whether I’ve got the particle system filling my screen or not, which makes me question the accuracy of the shader complexity viewmode. http://imgur.com/alHilV9
However I’m not sure if that’s just because shader complexity is geared towards weaker systems than my PC.
But that still doesn’t mean much. What does red mean? A certain number of instructions? A certain type of expensive instructions?
Without actual numbers from the target platform with a representative level and gameplay systems running, this is all very academic and a bit pointless in my opinion.
“What does red mean?”
That’s basically my question. According to the documentation it represents the number and complexity of shader instructions calculated per pixel. When I was working in Unreal 3 during my internship my boss told me to make sure my effects never came near white, though I suppose that was due to us working on a 360 game at the time.
I guess now I’m just wondering if there’s any other way of gauging potential performance impact, other than just running tests on the relevant hardware (which is difficult since I’m working remote and don’t have a PS4 devkit)
Good question. I always wondered about that. Another example:
Super-simple material and the only special is the blend-mode: Masked. But there shouldn´t be any blending operation involved (like it would be with a blend mode like “additive” or “translucent”). So why is the shader turning red when I have 10 particles on top of eachother?! Shouldn´t the shader do some early-culling to don´t waste time with those particles which aren´t visible?
Thanks for the hint! But unfortunately this only seems to work with Flipbooks/SubUV. Also, while I totally understand that translucent/additive materials have a lot of overdraw, I didn´t expect that to be a huge problem with alpha1/masked - and especially not being a huge push for shader complexity…weird.
Yeah, your example surely is weird. On the shader complexity view, there’s a color bar indicating how complex is the pixel shader and the vertex shader (a lil PS and VS floating around), how does it look on yours?
I haven’t used the particle trimming on unreal just yet, but if you’re having a particular overdraw issue you could set it as a flipbook with a single frame, no? Or even use custom geometry depending on the case.
that behaviour is new since 4.13 and probably came to be due to :
Bugfix: Fixed the Shader Complexity viewmode for materials using depth pixel offset.
This could cause masked materials to appear cheaper than they actually are.
Not sure if it’s a bug or intended result from that change though.
Any previous version the viewmode worked the way one would expect to for masked materials.
Thanks for the update but I worked from 4.8 to (now) 4.12 and the behavior of the shader complexity mode was always like that with my masked materials.
the Shader Complexity viewmode should basically only really be used as a rough guide - there’s so many factors involved in optimisation that its hard to rely on any single tool as your benchmark. Maybe the effect is super expensive in terms of overdraw but if its only ever used in a cutscene and doesn’t take up that much of the screen it might not be a problem.
theres a bunch of commands there that give you breakdowns but unless you’re testing on your target platform these are again only a guideline, i imagine your workstation has a lot more power than your min spec machine.
its really worth noting that the CPU and GPU are linked too so if your frame is CPU bound no amount of reducing overdraw will make your frame rate better.
In my opinion, if you’re just starting out learning Unreal and VFX then you should focus much more on getting things to a visual quality bar rather than worrying about optimisation, once you get your first job/ship your first game then you’ll learn so much about that from the more experienced artists and coders you work with, and there’s also no guarantee that the optimisation techniques you learn for Unreal will even carry over to whatever engine you’re using.
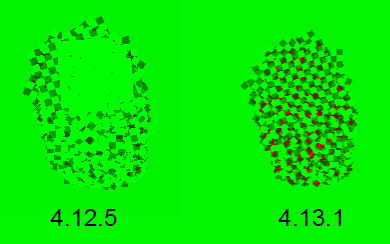
the amount of red you are getting is indeed strange. After 4.13 I noticed an increase in complexity for my masked materials, but after checking it again it is nowhere near as bad as in your screenshot.
here’s the difference i get between 4.12.5 and 4.13.1 after replicating your setup but with a spawnrate of 600 to make the much smaller difference more visible.
possibly slightly off topic but something i had some quite good results messing around with in Blueprints was manually scaling a particle effects release rate based on the current frame rate - not something i’d recommend for everything but for this particular dense fog sprites (always a performance killer) it worked surprisingly well.
its quite a heavy handed approach but for particularly stubborn frame rate areas i can see it being a useful tool to have.
New: Particle cutout optimization no longer requires SubUV animation.
It is now on the “Required” module and there is now a Project Setting under Rendering > Optimization > Particle Cutouts by Default that will automatically set up the cutout optimization when materials change on an emitter.