
Flipping your textures randomly per particle is a great way to create extra variation without having to add more variations to your flipbook texture. Ever seen how your particles spawn with that same curl on the same side, even though you have two to four shape variations? Well this is a great way to cure that. Just imagine flipping your textures horizontally or verticaly in photoshop, per particle. It’s pretty much that.
This tutorial is for Unreal engine. Though if you look to my material version of the technique at the bottom. Im sure you can use this technique for other node based material editors!
Let’s get started!
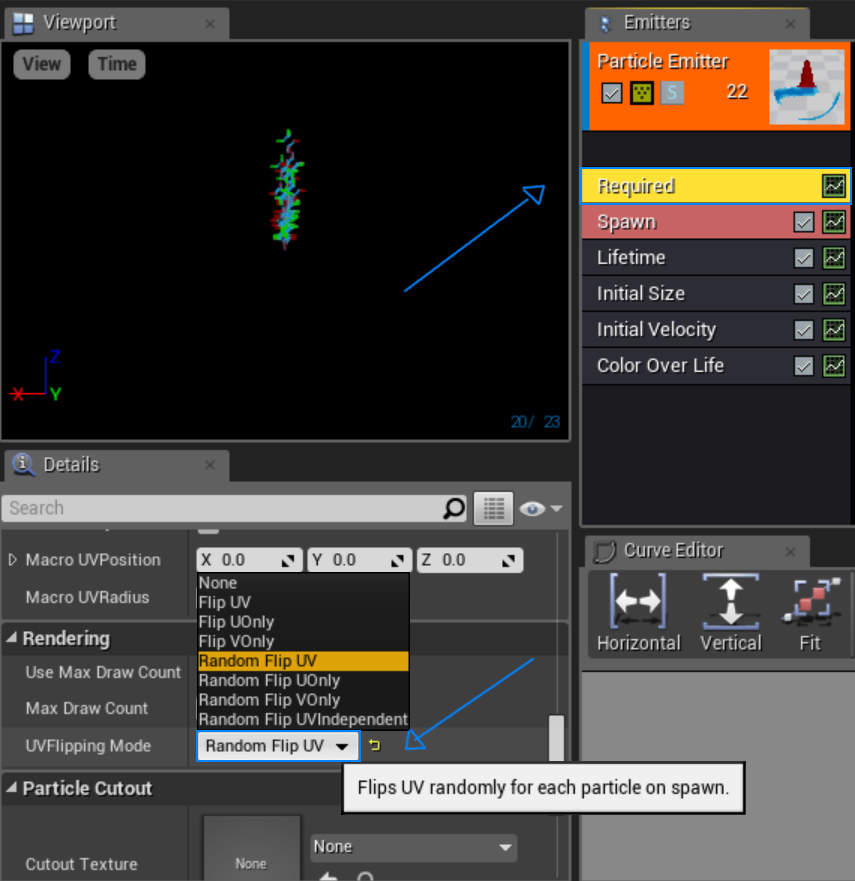
To start off with the easiest option, we have the texture flip option under Required > Rendering in our particle emitter.
The setup for this method is quite simple. Under the Rendering tab we have the UVFlipping Mode. Simply set the options to Random flip Uonly to only flip on the horizontal axis. Random flip Vonly to only flip on the V and of course, Random Flip UVIndependent to flip both axises randomly. Keep in mind, this option does not seem to be in all versions of Unreal. The version I am currently using at work does not have this for example. So I have more examples of how to achieve this effect below if this is the case.
Credit for pointing out the above technique goes to @Frogspasm
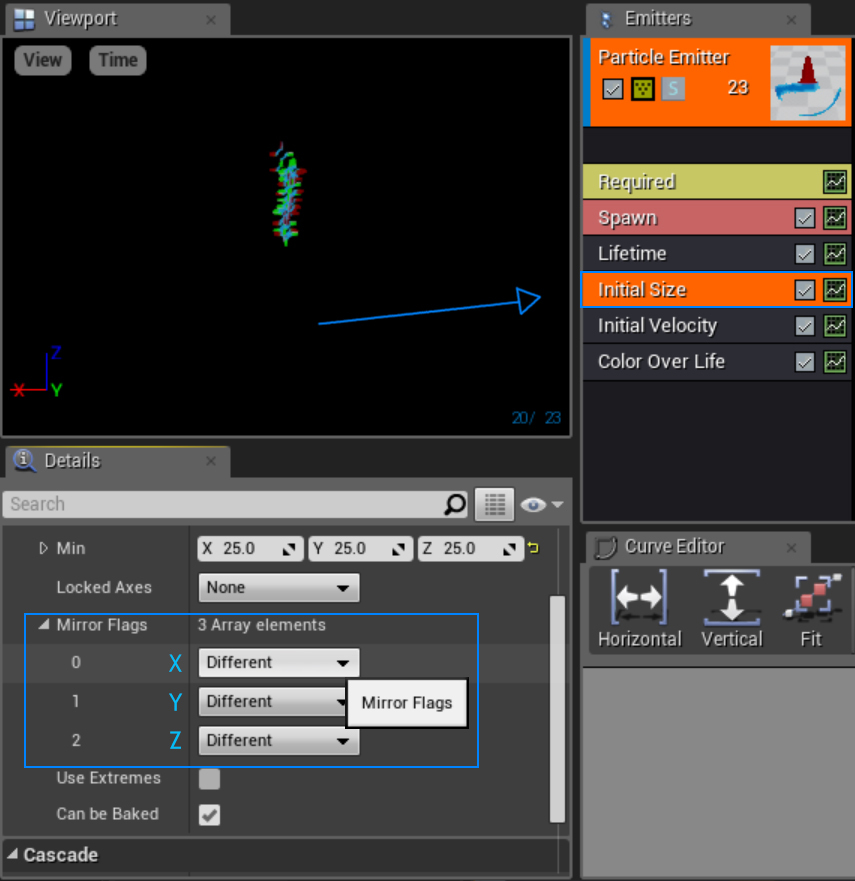
Another option we have in Unreal can be found under the Initial Size modifier. If you look below where you set the scale of your particles, you will see a mirror flats drop down. Open it up and you will see 3 other drop down boxs labled 0,1 and 2. These are your different axis of your particle. So 0 is your X axis (horizontal) 1 is your Y axis (Vetical) and 2 is your Z axis (Forwards/Back for mesh particles). Setting any of the drop downs under 0,1 and 2 to mirror will flip your particle randomly on that axis randomly per spawn. In some versions of Unreal you can use this to flip mesh particles randomly. However I cant seem to get it working in the version I am using at home or at work. Again I will mention that not all versions of Unreal have this feature. The Version of Unreal I am using at work does not appear to have the mirror flags drop down. If this is the case for you too, you still have more options!
Credit for the above technique goes to @Luos_83
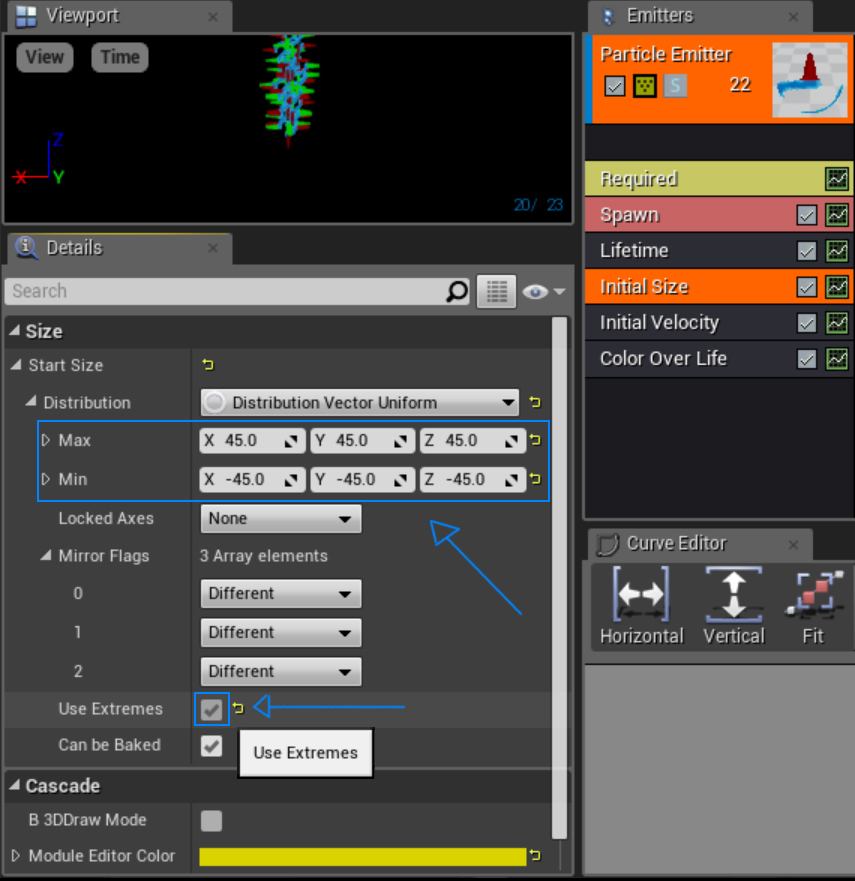
As you can see in the image above, I am using a vector uniform to set both a positive and negitive value for my particles size. This means that the particles mesh will pick between one of these two sizes. Though make sure to tick the Use Extremes check box below. Otherwise you will have particles spawning at random sizes on all axis! In other words, you could end up with particles 45 high but -0.01 thick! The use extremes check box makes the emitter only choose one value on the Vector uniform or the other. Rather than picking BETWEEN the two values. Obviously the issue with this option is it only allows your particles to pick between two sizes. So this technique is quite limited. This option can also be used with mesh particles, but it again apears not to work with my current version of Unreal. Its possible its a bug.
THE MATERIAL TECHNIQUE
This is the technique I had to create to randomly flip my particles. As the options above were not available to me on my current project. We will be flipping the particles through the material instead of through the particle emitter. This technique has its upsides, as you can choose which texture samples you wish to randomly flip inside your particle material. Say you have a mask that you do not want flipped, but you have a scrolling noise texture that runs under the mask to randomly flip. You can do that! Im sure there are a lot more things you can do with it as well.
Lets go!
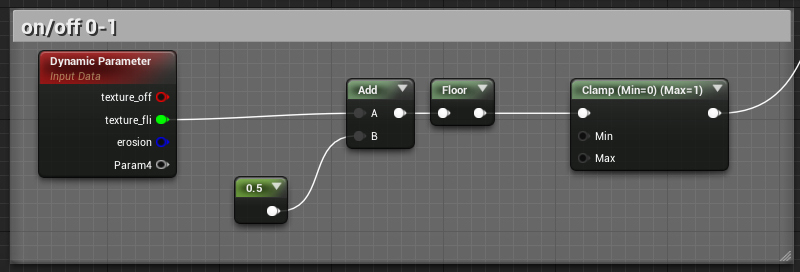
First we need to create a simple switch that toggles between 0 and 1 per particle. You could simply use an if function to create this same thing. However, I wanted to create something a little cheaper. The function above will give you a random output of either 0 or 1 per particle if you set the dynamic parameters range to 0 - 1 in cascade. Remember, I said 0 OR 1, not 0 to 1. Very important difference!

I’ll give you a quick rundown on the way the math works above. I like to think of things as graphs and gradients when working with math in Unreal. So for this, I have used gradients. As they are a great way to represent 0-1 visually.
First we have our dynamic parameter node(G channel in this diagram). If you look above, I have already represented the node as a 0-1 gradient. As this will be the data we want it to output per particle in cascade. Next we plug our 0-1 into an add node, adding 0.5 to our 0-1. Bringing our gradient/numbers up to a value of 0.5-1.5. We then plug the output of our add into a floor node. As you may know, a floor node will take any value between 0-0.999 and round it down to 0. As any number above 0.99-1.99 will be rounded down to 1. If we were to simply plug our 0-1 dynamic parameter into this node. We would end up with the value of 1 only getting chosen 0.01% of the time. This would not be so good for a random 0 or 1 switch. So to fix this issue, we added 0.5 to our 0-1 gradient/numbers. As you should see from the diagram above. Our gradient gets lifted over the rounding threshold. So now we have 0.5-0.99 getting rounded down to 0 and 1-1.5 getting rounded down to 1. Each range gets an even 50% chance of being chosen. Effectively giving us an on or off switch per particle without using a pricey If statement!
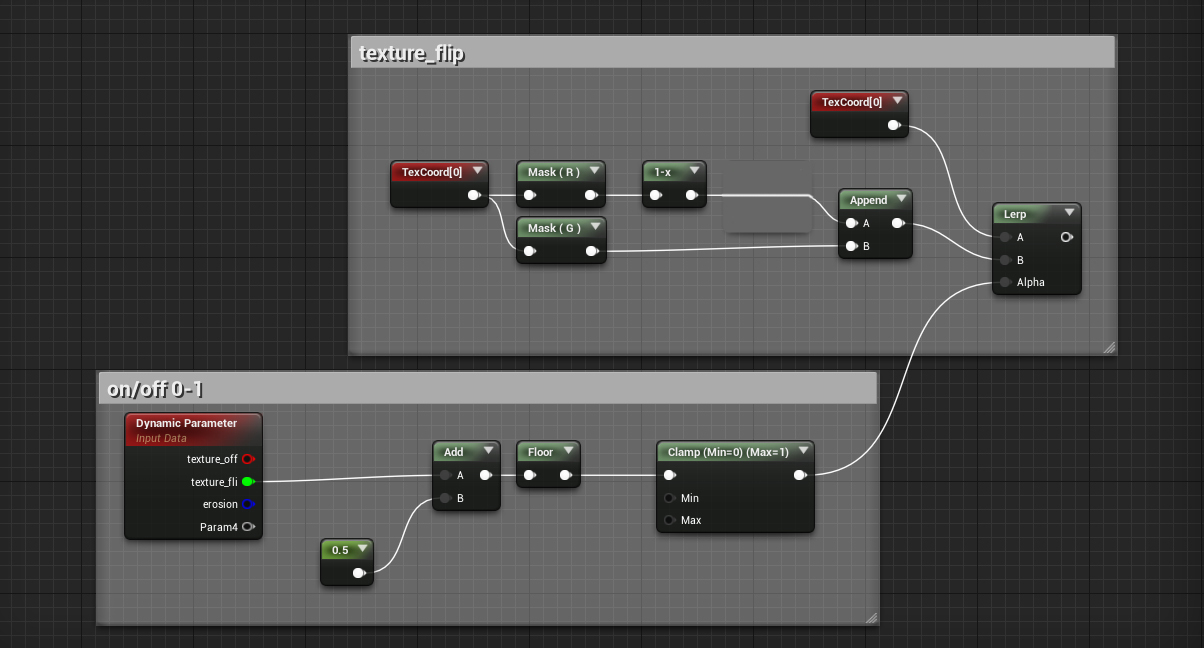
The next step is simple. We just need to create a texture coordinate and split it with the normal component mask method. Plug your channel of choice into a one minus node. This will flip that channel in the opposite direction. Next we simply need to stick both channels back together with an append node. Create a lerp and a default texture coordinate, then plug your inverted texture node and default texture node into its A and B slots. Plug the dynamic parameter switch setup into the alpha. Plug the output of the lerp into your texture sample and you should be ready to go on the material end!
If you plan to add distortion to your material network or any other interesting things. Try to do it AFTER the lerp shown above. I’ve found if I plug too much stuff into the network above before the lerp, the texture flip stops working and the particles with simply use the A result.
You can tweak the numbers in the texture coordinates to whatever you like.
Now for the particle setup
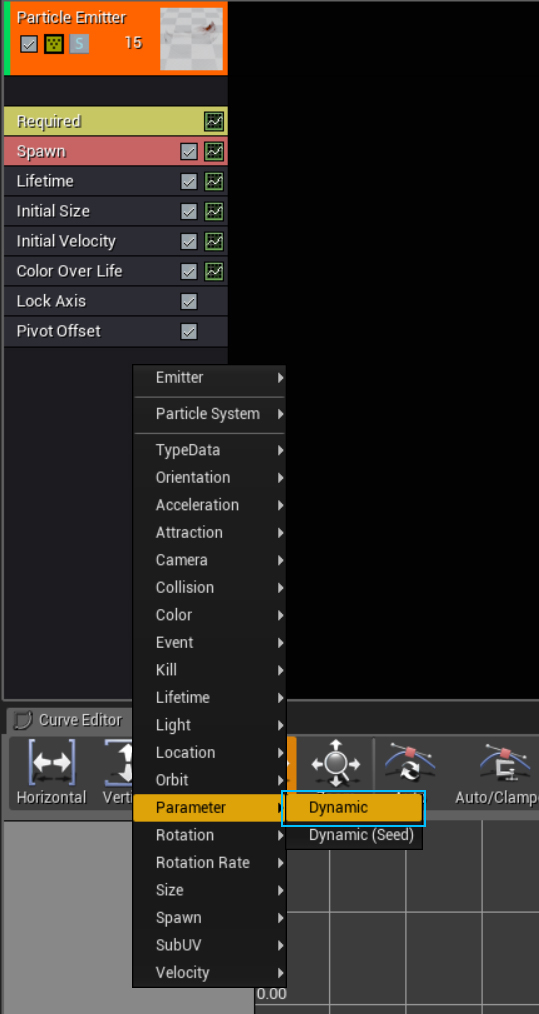
First create your particle emitter that you wish to have the flipped material on .Next we need to add a dynamic parameter to our particle system. To do that, right click on your particle emitter drop down. Navigate down to parameters and select Dynamic.
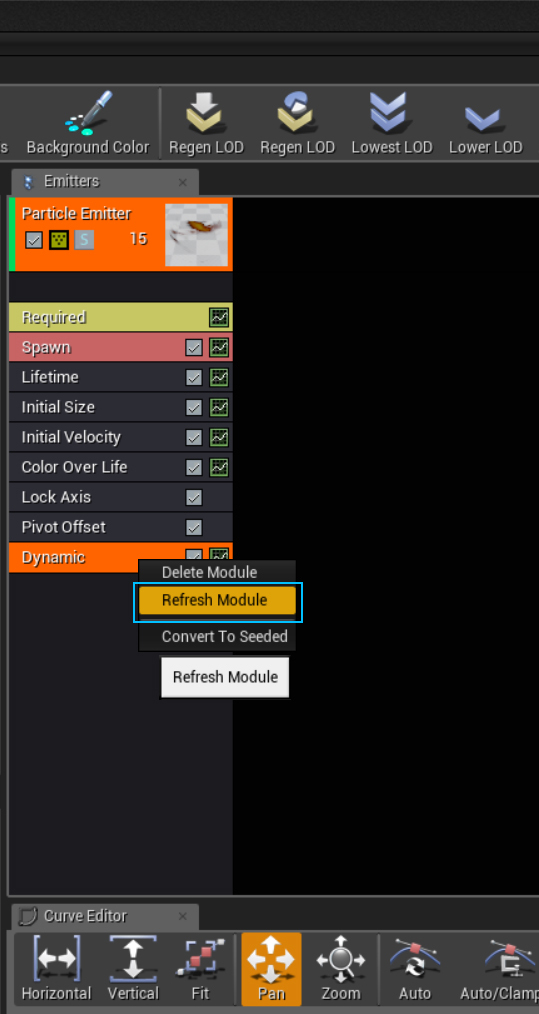
Next, right click on your newly added dynamic parameter and select refresh. This will update the dynamic parameter with the names you entered into your material dynamic parameter. In this instance, I named my green channel texture_flip
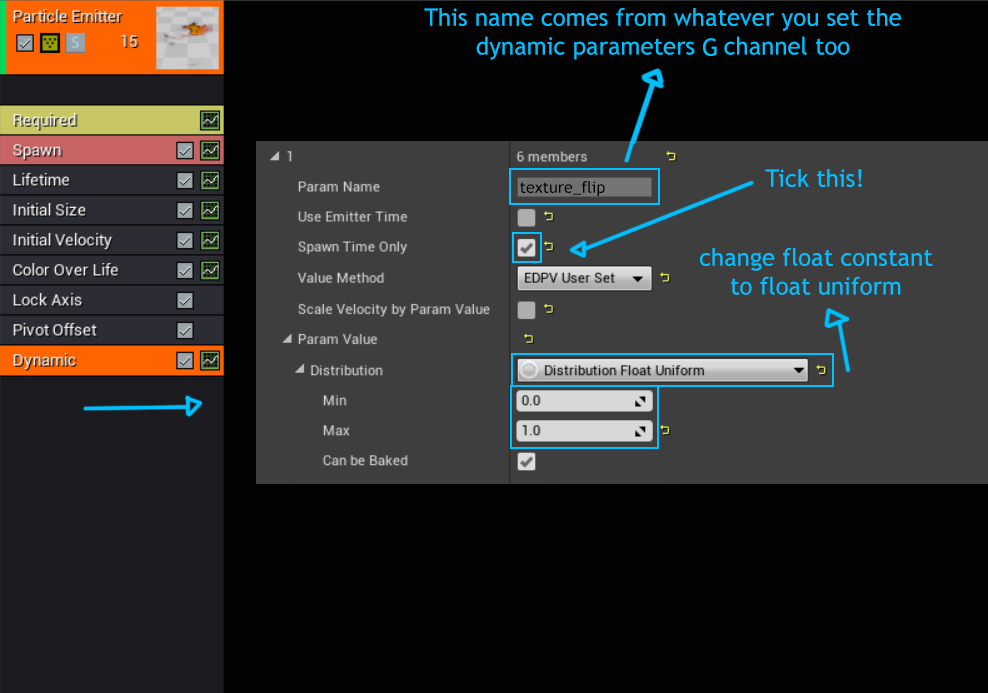
Next we need to look down to our dynamic parameters settings. Open up “1” under your dynamic parameters drop down list. “1” in the dynamic parameter is your Green channel. 0,2,3 Will be your red, blue and alpha channels respectively.
Under “1” you will see whatever name you set as your dynamic parameters red channel and a bunch of other settings. Tick spawn time only. This will make it so when a particle spawns, it will pick a random value from the parameter below. Once it has that value, it will not change over the course of its lifetime. If you fail to enable this option, you will notice your particles will be flashing like a disco.
Last we need to change our Float Constant under Param Value to a Float Uniform. Once changed to a Float Uniform, set the min to 0 and the max to 1. You should now have a texture that picks at random per particle if it flips horizontally or not. No more wonky one sided textures!
Hopefully this was some help
This is the new UV and mesh flip guide. As the old thread got a little bit muddy. I have compiled everyones techniques into this thread.
If anyone has an issue with this tutorial or thinks somthing they think sould be added. Please contact me through private message so I can update the tutorial.