I wanted to create a volumetric effect that uses transparency but ran into a common issue- the object doesn’t want to sort properly. It’s using a double-sided material in Shader Forge.
Currently my solution is using a flat billboard mesh with a custom camera facing script to fake things but it’s rather apparent that its a card when you see it intersect with the floor. I want to use a 3d mesh but it may not be feasible.
I’ve tried different methods such as splitting the mesh into 3 objects and with separate/same Order in Layer.
I’ve also tried splitting it into 3-4 separate parts/faces thinking that it’d render each face separately and sort it out based on depth. Unfortunately that caused striping/aliasing in the texture and the smoothing groups were broken.
I want the mesh to be double-sided and sort properly.
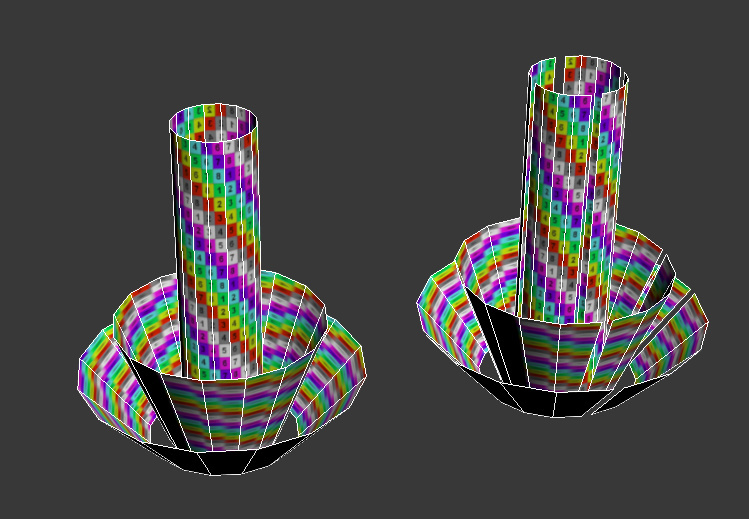
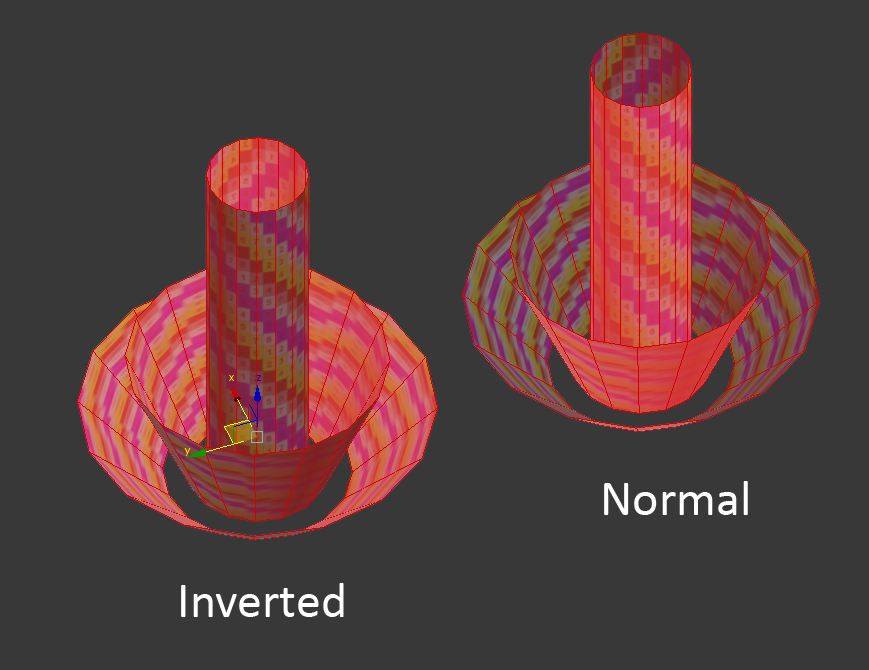
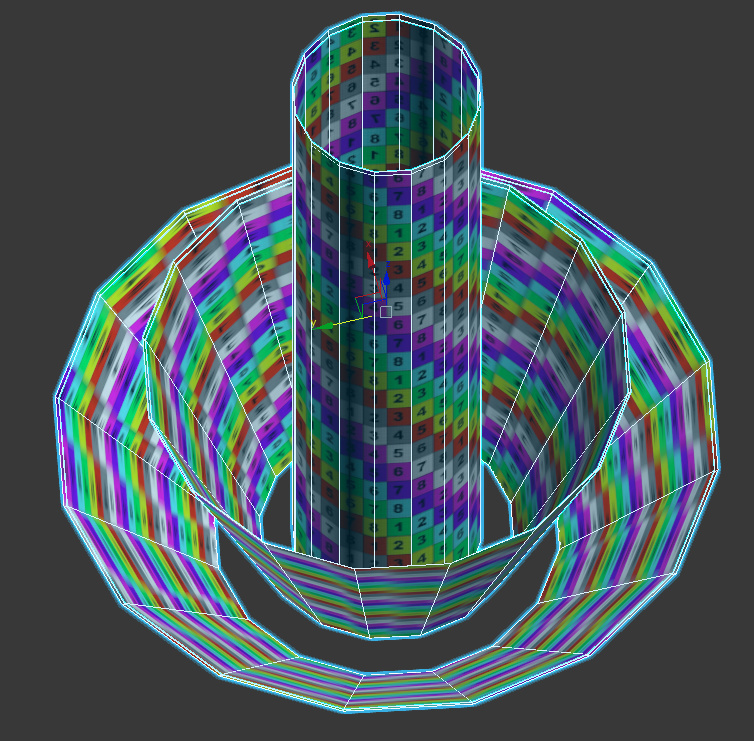
On the first image on the left is the mesh I use. On the right is the solution I tried (spaced apart for clarity).
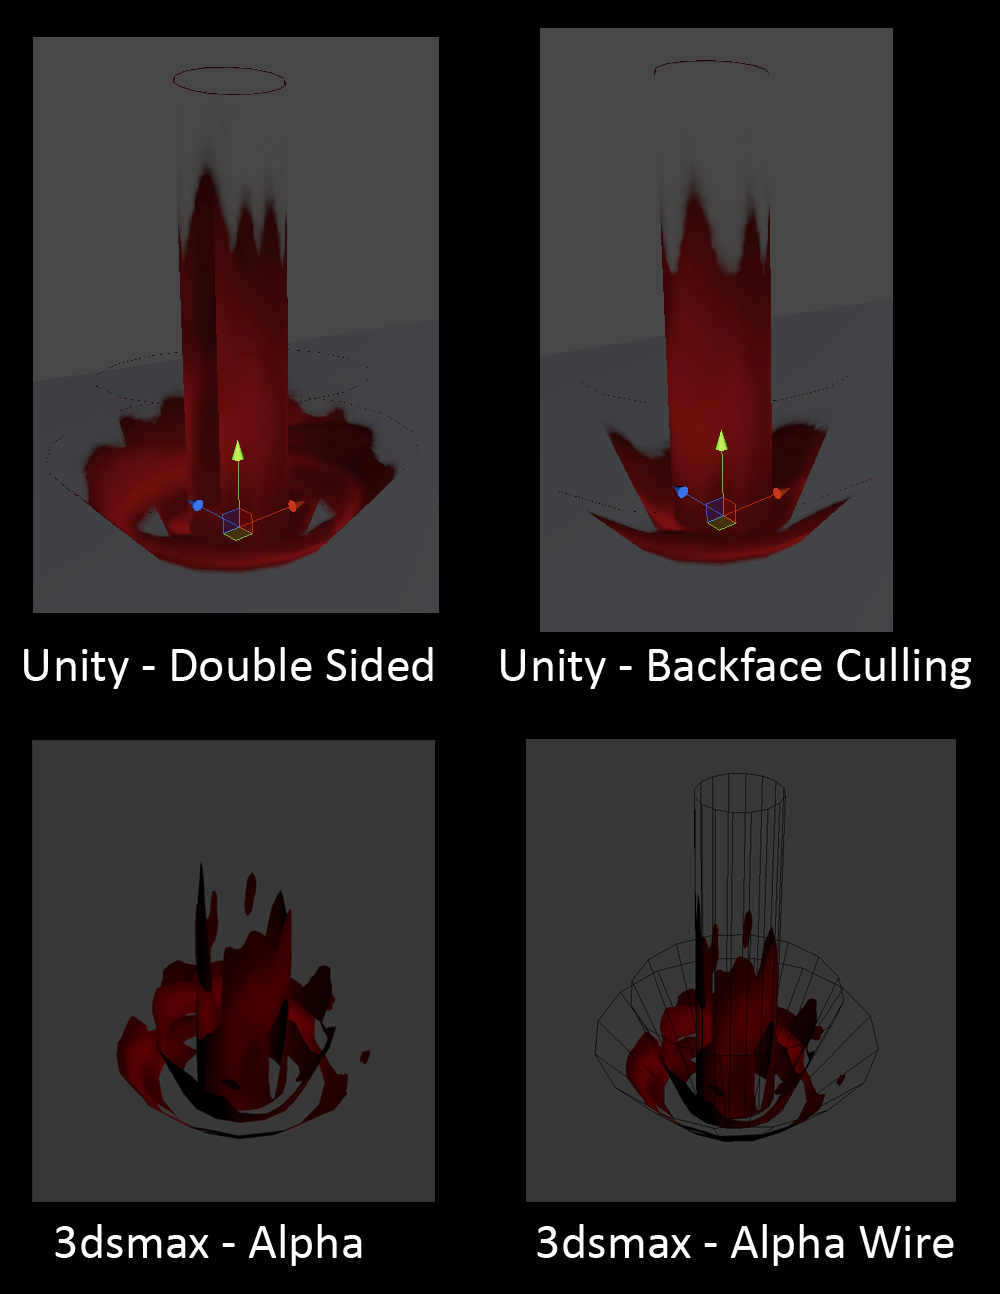
The second image below is the scene render in Unity and 3dsmax. Ideally, the result would match how 3dsmax does it. It shows both sides and is sorted properly. It’s a really irritating issue and I’m curious as to why it’s like this in general.
I heard something about forward vs deferred rendering although I don’t understand it that well or how to find a solution.
What are your solutions? How can I keep it cheap for a mobile application?
Transparency sorting is an unsolved problem for real time graphics. It’s not that there’s no way to do it, it’s just there are no solutions that are accurate and fast enough in all situations. What you’re looking for is Order Independent Transparency. There are several approximations out there that are being used on PC (and console), but none fast enough for mobile.
Transparent objects render sorted by depth per object (furthest rendered first, this is known as Painter’s Algorithm), then draw the triangles in the mesh in the order they’re stored in the mesh. It’s possible to sort the triangles in the mesh before rendering, but this is slow. It also doesn’t solve intersecting geometry. Most real time engines don’t bother with this, and to do it in Unity would require a custom script that built a new mesh every frame for every camera.
So then there are the hacks.
Alpha Test
Alpha test is opaque, and opaque stuff can be depth sorted! It also doesn’t look that great, but on mobile you can often get away with stippled alpha & alpha test because of the high pixel density. Multiple layers can be a problem in the stippled areas unless you use a 3d noise.
Alpha to Coverage
Like alpha test, alpha to coverage is also opaque, but takes advantage of MSAA samples to fake transparency. Can look a little nicer than alpha test alone, but has many of the same disadvantages of alpha test.
Two Pass / Z Write Pre-pass
Draw the mesh once with alpha test, but only to depth using ColorMask 0. Render again with alpha blend. Sorting in the areas that are opaque will be correct, elsewhere will still be wrong.
Pre-sorted Geometry
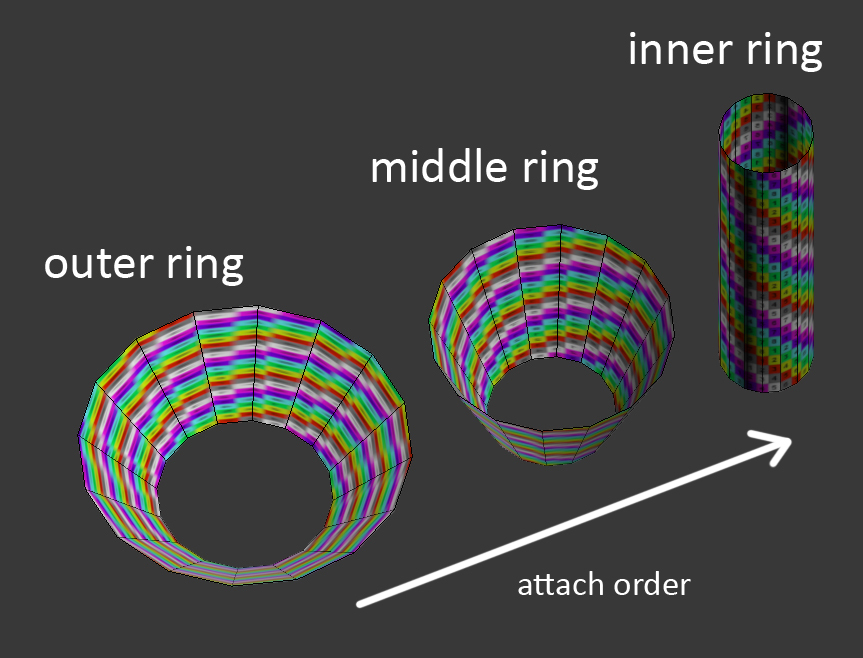
When you don’t have intersecting geometry, like your mesh here, you can pre-sort the triangles to render in the order best for your use case. For this particular situation, this is what I would suggest.
Unity doesn’t have any tools for this, and usually modelling tools hide the polygon order, but you can work around that by separating all of the parts and re-attaching them one by one in the order you want it to render. You’ll also want to switch to using a single sided material and doubling up the geometry so you can render the “interior” before the “exterior”.
So, separate the three cylinders into their own parts. Duplicate all three and flip the polys. Disable backface culling in Max so you can tell them apart. Then select the outer ring “interior” (the side facing up) and attach the rest in this order:
Outer cylinder interior (where you start)
Middle cylinder interior
Inner cylinder interior
Inner cylinder exterior
Middle cylinder exterior
Outer cylinder exterior
Re-export the mesh and apply the single sided transparent material and it should look correct and still be fast enough for mobile.
For anyone out there- here’s a visual of what I did.
Select the Outer ring, attach the middle ring then the Inner ring. Do this for each set (inverted and normal as seen below). There will be 6 objects in total.
The order after attaching each set is select Inverted Mesh and attach Normal Mesh. The Inverted is on the outside rim (I think mine might be backwards but it works! same logic).
@bgolus I do have one more question about this though-
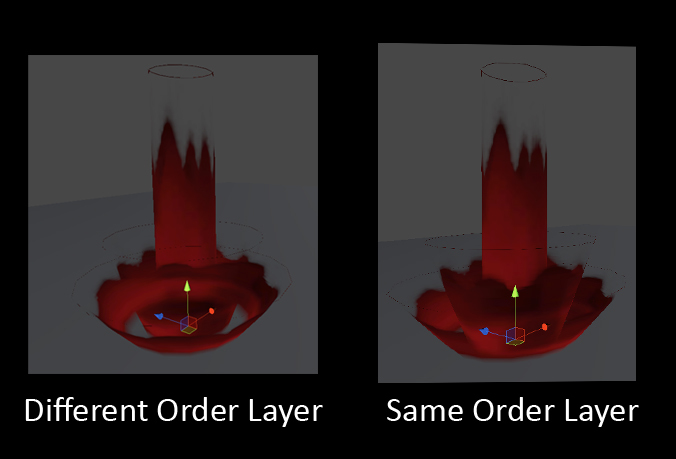
Say these splash meshes were all separate intentionally (for different timing). How would you get the sorting to work properly since their not attached?
This seems to be an issue if I were to have multiple objects using transparency and I wanted them to sort properly as well. This works great for a single object though.
The first example has one of the objects (inner ring) sorted to the back. The second one has them on the same layer and is sorta “sorting” it ( :l ). Although the front edge of the inner ring is showing through.
You would have to have all the parts separated into unique meshes, or at least using unique materials, with different render queues or sorting orders (accessible on all renderer components via script at runtime, though not exposed to the editor) to enforce their render order. This is messy. Using the material render queue or sorting order means it messes with how it sorts with other objects. You can do it, but I highly recommend against it.
My suggestion is, don’t do this. Keep them a single object.
I’m not saying don’t animate them separately, I’m just saying don’t break the parts up. Instead the solution here is to animate them via shader parameters. You could do this with an animator modifying material parameters directly or with custom data on a particle system.
@Torbach Ya that would seem to be one solution. I’ll have to see if we can get that to work. Below is just their visual example. Ideally, my texture is opaque where it isn’t black then dissolves out, so it isn’t necessarily “semi transparent”. The dissolve acts like an alpha clip (but softer and in opacity).
@bgolus Ah damn. I see, so it’d either be a bunch of meshes in one object animated separately (via bones/shader) or not at all (since sorting issues with opacity).
My question was related to having other types of meshes/effects playing on top that may also be volumetric. Or more specifically things that intersect since I use that alot.
An effect example would be a pillar of blood shooting up, and a ring of blood comes flying out around it. The ring tends to either render on top or bottom, not half way in front or behind the center object.
Performance caveat: beware alpha testing (clip and discard functions) on PVR GPUs. It is still a performance detriment on many mobile devices over alpha blending.
Yep. Alpha Test is significantly slower on mobile devices than on desktop. It is almost always going to be slower than using alpha blending or a mesh with a similar shaped edge, as long as it’s not too high poly.