So I was working on something similar a while ago:
What I did to get that cone shaped smoke you’re looking for is to emit smoke particles continuously for a very short period of time (.1 or .2 seconds) and as they emit, lower their initial velocity and initial size over time.
And to get a sort of random feeling wind, I’d add an acceleration module that randomly chooses between two accelerations, but keeping those accelerations pointed in the same general direction, for example if I want the wind to be blowing primarily in the +X direction, I’d have it randomize acceleration between values like (500,100,25) and (200,-100,0)
It looks like you used more than one particle system for the smoke. Like an overlap of big and small.
You said the emission time is very short. I set mine to .1 but kept the Lifetime 5-6 seconds. It fires out now but doesn’t scatter. I used varying Initial Velocity (-1000 to -12000) and it creates a line, but not a cone. I’m trying to use a sphere location module to scatter the smoke some.
You say “as they emit, lower their initial velocity/size over time”. What module allows the emission to lead with a larger shape and slowly emit smaller particles over time? It’s like a reverse size by life but at spawn time.
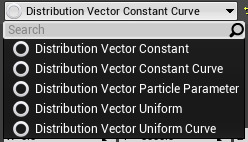
So in the Initial Size and Initial Velocity modules, you know how you’ve got the Distribution dropdown menu? That’s where you change it from being DistributionFloatConstant and DistributionFloatUniform in order to have random value distribution.
It also gives you a graph in the curve editor to fine-tune the tangents. DistributionFloatUniformCurve is similar, but it lets you randomly assign values over time between two curves.
By setting your particle’s Initial Size and Initial Velocity to constant curves, you can have the particles emit smaller and slower over a period of time.
Hmm! Now things appear to work. I swear this didn’t work before that’s why I’m baffled. Issues I had were probably tied to the particle emitter duration or something strange. It wasn’t registering “over life” values (0 - 1) within the modules before. Might’ve been wrong “curve”.
I’ll need to read into the Modules more since I don’t understand them. It looks like Constant is all values, whilst Uniform is between X and Y (if one wanted to differentiate each axis for whatever reason).
Here’s what I got with some scatter from the Sphere module. The acceleration kicks in later for the fake wind. The Size by life and Velocity is scaling to zero. I should probably adjust that to a smaller value rather than zero.
So I’d suggest scaling the Initial Size module rather than Size By Life, and also emitting particles for a much shorter period of time so you get more of a kick from the smoke. If you want more scatter to the particles try using the Velocity Cone module rather than a Sphere module. Velocity Cone would replace your Initial Velocity module. As it’s name implies, it lets you emit particles with their initial velocity randomly chosen from within a cone you define.
Also regarding the acceleration that kicks in after the smoke has settled, it looks fairly strange since it doesn’t really feel like it’s reacting to natural forces. More like a big wind machine turns on a few seconds after it fires and blows the smoke away. It’d probably look better to have a constant acceleration force on the smoke to simulate an ever present wind acting on it.
Alright. Thanks for the input! It’s helped clarify things better.
Turns out that style of smoke had to be scrapped (since its Artillery not Tank- I was misinformed).
Apparently the video (below) is the correct smoke spread, I just need to slow it down. It’s too bursty atm. I believe the idea is to have it push out and roll overtime.
Okay so I have this question. How can I get my “smoke ring” to spread out slowly over time? I want it to burst out at a certain speed but retain its long lifetime (5-6 seconds). It seems that the emitter doesn’t work with certain In values.
I’m trying to have the spread large, but emit slowly. I’m a little confused on how to achieve that.
Really love that ground dust that lifts up in the area around it. Something I see in lots of live videos, but practically never in a game. It lasts a tad long for the emission, but the shape, look and feel is good. I think it should be more a burst than a stream of smoke/dust
Okay, so the smoke looks proper and the emission can be reduced to probably 4-5 seconds? The lead wanted the smoke to linger for a while that’s why its got a long lifetime.
He was saying that the spread was too fast (as a burst). Are you saying that it’s fine? I did make a stream version, but it looked off.
I’d still like to achieve his vision but set aside this version (like I did with the artillery).
Do you know how to reduce the burst speed? It looks like the Cylinder Module acts as an Initial emitter rather than something that can scale over life. It only takes into account the first value (zero).
I think my question is “How can I scale up the velocity (cylinder) over its life?” Since that appears to be what dictates it’s outward movement. I need that to be slowed down.
Right at 1:15/16 I thought it looked good, but was spawning from the ground area a little longer than I’d personally like. It had a bit too much velocity on the Z too, or maybe the sprites are animated and they are a bit too tall. It felt more like steam than just dust kickup you’d see from a shockwave.
Shoot. It was supposed to look like a shockwave. It’s probably the color too, I made it dusty this time.
Yea, the sprites are animated. I lowered the spawn origin so it appears shorter. I can’t squish them though since their using a Initial Rotation/Rotation Rate module to randomize their appearance. It’d be better if the modules worked within the mesh’s texture imo, then PSA_Rectangle wouldn’t flip out (>_>)
You can see me lowering the origin point and the smoke becomes less visible.
Looks like the smoke starts low then stretches upwards/enlargens in the reference vid. The smoke isn’t a quick burst, its got some small delay to it. It kicks out a small distance then rolls.
Ah. I found the problem. Drag is what caused the Cylinder Module to be canceled out. Also lowered the constant acceleration drastically since that’d move the rolling smoke too soon.
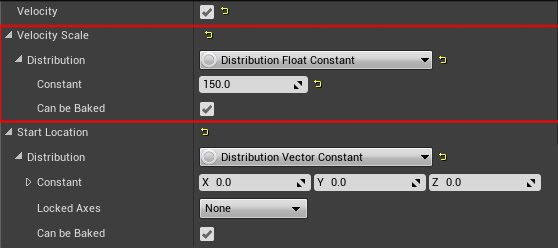
Not sure if it’d be possible to have it burst then slowly move outwards though. Like a sudden jolt then it rolls outwards The Velocity scale is what I believe would enable such a thing, but it doesn’t appear to accept more than one value (due to being float perhaps?).
Unless there’s another type of location module that allows a radial burst (scaled down over life) I don’t think it’s possible to get that result. There does appear to be a Drag/Scale Life but not a “Radial Velocity/Scale Life” kind of module.
I stand corrected again. Turns out you use Drag not Drag/Scale Life.
With the Cylinder Module’s Velocity Scale set to 20 and the Drag Module set to FloatConstantCurve with a value of (In: 0.0, Out: 0.0 and In: 1.0, Out: 75.0) you get a nice burst that slows down over its life. Man, that took alot of time to figure out haha.
Sometimes when it emits the radius will be larger, even though its fixed. It looks like Drag isn’t catching the Velocity. The numbers are fixed and only the Drag is scaling by life. Drag/Scale Life has no effect on GPU (I tested extreme values, no results).
As it emits, it ignores some of the velocity on spawn. The reason I’m using GPU is because there is a strange popping in/out with CPU when you have time gaps above 1 in the Lifetime. Particles will show up late in the overall lifetime and pop out of existence. It could be linked to the SubUV but I’m not entirely sure.
I’ve tried setting the value to 0.1 on it’s lifetime (0 to 1) but the Drag still manages to miss the Velocity even though its immediate. This is a problem because I want a fixed radius, not particles occasionally shooting out into space.
One thing to note: When resetting it within the Cascade Editor (Restart Level Button) it fires off correctly always. However when its emitting on its own there’s issues. I hope that having code fire it off acts like the editor rather than what it’s doing right now.
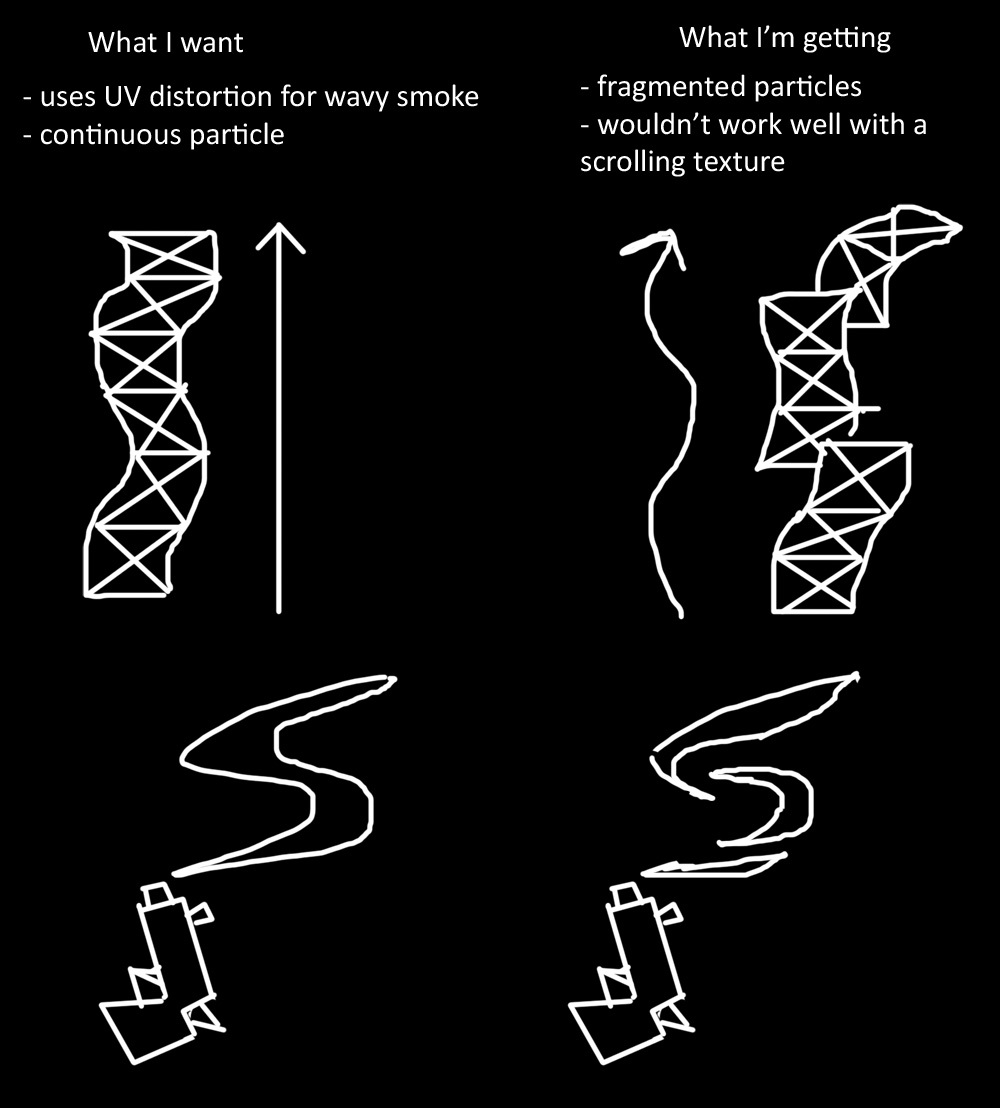
Hey Folks, how do you create gunsmoke as briefly seen at (5:40)? As in have a trail that moves around dynamically based on your direction. I know ribbon emitters are an option, but it doesn’t look as nice. It looks like a string with a gradient on it. Alternatively having it emit like a cone (world space) looks decent, but not as good as it could be.
It looks like it’d be a plane with a flipbook on it and it’d rotate based on direction. Is this something that would require code, or could Cascade do it on its own? What do you think?
Better yet- is it possible to have the Ribbon Emitter/Anim Trail act like a smoke trail? As in have it emit (to a certain height) then drag around based on movement. I see that it kind of works, but when it emits it’s in pieces. The trail’s don’t connect and break apart while their emitting.
It would be similar to Unity’s trails but it’d allow for velocity on the Z axis (so the smoke rises, instead of only stretching based on movement). Kind of like the Air Dancer below haha. The geometry is locked in place (at barrel and always facing camera) and the wind would be the players movement.
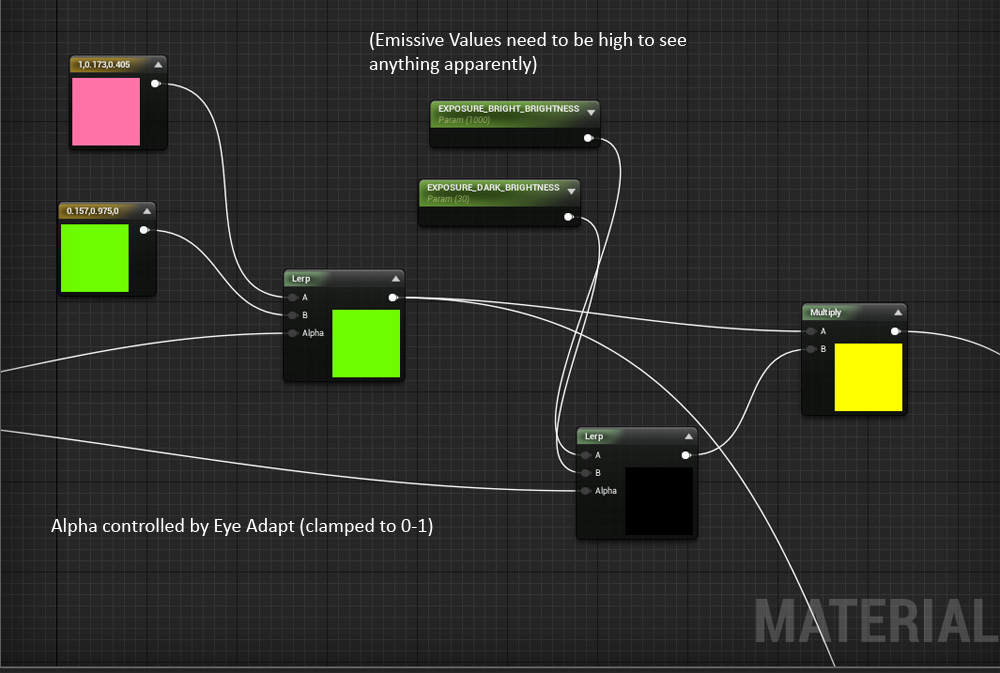
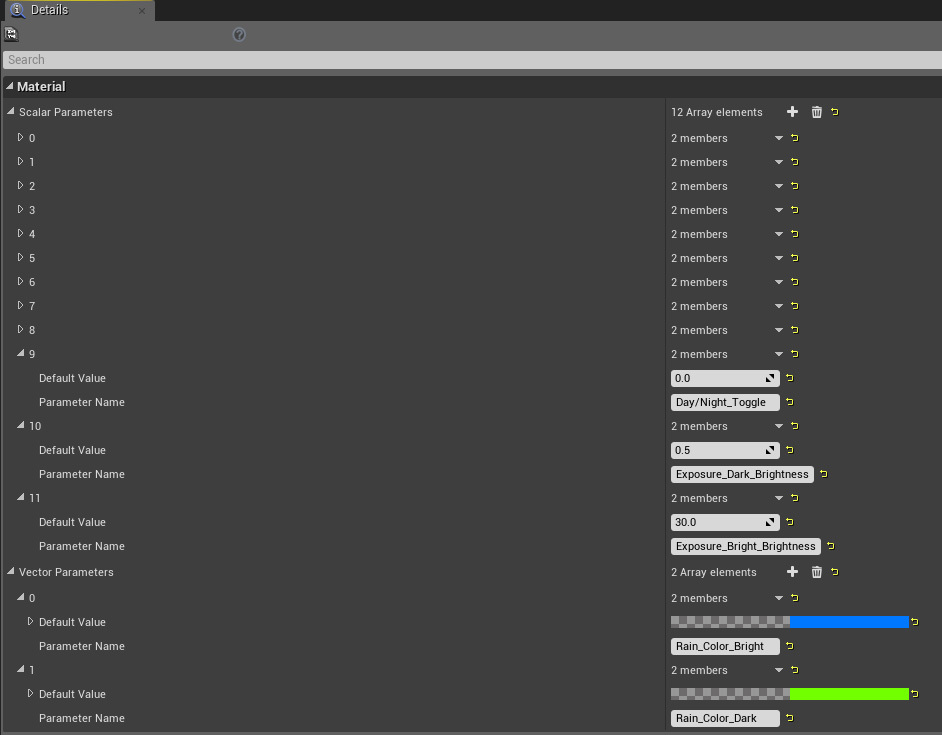
Also on a side note- I finally set up DebugScalarValues correctly. Here I’m trying out the settings to see what works the best. This was for the rain (since it’s harder to see on individual drops). The range is clamped from 0-1 and the Lerp is there for visual reference. I figured this would be the best way to make rain more visible without having to use blueprints/code. Combined with a ScalarParameter the entire thing can be turned off at night. Emissive problem solved.
Still- It’s kind of hard for me to tell whether or not the Lerp speed is matching the Auto Exposure. If I could get them to line up (mathematically) then it’ll blend correctly based on how soon the auto exposure changes. Perhaps even have some delay if the Auto Exposure is too sudden.
With Rain- Values are pretty high (around 300-1000) for the Emissive. The weird part is that if you multiply the color by a value then plug it into the lerp- it’ll always set the number to 1. But if you multiply the color AFTER (using two lerps) it’ll work correctly. Not sure what that is. Apparently using two lerp chains and a multiply works the best.
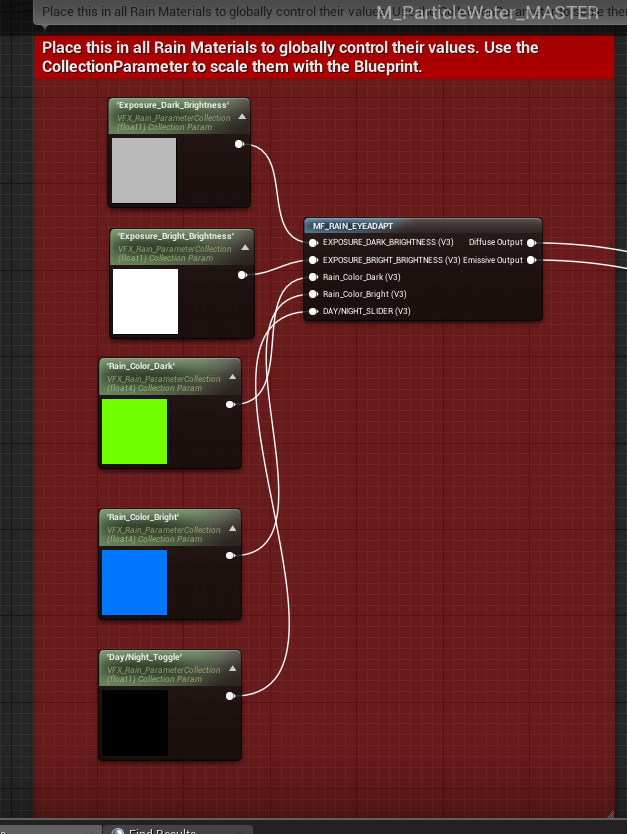
Welp, I feel like I’m getting pretty close to the solution. I’ve already created a Material Function in line with the Collection Parameter. I’ve got full control over the EyeAdaptation and things seem to be working well now.
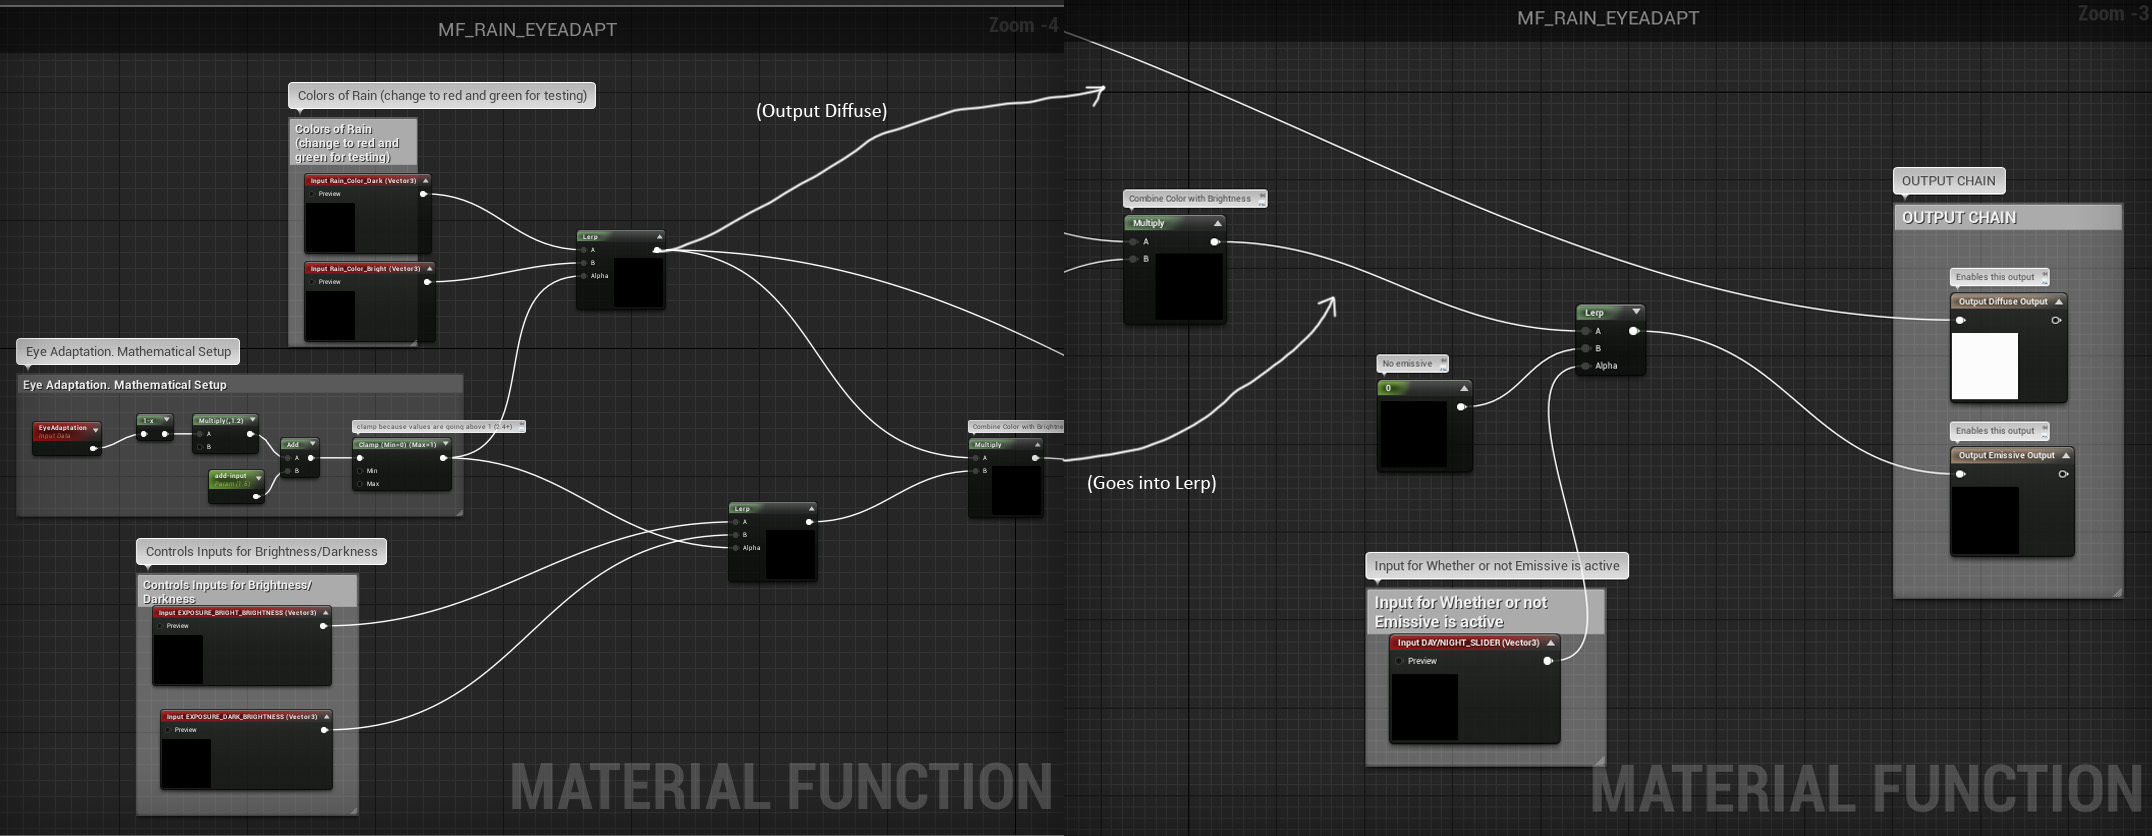
There’s a graph below for anyone who wants to see or try stuff out. The first image is within the material using Collection Parameters. The second is within the Material Function itself.
Day/Night Toggle is just a 0-1 value. It switches the entire system off during night. I probably should’ve created a second system with lower brightness values (for moonlight). That’s easily fixed.
Ok, so I’ve been fighting this for a while. I’ve been trying to get the “gun smoke” trail to work properly and I’m running into some glaring issues. I’m using Ribbon Trails for the smoke since it’s the smoothest.
It looks like spawn (and velocity) is tied to the Ribbon Data. Lower spawn = jittery trail, Higher spawn = Smooth but scrunched/overlapped geometry. I want to see the ribbon trail, but have it smoothed out when moving around. You can see the texture in the beginning of the video, it looks right but its jittery because of a low spawn count. Then as I head to smooth it out, problems begin to arise with spacing.
Increasing velocity does fix the spacing, but then it looks weird because its rushing upwards (smoke is slow and wispy).
The velocity is 100. It’s like I’m almost there but I’m missing crucial details to get it to work right.
So I did some gunsmoke in UE4 a while ago, these were the ribbon typedata settings I had:
Tangent Recalculation Every Frame will give you much smoother results, though I’m not sure what the performance cost is.
I had my smoke emitting at 10 particles per second, but having their alpha fade in when they spawn so the beam doesn’t jump every time a new particle spawns.
I feel like there’s some material parameter you need to set to get the texture to actually scroll along with the particles as they spawn, but I can’t remember it at the moment, sorry :S
The thing about ribbons is that you don’t want them to get too bunched up, so try to get your particles to spread out more. The system you’ve got in your video could probably have more vertical speed to help keep them from clumping together as they spawn.
If you want your texture to properly loop and scroll across the ribbon, you need to add a TexCoord node to your material and set the Coordinate index to 1.


 Blind (Let's Play) Part 12 \"Birthday Trap Solved\"")