Sorry for the delay @Beardilocks, got focused on work and my response was put on the backburner.
So in addition to related particles playing on the character(s), if you want something playing on the body without setting up the effects in the character’s material, you could spawn chunks of geo onto sockets of the character, with those chunks using the 1-x Depth Fade method you mentioned in an additive material. You would have these placed inside the character’s geo. I did this for some R&D for a healing item in Remnant (I think it actually made it into the game…). With this method, you could just have a suite of particle systems for your status effects including the extra layer stuff like smoke or sparks, with no need to control any materials or their parameters through BP.

Some caveats with this method would be needing more extensive BP setup or code support if you have different characters with unique skeletons, as they may have different bone names. This is why I always use sockets for all my work, since any skeleton can have a “VFX_Head” socket name. You may also run into issues if you have characters with significant size differences, then you may need different sized meshes for them, or some kind of solution within the material, like WPO to scale the geo up or down a bit.
Another method is having your status stuff built in to your character master material, with switches for each different status, and then having material instances with those features turned on. You could just swap out your main mat instance for whichever status one you need, and then swap back to keep your base instruction cost low. I did this in Darksiders for when an enemy would die. We’d swap to a “dissolve” version of the material and erode it out while playing particles with it before the enemy was removed from the game. The downsides of this is obviously you would need each new character to have these instances made exclusively for it, and the more status effects, the more instances you’d need to make and set up. (Vimeo’s the worst, click to 1:19 for the example)

Since you can’t toggle material switches on the fly, as was previously mentioned, you could potentially have everything built into your character master shader. To swap between things though, you’d probably have a bunch of Lerps instead of switches, and then just toggle a given status lerp’s alpha input param between 0 and 1. This would mean every character is always carrying those additional texture sample lookups and instructions around with it, and there’s nothing preventing the material from accidentally having more than one status lerp parameter set to 1.
My last suggestion, and something I’m currently using for a few fun things is @Bruno 's option B. I wish I could share my exact setup and screenshots, but my basic flow is have a separate Blueprint Actor you can spawn. In that actor you have an empty Skeletal Mesh component to target. You’ll cast to your character, get its skeletal mesh and use “Set Skeletal Mesh” with your empty as the Target. The key node to set after setting your skeletal mesh is “Set Master Pose Component”. That node will basically mirror all the bone movements from the character you cast to onto your new BP actor mesh. From there you can set your material on to that mesh, and you’ll most likely want that as an additive material. This allows you to basically spawn a clone mesh on top of your chosen character. While your overdraw will most likely be very minimal, you’re doubling the number of animated skeletal meshes, bones and all, that are playing and updating at once. Additionally, there are all the issues Bruno mentioned, so I don’t know how this would react to things like cloth, physics, ragdoll, etc.
Below I added some screenshots and a video of a wip material I threw together as a demonstration. It’s not perfect, but it’s based on screen space UVs and uses the geo’s normals for a fresnel that bends the texture around the mesh a bit so it doesn’t look flat. This could be used over a character without needing any special UVs set up, so you could apply this to almost any cloned character mesh as is. It falls apart a bit at extreme angles, like looking straight down, but it gives a decent result from average viewing positions. All you need is a noise texture of your choice and a color LUT or Lerp.
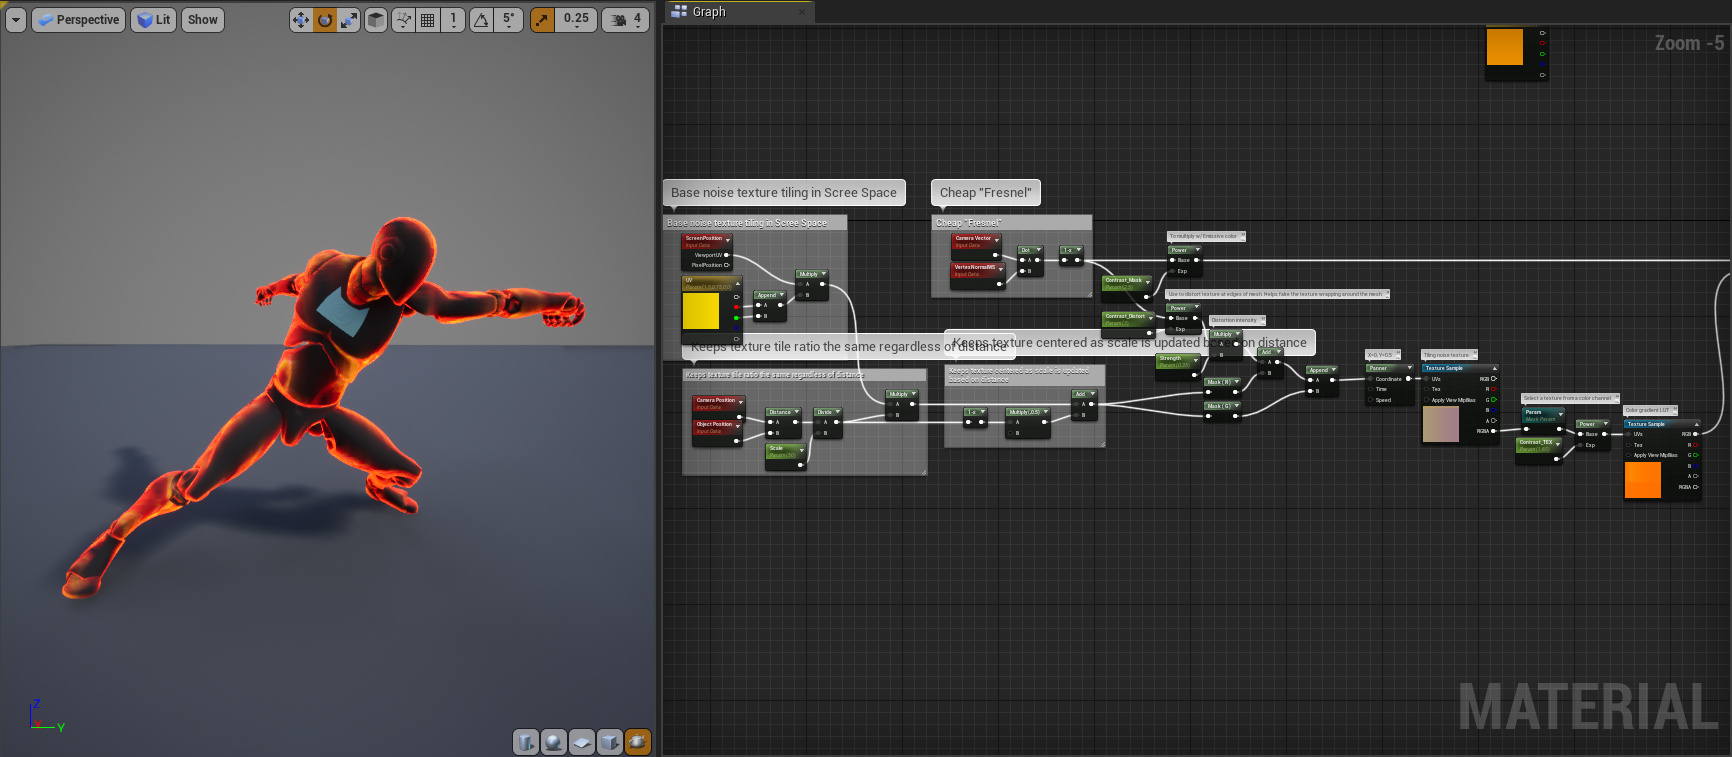
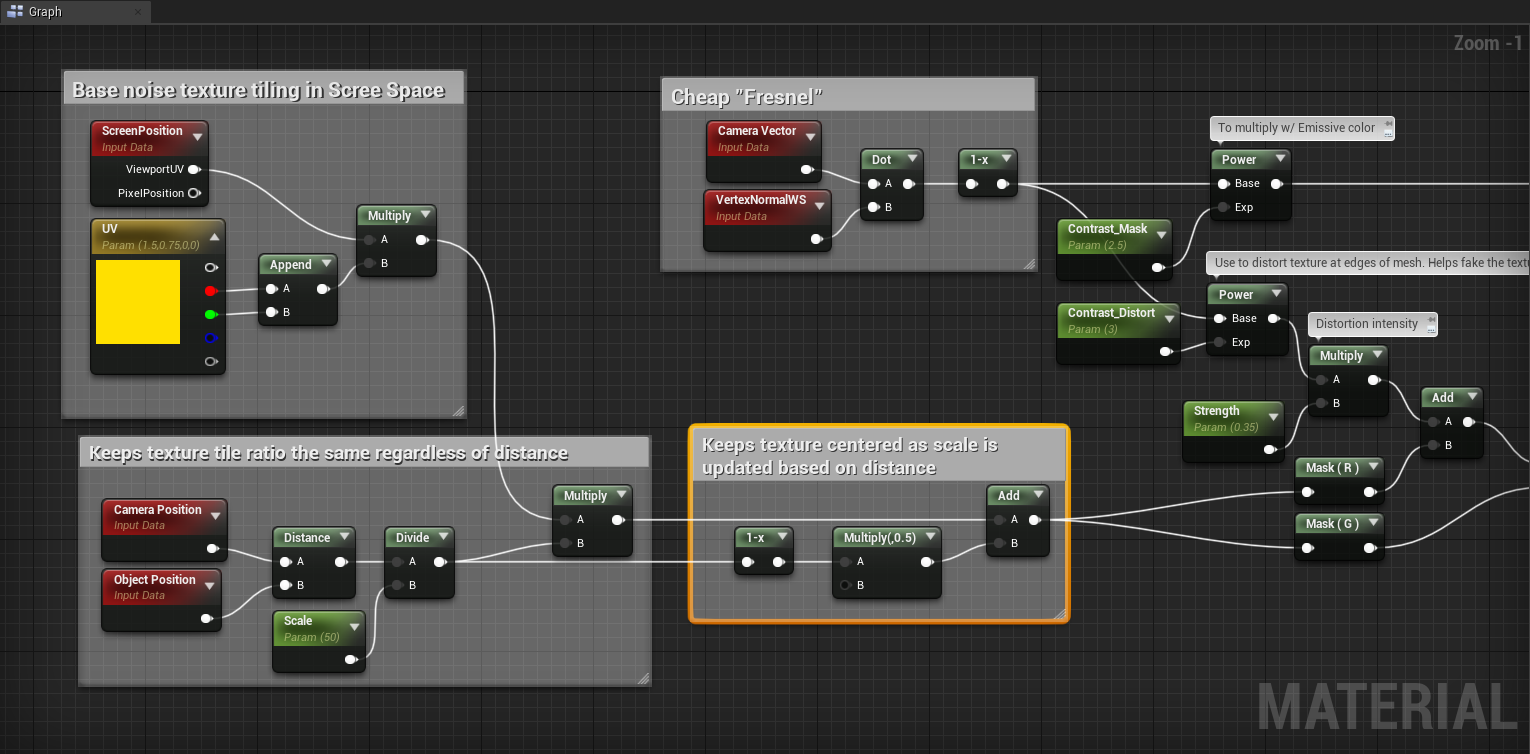

I have this playing on an Opaque/Lit material just to give a better feel of how it looks on a textured and lit character, but this would most likely be an Additive or Translucent Unlit material you’d play on top of something.
