Material setup for characters that require lots of status effects as part of the shader. Material Layers?

Hi VFXperts,

I’m working on a project where we would like to have a lot of different material effects for statuses built into our master character shader. For example burning, poison, frozen, empowered, etc, appearing as panning textures or fresnels overlaid on top of our existing character textures.

Our intention is to set these up as Material functions and then only turn on the sections we need as we use them.

My question is about how to set this up whilst trying to be as optimised as possible. Obviously we could just make a giant master shader with all the effects at once and lerp in these when needed, but making a material that included all of these possibilities would get super expensive.

In previous projects I’ve worked on we’ve just duplicated the whole character mesh and applied a separate material to it, or swapped out the basic character material for a different one with the required nodes as different statuses happen, but both of these have drawbacks and I’m wondering what the best approach is for this in Unreal at present. It’d be awesome if there was some way to dynamically swap in material functions at run time, only turning on the ones we need.

We tried setting up our material instances with switch parameters that toggle on our effect nodes, but these can’t be triggered at run time, so we only see the effect if we toggle it on before launching the game, in which case it always adds its instruction count.

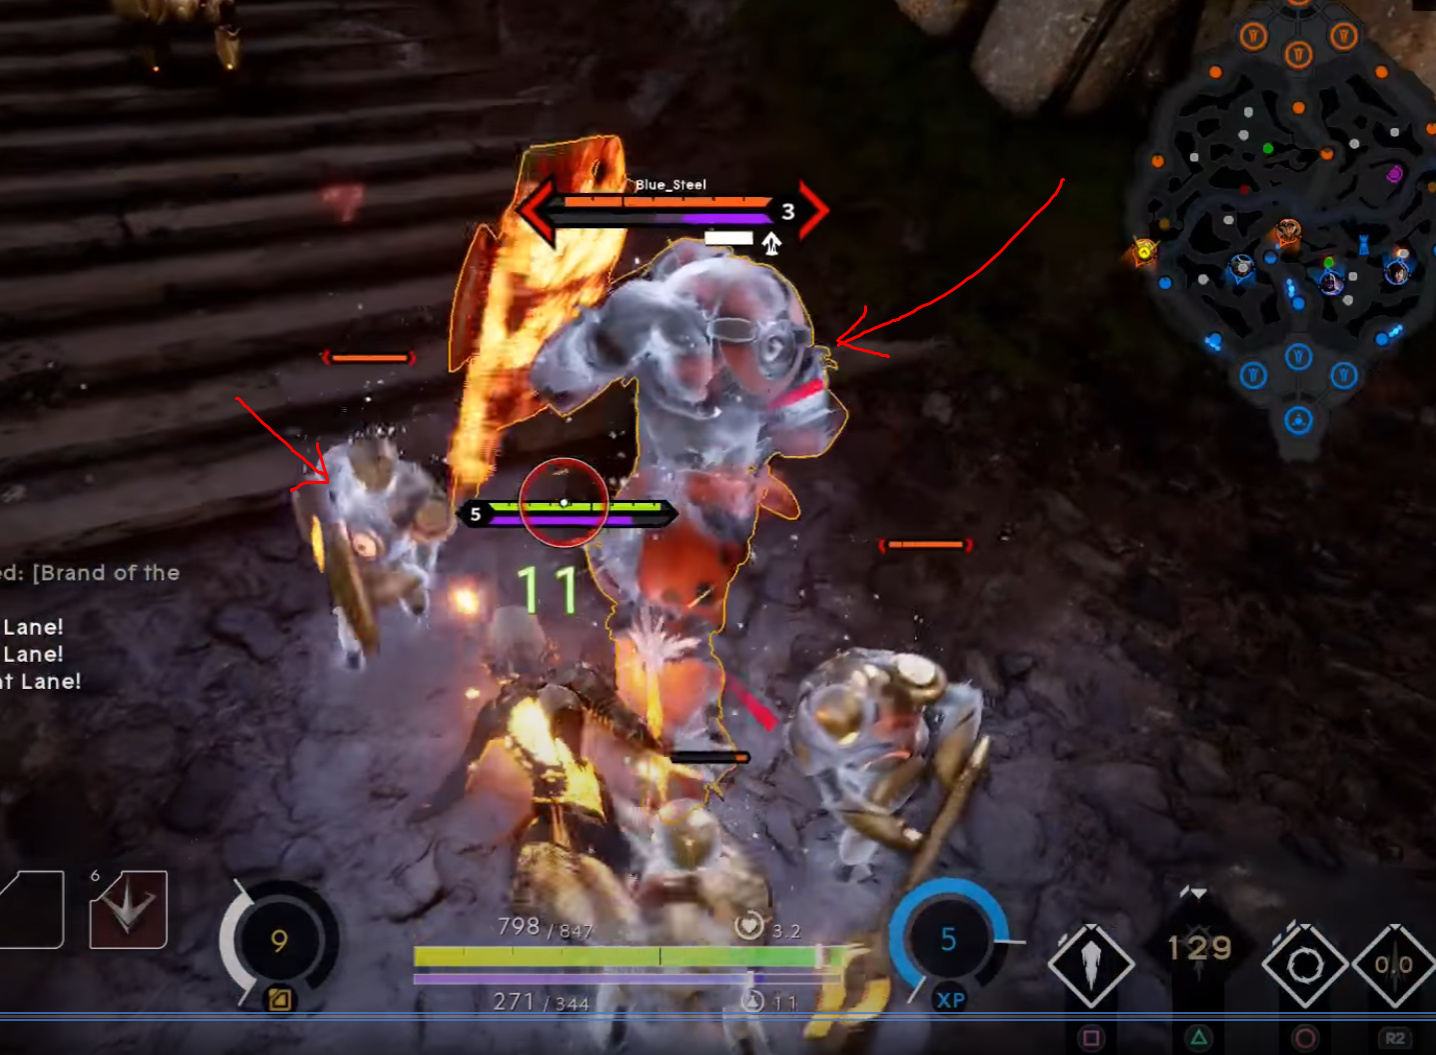
I was trying to see how Epic did their material effects on Paragon by looking through their free assets on the Unreal marketplace. An example is this frozen effect that the frost lady (Aurora) causes on other characters:

From what I can see by looking at their character material, they’re using a material function called MF_CharacterEffects.

When i looked into this function there are a few things that are always on (death fade and hit flash), but other than that it doesn’t seem to do much.

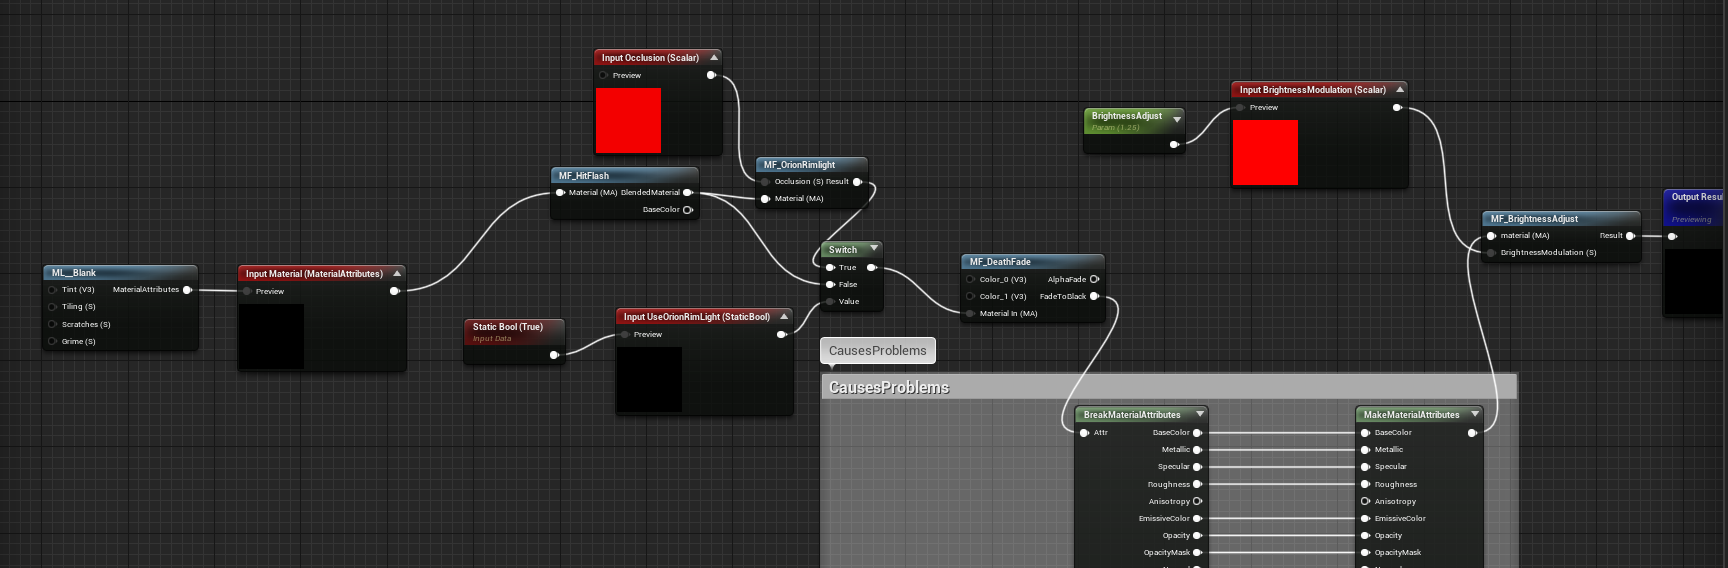
It does reference this Material Function called ML__Blank in a folder called Material Layers though.

Since this doesn’t do anything, I was wondering if in fact this is something they override at run time to generate all their effects? I can’t see any blueprints or anything that reference this sadly.

I dived into reading about Material Layers (not to be confused with Layered Materials), but that mostly seems to be used more for masking many materials on one character/prop/environment, and not for VFX.

Does anyone have any experience using Material Layers for dynamically turning on and off material effects for characters? What is the best approach when you potentially have a lot of different, costly effects you’d like to apply to your characters?

Thanks in advance.

3 Likes

As far as I can tell, you don’t really want to do too much special. Most of these effects are simple math that gets added into just one or two of the material outputs.(usu. emissive)
The non-special case tends to be less expensive than any attempt to build special cases.

Any form of switch or precompile action adds complexity that the shader program and/or gpu cannot optimise in.

Some other things of note:

  • shared samplers for textures
  • probably don’t want too much texture samples either
  • avoid loops and complex conditionals like the pest
  • If you can set the entire result to 0 somehow, theres a reasonable chance modern gpu will detect that and try to skip the processing
  • Unreal is capable of collapsing instructions down that do not require per pixel values, so you can group these values before adding per pixel values. For example Time*5+8 can be calculated for the entire shader and passed in.

Ah, as for changing parameters
UMaterialInstanceDynamic::Set[Vector/Scalar]ParameterValue

5 Likes

Hey!

This isn’t exactly the same problem, but some techniques mentioned in this video about handling something similar (different status effects on enemies):

1 Like

How many status effects are we talking about? Or do you need a solution for an open ended number of them?

I haven’t tried this technique outside of stencils/outlines, but would creating a particle faked post process/overlay for each status effect, and then just spawning that particle over a given character be an option?

1 Like

Material Layers are essentially just an editor construct – if you look at the resultant shader, everything is just collapsed into one ginormous, procedurally-generated chunk of HLSL. (There might be some more details, but that’s basically what’s happening…)

If you wanted to take the “giant master shader” approach, Material Layers are a pretty good way to organize it; but functionally, it would do the same thing – each layer would have an opacity parameter, and you’d lerp between them at runtime.

I’d try that approach vs. swapping materials and measure the performance. Even if you could use static switches, that would require a runtime compile, which is generally not controllable timing wise (it finishes when it finishes).

Interested to hear the results if you do some tests!

Thanks for your responses everyone.

Material Layers are essentially just an editor construct – if you look at the resultant shader, everything is just collapsed into one ginormous, procedurally-generated chunk of HLSL.

After doing more research yesterday I realised that Material Layers weren’t really what we were looking for. Like you say they’re for simplifying multiple materials on an object rather than dynamically switching between different materials or parameters.

After chatting with an engineer yesterday we saw that though you can set scalar and vector parameters in blueprint you can’t change any switches, for the reason your described, as it would have to recompile.

This is super awesome, this is kind of exactly what I was looking for! Figuring out how to organise what could potentially be hundreds of different materials for characters is kind of the root of our issue.

I think our plan is to an uber shader with a bunch of common functionality (fresnel, panning texture etc), then use this CopyMaterialInstanceParameters to copy the look of materials we set up as “templates” to avoid having to set multiple parameters manually, just like they did in Fortnite. We’ll also possibly look into profiling to see whether the performance cost of swapping material instances regularly outweighs the increased complexity of having all the nodes existing in our shaders all the time.

This is super interesting. Do you know any examples you can refer to that might list more details on what does and doesn’t do this? Any idea if mobile GPUs would do the same?

2 Likes

Cool! Keep us posted and let me know what you ended up with!

1 Like

Do you need it to be entirely material based? I’ve set up status effect stuff in Unreal before, and may or may not be doing something similar right now for what I’m working on. You can DM me, or I can do my best to lay out my experience and setup in this thread.

So I would probably use particles in addition to material effects for those examples listed above (burning, poison, frozen, empowered, etc). Like adding some smoke particles, embers or wisps in addition, just as a nice extra layer.

Mostly for the material effects I want to see a fresnel on some or all of the character, and/or a panning texture on some/all of the character.

I did do some experiments using 1-x of Depth Fade and some particles attached to the character to basically mask out some particles based on where the buffed character was. However that would also then show if the creature was next to any other geometry, such as a wall or other character. It also generally needed quite a few particles so added a lot of overdraw.

I’d love to hear what your approach was for this kind of thing? Any context is super helpful :slight_smile:

I’ve worked on projects that included all the shader math in the base character shader, and projects that would spawn a replica of the skeletal mesh with a different shader applied.

Hard to tell what’s the best approach for your project specifically, but I personally would choose approach B since that’d allow you to go a bit crazier with the character effects, and since you won’t be messing with the base character shader, you won’t be invalidating and recompiling dozens of thousands of shaders all the time as you work on it. Approach A can also be really limiting, especially if the system was designed by someone else and you’re not supposed to be messing with it.

With method B I remember having issues with jiggle bones not being fully consistent between the two skeletal meshes, so some clipping occurred. I just did my best to mitigate the issue since fixing it was beyond my reach. So this is worth investigating - if all your characters have ponytails and capes, this might be a deal breaker. No idea what caused the problem though :expressionless:

2 Likes

Sorry for the delay @Beardilocks, got focused on work and my response was put on the backburner.

So in addition to related particles playing on the character(s), if you want something playing on the body without setting up the effects in the character’s material, you could spawn chunks of geo onto sockets of the character, with those chunks using the 1-x Depth Fade method you mentioned in an additive material. You would have these placed inside the character’s geo. I did this for some R&D for a healing item in Remnant (I think it actually made it into the game…). With this method, you could just have a suite of particle systems for your status effects including the extra layer stuff like smoke or sparks, with no need to control any materials or their parameters through BP.

Some caveats with this method would be needing more extensive BP setup or code support if you have different characters with unique skeletons, as they may have different bone names. This is why I always use sockets for all my work, since any skeleton can have a “VFX_Head” socket name. You may also run into issues if you have characters with significant size differences, then you may need different sized meshes for them, or some kind of solution within the material, like WPO to scale the geo up or down a bit.

Another method is having your status stuff built in to your character master material, with switches for each different status, and then having material instances with those features turned on. You could just swap out your main mat instance for whichever status one you need, and then swap back to keep your base instruction cost low. I did this in Darksiders for when an enemy would die. We’d swap to a “dissolve” version of the material and erode it out while playing particles with it before the enemy was removed from the game. The downsides of this is obviously you would need each new character to have these instances made exclusively for it, and the more status effects, the more instances you’d need to make and set up. (Vimeo’s the worst, click to 1:19 for the example)

Since you can’t toggle material switches on the fly, as was previously mentioned, you could potentially have everything built into your character master shader. To swap between things though, you’d probably have a bunch of Lerps instead of switches, and then just toggle a given status lerp’s alpha input param between 0 and 1. This would mean every character is always carrying those additional texture sample lookups and instructions around with it, and there’s nothing preventing the material from accidentally having more than one status lerp parameter set to 1.

My last suggestion, and something I’m currently using for a few fun things is @Bruno 's option B. I wish I could share my exact setup and screenshots, but my basic flow is have a separate Blueprint Actor you can spawn. In that actor you have an empty Skeletal Mesh component to target. You’ll cast to your character, get its skeletal mesh and use “Set Skeletal Mesh” with your empty as the Target. The key node to set after setting your skeletal mesh is “Set Master Pose Component”. That node will basically mirror all the bone movements from the character you cast to onto your new BP actor mesh. From there you can set your material on to that mesh, and you’ll most likely want that as an additive material. This allows you to basically spawn a clone mesh on top of your chosen character. While your overdraw will most likely be very minimal, you’re doubling the number of animated skeletal meshes, bones and all, that are playing and updating at once. Additionally, there are all the issues Bruno mentioned, so I don’t know how this would react to things like cloth, physics, ragdoll, etc.

Below I added some screenshots and a video of a wip material I threw together as a demonstration. It’s not perfect, but it’s based on screen space UVs and uses the geo’s normals for a fresnel that bends the texture around the mesh a bit so it doesn’t look flat. This could be used over a character without needing any special UVs set up, so you could apply this to almost any cloned character mesh as is. It falls apart a bit at extreme angles, like looking straight down, but it gives a decent result from average viewing positions. All you need is a noise texture of your choice and a color LUT or Lerp.


I have this playing on an Opaque/Lit material just to give a better feel of how it looks on a textured and lit character, but this would most likely be an Additive or Translucent Unlit material you’d play on top of something.

8 Likes

Maybe you could also use decals in some way?

Thank you, I’m facing an identical problem in a game i’m working where I needed to setup the materials for a death fade and hit flash effect, my difficulty being that the emissive channel was already taken (the characters themselves are already emissive). Math is tough :slight_smile:

What I’ve done so far is to keep the hit flash and death fade in my master material and do material swaps for burning/freeze or anything that is a bit more in depth.
This thread was pretty enlightening for me, thank you.

1 Like

If you have a coder at hand, the best/most performant solution would be, to switch out materials entirely on the fly, copying over some of the common character parameters needed like textures etc.
This way you don’t convolute materials and only ever switch when needed. If you need multiple status effects at the same time, it becomes more complicated.
You could also render a shellmesh on top of the existing mesh onto which you apply your status effects, that’s a lot of effort to setup though and most likely more expensive in the long run.
I assume you are looking for something similar to this:?

https://www.artstation.com/artwork/W2kZKE

4 Likes

This video is incredible, thank you for posting this. Will help me improve many of my effects.

1 Like

Wow, thanks so much for your super detailed response Travis! Sorry for my delay in responding.

For our game the shapes of the characters/creatures are going to be quite varied (sorry I can’t really be more specific), so we’re looking for a system that can

Wow that works really well for that character. I think this is a great approach when making a buff that applies to only one character. I will keep this in mind in the future as an approach.

This was basically the approach we used most of the time when working on League (we called them Avatar meshes).Their tools were very streamlined for spawning these as you could just spawn them directly from the particle editor, which was great. It would just duplicate their whole character mesh though. It sounds to me like this is another great approach similar to your earlier work for remnant. Thanks for explaining how to do this in Unreal. While we’re a little concerned about draw calls and overall bone counts for our current project, we may need to use this for the odd edge case, so this is really helpful!

I think we’re going to do this as well. Primarily because we’re aiming at a few different platforms, and dissolve materials require the material to be masked or translucent and we don’t want all our characters to have the addition cost of being in that mode all the time. I just want to avoid having too many different material instances for every single character. Using that CopyMaterialInstanceParameters for the majority of global buffs/debuffs is going to be a really helpful way to reduce the amount of unique instances we need for each creature.

1 Like

I’m new to vfx and would like to apply the VFX procedurally at runtime on any static or skeletal mesh with blendshapes, animations, etc.

Would a viable approach be to create a clone of the sk mesh, paint its vertices, don’t add original materials because the cloned mesh was painted, and then add a single master material containing the functions for freeze, fade, fire, etc?

For example, if I have a sk mesh with multiple material slots, blendshapes, sk mesh clothing, static mesh accessories, and animations being applied.

I could clone the complex character by:

  1. creating a procedural sk mesh based on the original skeleton and vertices
  2. paint the the cloned mesh so it looks like the original
  3. create a single empty material slot on the cloned mesh
  4. copy desired blendshapes to the cloned mesh to use later
  5. apply animations to the clone mesh at any time in the future

Would that work or is there a better approach?

My goal is to be able to use any skeletal or static asset imported at runtime without having to do any setup work.

I don’t know if you’re using Unreal or not, nor have I tested this at scale. but the main winning point for me was to avoid any recompiling of master shaders and character shaders. Which from experience can be up to 50K compiled in certain cases on large AAA projects.

UE5.1 just released a new Material Overlay


This is quite flexible, as you can just create a separate material with all it’s functionality and parameters, moreover, you can make any instance and just slap it onto any mesh, static or skeletal.

A few drawbacks are that it’s translucent materials only, which for materials that require Normals and blending like Ice or Turning something into rock isn’t ideal I know. Finally, you can only have up to one overlay material assigned at a time, which could also limit you in many ways.

However it’s non-destructive and you can easily slap one on top at runtime, with a simple blueprint call, without needing any recompilation and you have access to buffers that are only available with translucent materials.

My two cents is that overlay materials could potentially allow you to offload a lot of SM/SKM effects that are emissive and require translucency.

5 Likes

I saw something on gdc maybe this is what you want but change materials dynamically is much eazy way.

1 Like