M0okA - VFX Sketchbook

Love the theme on this one! I would suggest adding a little speckle of flame upward? right now it could work as a UI flame outline but not in 3d space yet IMO.

1 Like

Thank you! That’s great that you mentioned a UI outline usecase, those two effects actually designed to fit with an item viewer UI screen. That’s why I wanted to make such a “static fire” with no upward velocity. Now that you say so, I agree with you that some more physically based dynamic (like fire going upward with heat) would be appreciated with this fire hole one!
I’m not finished with this yet, so thank you for the feedback! :slight_smile:

1 Like

Hi VFX people! :slight_smile:

To begin with, I recently changed this topic title to “VFX Sketchbook”. I honestly don’t know when I will have the opportunity to work on my Elemental Crystal project again, so I asked myself: instead of making a new topic to show some of my work, why not simply rename this one and make it my own personal sketchbook? :wink:

Today, I want to share with you an “art test” I was asked to make lately for a job offer. I was asked to make a realistic fuel explosion inside UE4 in 28h. It was the very first time I got involved with an explosion effect, therefore I had to learn while working on it. I chose to use Houdini for smoke simulation and Substance Designer for VFX texturing as additional softwares. At last, it took me 26h (3 days) to achieve the following effect.

https://youtu.be/cX_eu5FsQnA
https://youtu.be/hih-P8ZdE64
https://youtu.be/vRy22w3zJdY
I want to thank @Partikel for his Houdini’s pyro simulation to flipbook tutorial on Pluralsight, hope to make good use of this knowledge in the future! :pray:

As usual, feel free to share your thoughts about this, feedbacks are more than welcome!
See you soon I hope! :slight_smile:

4 Likes

Hi everyone, long time no see. Was pretty busy lately, but found the perfect opportunity to get back on track with VFX making in my free time. And this opportunity is called “Swordtember” ! :crossed_swords:
The idea is to follow a chosen prompt list and make some “Sword aura VFX” each day until the end of September.
The purpose ISN’T to stress myself with deadlines, therefore I’ll try to stay in the race but if I have to take more than one month to complete this, I will do so :wink:

Above, the prompt list I will be following for this challenge, starting today with “Shadow” prompt.
I saw this topic as a perfect opportunity to get back on fluid simulation with FluidNinjaVFX. :sparkles:

I also had to set up all the UE4 project and made some dedicated spawning blueprint to work faster with later effects. (will make some dedicated post later to present my workflow :wink:)
The sword mesh is clearly nothing more than a placeholder for now, it will be rework slowly during September to have some clean render of all effects at the end of the month. :innocent:

See you later for the following prompts, and may the VFX be with you guys! :smile:

3 Likes

Hi everyone,
It’s Day 2 of Swordtember today with “Light” as prompt. :sunny:
I tried to play a bit with high color values, perlin noise, and some glitter effect to create some “sparkly rainbow light energy” kind of stuff. :sparkles: :rainbow:
I wanted this one to be directly related to the shadow prompt, therefore I’ve kept the same elements than for the shadow yesterday (kind of flare inside the guard + FluidNinja fluid sim for the blade effect).

Feel free to give your thoughts about those sword effects, and see you soon for next prompts! :smile:

2 Likes

Hi everyone,
Day 3 of Swordtember! Today’s prompt was “Insect” :mosquito:
I felt it was the perfect time to work a bit on the blade lit shader. It took some time, but I now have a pretty customizable material that I can use later on with any wanted lit surface for the blade. Below, a quick overview of the shader work done over the night: the shader is using combined textures to apply colors / normal / roughness / ect, mainly by using lerp, smooth step and some basic math to control mask intensity / contrast / max.

For the VFX part, I wanted the blade to have this sticky / slimy feeling, quite like honey would be but far less attractive and more toxic alike, to justify the insect being here and flying around the blade. Still using FluidNinjaVFX for the spritesheet making, getting slowly used to it and want to try more specific stuff with it already!

And here’s the result so far! See you soon for the next prompt! :smiley:

Hi everyone,
Day 4 of Swordtember with “Ghost” as prompt :ghost:
Took some time to improve blade and spirtesheet shader a bit, and made new Niagara emitter for specific behavior I will be using later. But for the most of my time today, I’ve just made some test in FluidNinja to understand more how to use it for various usages.

For the ghost part, I’ve mainly tried to work on colors and timing. Trying to link the shader behavior on the blade to the spritesheet behavior of the aura around it. Love this one, will definitively come back on it later :wink:
See you soon for next prompts! :slight_smile:

2 Likes

Hi everyone,
Day 5 of Swordtember with “Lava” as prompt :volcano:
Didn’t have much time today, I had to make something very quick and I’m not very satisfied with the result. But the base is here fore some improvement later, here is the result so far:

Thanks for watching, feel free to say your thoughts about this sketchbook, and see you soon for the next prompt. :slight_smile:

Hi everyone,
Day 6 of Swordtember with “Snow” as prompt :snowflake:
For this one, I wanted to play with the sword mesh shader a bit and try to use some parallax occlusion mapping to get some kind of ice feeling. Didn’t had much time to spend on the fluid simulation though and it could be improved by much with more time.

Above, the result so far for today’s prompt.

Also made a quick record of the attempt of a frozen handle from closer :point_up_2:
Thanks for reading, and see you soon for next prompt! :slight_smile:

Hi everyone,
Day 7 of Swordtember with “Storm” as prompt :cloud_with_lightning_and_rain:
Tried to quickly make some lighting flipbook texture for this one and applied it to various meshes.

This one mark the end of this first swordy week! I made a little line up of all the swords made so far. Considering I’ve to work all day before I can participate in this challenge, making one effect per day was indeed exausting. Therefore I’ll take some quick break and see after if I’m up to continue this challenge until the end. Still, was fun to do this first week either way ! :slight_smile:

Feel free to comment, give some feedbakc, and thanks you so much for reading. :sparkles:

6 Likes

Hi everyone,

It’s been a while since my last post here, so here I am to change that ! :wink:
I didn’t really take time to work on any personal VFX project lately, so I’m afraid I don’t have anything visually shiny to share today.

I’ve been working a lot with Niagara inside Unreal, and the one thing that stroke me as a major strengh is how much customizable it can be at any level with the related module / dynamic input / function script. With that said, some of the engine provided Niagara module script looked like they could use some little upgrade, starting with some basic location modules.

Sphere Location module :
The first one I’ve modified is the cylinder location module. In the default module graph, the “hemisphere picking” feature is happening before the “sphere rotation” feature.


Therefore, when you chose some given hemisphere picking and rotate the sphere orientation, the “side” of the sphere picked by the hemisphere will rotate with it since it’s happening first in the maths. That could be a wanted thing depending on specific usages, but it seemed very limitated to me when I had to use it.
image
First things first, I’ve changed the order of execution of those two features, so now the sphere will rotate first and then pick a sphere side to spawn upon. For the side picking, I’ve chose to get rid of the simplier hemisphere picking, and replaced it with some sphere normal constraint comparison. The sphere will now compare the sphere normal to a user provided axis using cross product, and then will apply a threshold on that result to obtain the particle spawn location.
All of this above allow me : 1. to have some controll over sphere rotation without it having any influence on the world axis contraint / 2. to controll the axis constraint at runtime in a smooth way using dynamic values for axis direction and threshold (for runtime wind behavior for example, that would make possible to make the particle spawn from the side of the sphere that match wind axis).
Below, I’ve just made some simple debug blueprint. The red square foward vector will be the axis constraint, the green square foward vector will be the sphere orientation. (Think of it like the red one being the wind direction, and the green one being the actor rotation for non-uniform shapes)

Static Mesh Location module :
Default static mesh location module is featuring some axis constraint similar to the one I’ve added to the cylinder location. While working on some weapon aura effects, I’ve noticed that the axis constraint was taking place in the same coordinate space than the emitter itself. This meant that if you wanted some world space emitter that would leave some particle behind as the actor mooves, the axis contraint will change as the actor rotate and moove in the world.

My idea here was to let the user choose between world and local space for the axis constraint, and do the “does it need to be inverted from emitter space ?” trick inside the script.


Doing so, I’m now able to have this axis contraint and the emitter working together in different coordinate space. It allowed me to use new behaviors that wasn’t available before :

  1. Emitter = local + Constraint = local : particle stay around the actor when it moove, particles are spawning on the same side of the mesh no matter what.
  2. Emitter = world + Constraint = world : particle stay behind in the world as the actor moove, particles spawning side on the mesh is relative to actor rotation.
  3. (new) Emitter = local + Constraint = world : particle stay around the actor when it moove, particles spawning side on the mesh is relative to actor rotation.
  4. (new) Emitter = world + Contraint = local : particle stay behind in the world as the actor moove, particles are spawning on the same side of the mesh no matter what.
    (see example in video below)

Those new behavior really helped me while working on some weapon/item aura VFX composed with all of those coordinate space combinaison.
The n°3 for example was a really good way to handle smoke spawning on some object. I didn’t want my smoke sprite to stay behind if the player move, I prefered it to “stick” to the object, so local space was needed for the emitter. But I did want the smoke to always spawn on the side of the mesh that was pointing up, so I needed the axis constraint to be world space.
the n°4 was a really good way to spawn sparks on a given side of a mesh (think about some one sided sword, and you would like the spark to only spawn on the cutting edge of the blade), that would need the axis constraint to be local. But I did want those sparks to be world space and stay around with some curl noise as the player was mooving around.

In addition to this axis contraint improvements, I wanted my mesh location module to have more controll on how particles was spawning.
First thing first I’ve added is some “vertex color constraint” that would allow the user to choose a given color channel (R/G/B/A) from the mesh vertex color (that is sampled already by the sample static mesh module). This can be usefull when other ways (like material or axis contraints) are not working for a specific usage.
Then my second idea was to add a “local position threshold constraint”. This one part will let the user choose a given axis, and then allow particle to spawn only if their position value on this axis is above (or below if inverted) than the user provided value. I’ve also added some random range to this threshold, allowing me to create some kind of gradient with particles spawning instead of having particle spawning above a “straight line”. For now, I’ve made this position threshold happening in the mesh space only, because I didn’t want the spawning to change if the player crouched while spawning above a given Z value in world space emitter for example.

Making my first steps in module/input scripts for Niagara really made me realise how powerfull this tool is for being as customizable as possible. Don’t feel limited by the default modules and emitter, just adapt and create whatever feature you need ! :slight_smile:
I hope this little breakdown has been interesting to you guys, I’d like to find time to make more of those breakdown in the future. :roll_eyes:
As usual, feel free to share your thoughts about what you just red and to ask questions if you have some! :wink:

Thanks for the read, see you soon, and may the VFX be with you as always! :sparkles:

4 Likes

Hi everyone, :slight_smile:

Lately, I’ve been trying to learn how to use render target feature in Unreal. It appeared to me it was a pretty basic knowledge to have as VFX artists, and I was lacking it until now. The purpose was only to grasp what this feature is capable of but I had a lot of fun on the way! Let’s start! :slight_smile:

The Topographic map painter: :world_map:
To begin with, I’ve look to the Blueprint_RenderToTarget map in the ContentExample project. I found the heightfield painter was a really interesting and fun example to study, therefore I tried to replicate it “with a twist” to both understand it and try to create something a bit more visually interesting.
The result is some kind of island topograpic map painter at runtime:

I added some “on mouse click release” brush randomiser within the drawn to target material. The idea is pretty simple, when mouse left click is pressed the “brush” material will be drawn to target, adding a radial shape multiplied with some crossed noise textures. When the mouse click is released, the drawing to target end and the random offset for both noise textures is reset, resulting in some different brush stroke at each click:

A simple camera and related TV screen: :tv:
With a better understanding of render target basics and how to draw material to them at runtime, I wanted to get a first intuition about scene capture at runtime and how to use it in the more simple way.
It resulted in some kind of surveillance camera that will display the result on some giant screen.

The blueprint part of it was pretty simple, but I had some fun trying to make a “real” screen shader. The idea is to begin by pixelating render target UVs coordinate with some basic maths. Then, I tried to separate each channels of the resulting pixel and offset it just a bit to have those 3 RGB line that create the pixel color code.

Still, for now it’s just playing around with basics maths for fun, but it was a good training to make it react procedurally to the input pixel amount or other variables.
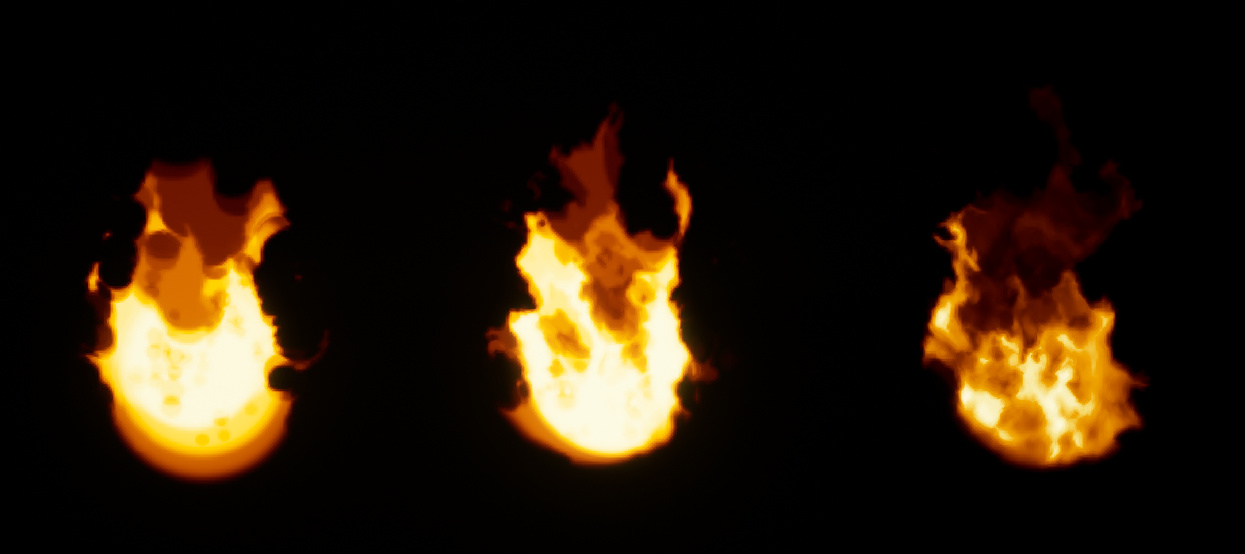
The Flame flipbook recorder: :fire:
This part get closer to what I was looking for in the first place : how does FluidNinjaVFX (the flipbook baker, not Live) works very basically ? While trying to answer this question, I found the wonderful sketch done by @simonschreibt almost a year ago. This one was more than very helpful to get more into render target and scene capture usages, make sure to check his awesome work. (Thanks Simon ! :sparkling_heart:)

To start the all thing, I chose a very similar structure to the one use by Simon’s blueprint for flipbook capture, but with a few twists :wink:
The first thing I did is trying to recreate the same logic, but with a few basic changes for a more procedural result (like changing canvas and/or frames resolution at runtime, or being able to restart the flipbook capture with a single key press). I also added some debug print in the output log with detailed for each event of the graph (resulting in all those line you can see appears on the viewport left side while capturing), this was a very good thing to do to be able to really dive in “what’s actually really happening ?” when I had some difficulties about making some part work correctly.

After I had the base working as intented, I wanted to add a new layer to the actual overall workflow. In a few words, for now the scene capture is actually writting what it sees inside a render target “A”, and then draw A at a specific location of another render target “B” to create the flipbook current frame. My idea was to begin with same thing (writte scene capture inside A), then use A as texture input inside a shader that will distort and erode it and writte the result inside a render target “C”, finally draw C at a specific location of B to create the current frame.

This process was really fun to investigate, and I’m really surprised by the final results, that ends being very satisfying with a minimum time effort spent on tweaking materials values and Niagara simulation as inputs. I’d love to spent more time playing with this one, and I hope to find time or opportunity to come back to it later!

Even if it was nearly scratching the surface, those little studies to discover render target feature really helped me to have better intuition about how does a 2D fluid simulation tool can work. :thinking:

I hope you enjoy reading this little learning report, and I hope to make more of those in the future ! Feel free to ask any question you could have or for additional details! :slight_smile:
Thanks for reading, be well and may the VFX be with you guys! :sparkles:

6 Likes

looks awesome! <3 such a fun technique to make flipbooks!

1 Like

And now in UE5 we have the Flipbook Baker to make all this even easier!

Yeah, saw it come out the same week I was finishing this aha! But still, for now, I don’t know how much controll the NiagaraBaker give to the user (I plan to dive into it a bit later), and if doing this kind of thing is now possible directly inside Niagara : adding a distortion layer to the capture before recording it in flipbook for example.

2 Likes

Hi everyone! :slight_smile:

This week-end, I’ve been starting to work on some basic mesh dissolve shader over the night. The idea is to make the shader as flexible as possible to be able to use it in different cases later with some Niagara effect.

It’s still very wip at the moment, but it already was a good way to get back to shader creation in Unreal! I have a lot of ideas to improve it from this point, but I’m pretty happy with how it cames out for this first session. :slight_smile:

I’m also really enjoying to use the new UE5 named reroute feature! It makes things so much flexier for later modifications, and so much easier to read from a global point of view.


I plan to make a full breakdown step by step later when I’ll have more work done, just wanted to share the first night results! :wink:

Thanks for reading / watching, and see you soon for next steps! :sparkles:

3 Likes

Hello everyone! :slight_smile:

It’s been a while since last time I found time to share some knowledge inhere. I’ve been trying a lot of things out on Unreal lately, and I want to start sharing the knowledges I’ve acquired during this time. That’s why I poster my very first Twitter VFX thread today, and plan to do more when I’ll get time to do so!
I’ll just drop a direct link to this thread, feel free to check it out and give your comments if you have some below the thread or directly here as you prefer.

Thanks for reading, and may the VFX be with you as always! :sparkles:

1 Like

Hi everyone, :slightly_smiling_face:

Today is the day, I’ve made my first post on Artstation regarding a shipped game I worked on as professional VFX artist. This means the world to me, like a kid’s dream becoming true ! :sparkles:

image

https://www.artstation.com/artwork/Ry3b3D

I still have a lot to showcase regarding my work on The Outer Worlds: Spacer’s Choice Edition, and I’ll try to make other posts for the other features I’ve worked on soon.
In the meantime, feel free to look at this post about ranged weapon’s muzzleflash effects for this game. And feel free to comment, give your opinion, ask some questions, I would be very happy to share some knowledge if I’m asked to ! :innocent:

Thanks for reading, and may the VFX be with you all! :fire:

2 Likes

Congratulations! Glad your hard work has paid off.

1 Like

Hi everyone, :slight_smile:

Finally found time and motivation to showcase more of my work on The Outer Worlds: Spacer’s Choice Edition ! This time, I chose to showcase explosive traps :firecracker:, melee weapon modifiers :crossed_swords:, and explosive distance weapons :gun: VFXs that I was tasked to rework.

https://www.artstation.com/artwork/zPO8DZ :firecracker:
https://www.artstation.com/artwork/ZaGNew :crossed_swords:
https://www.artstation.com/artwork/aok96J :gun:
https://www.artstation.com/artwork/elaEJZ :gun:

Thanks for reading, and may the VFX be with you all! :fire:

3 Likes