Jukerlaw - VFX Sketchbook

Greetings to all those who share the enthusiasm for what I’m engaged in!
This likely marks my initial VFX sketchbook, and I’m excited to share it with others. I hope you all find it valuable!

THUMBNAIL
Thumb

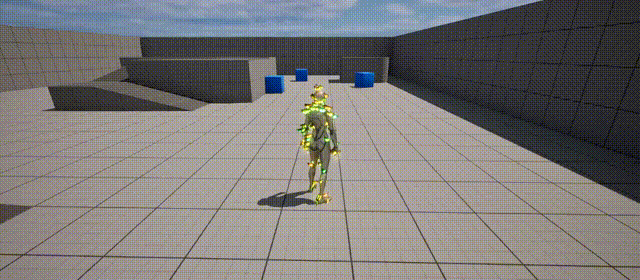
- The annoying butterflies -
AnnoyingButterflies
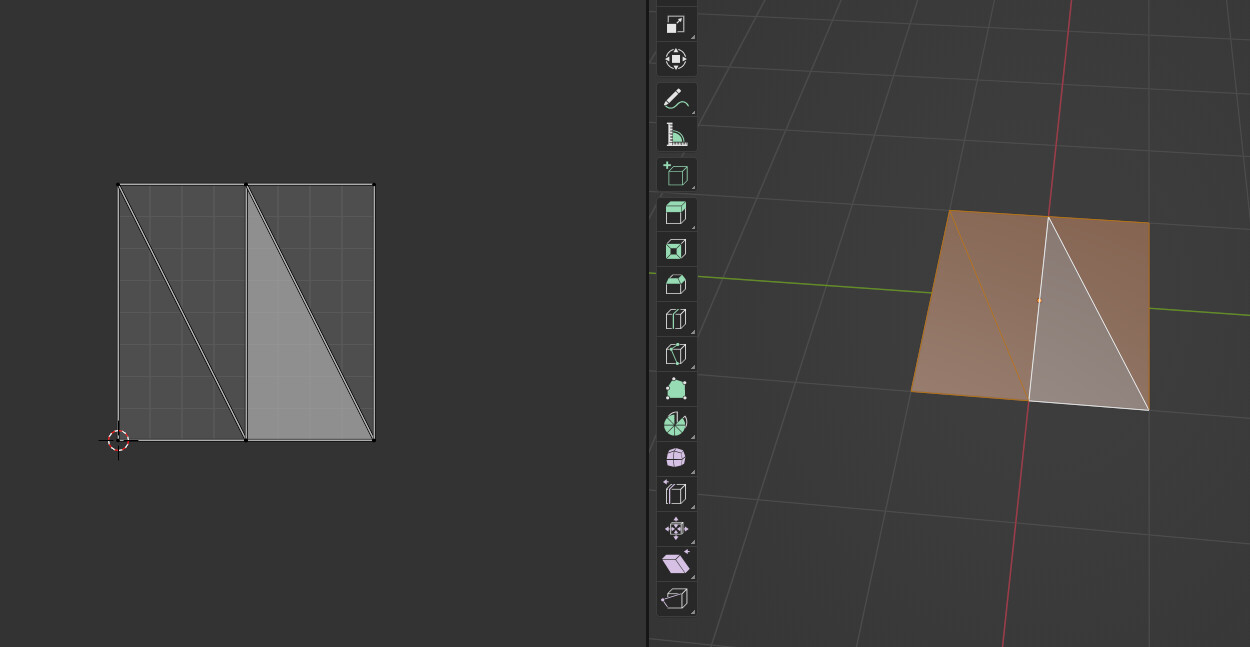
Simple plane with the middle cut for the butterfly mesh.


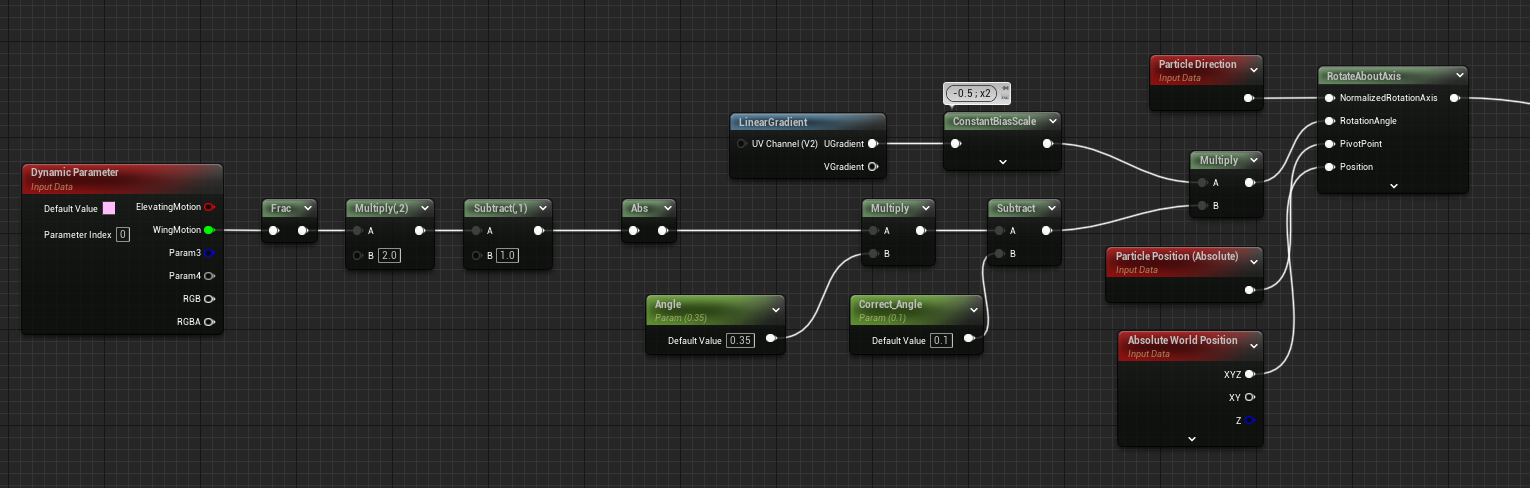
For the wing flapping motion, I use the RotateAboutAxis node and control the animation phase by a dynamic paramter which is later linked to the motion of butterflies.

Butterfly can’t generate any forward motion with their wings (as they’re flat and large), mostly up and down, but it’s quite a challenge for me to make a real butterfly motion, so I use WPO to fake the movement of the butterflies.

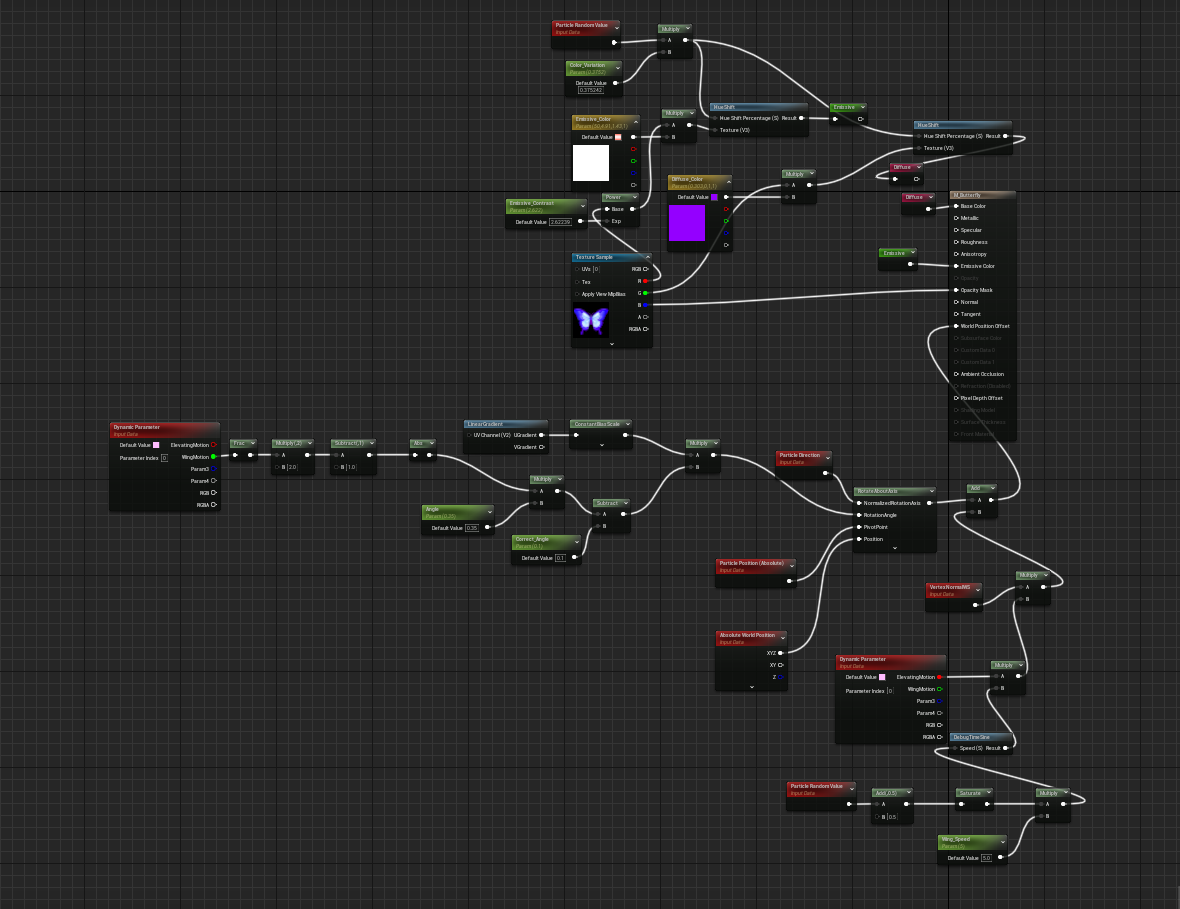
Butterfly’s material whole look:

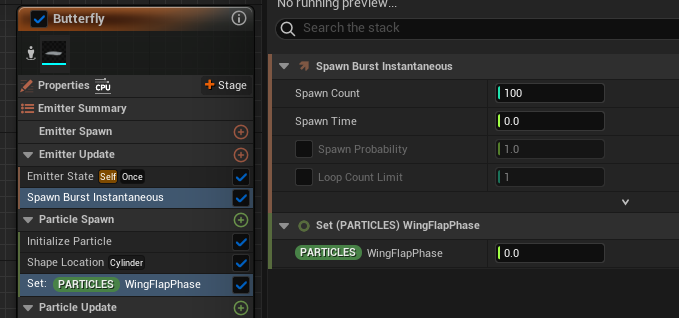
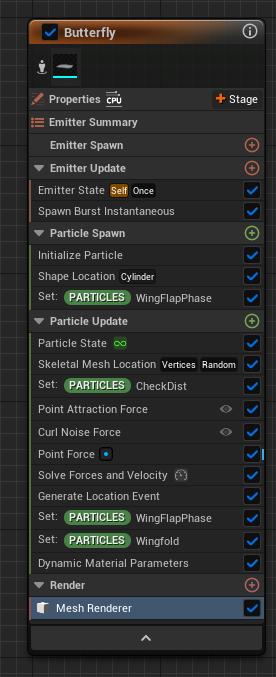
• Niagara System setup:
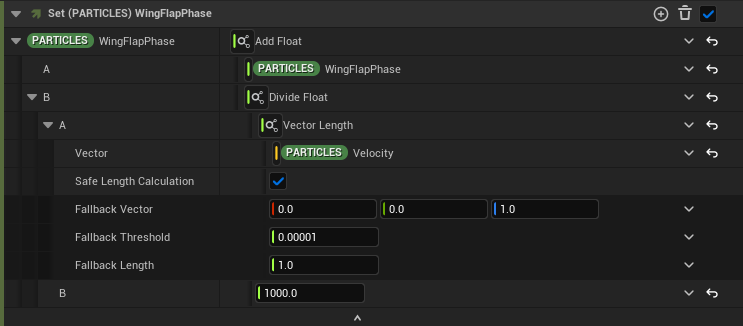
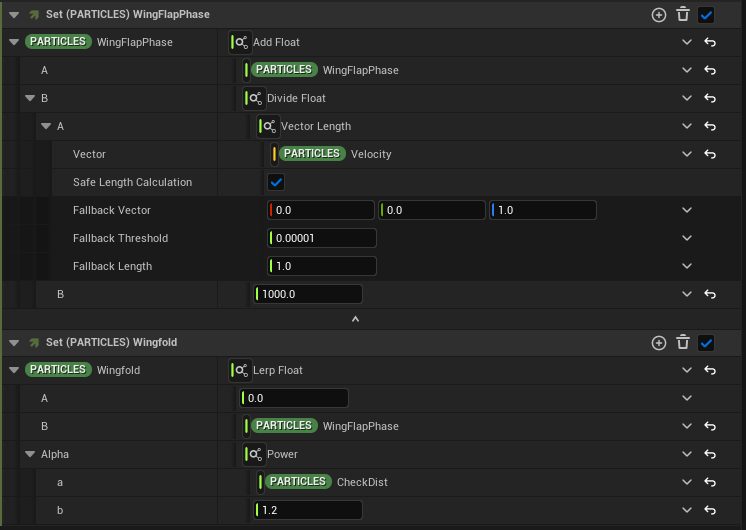
I make a float param WingFlapPhase to control animation of the butterfly.
image
Later in update stack. This param is accumulated if the butterflies has any forward movement.

  • In update stack:

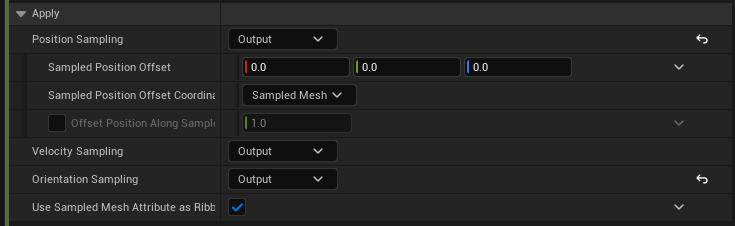
Sample the Skeletal mesh location, but don’t apply any attributes.


Set a new parameter CheckDist, I use this to change butterfly behavior as they’re near the character.

Use Point Attraction Force and Curl Noise Force to create butterfly movement.

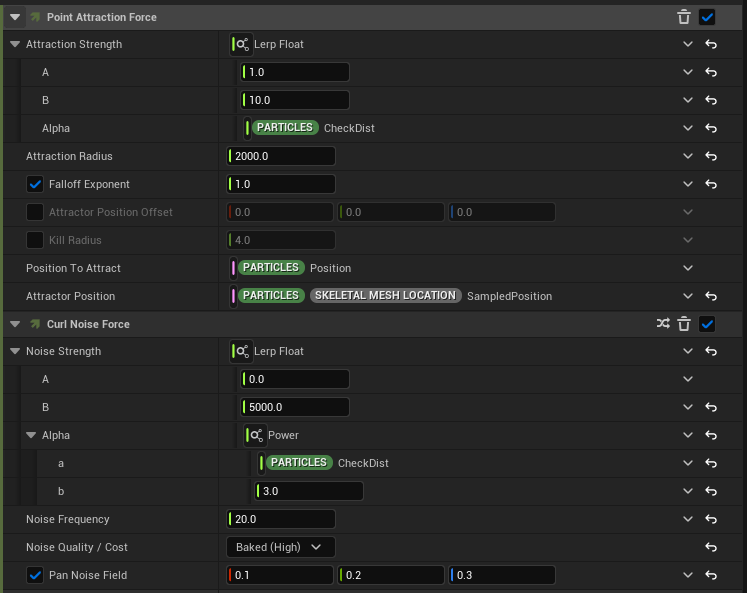
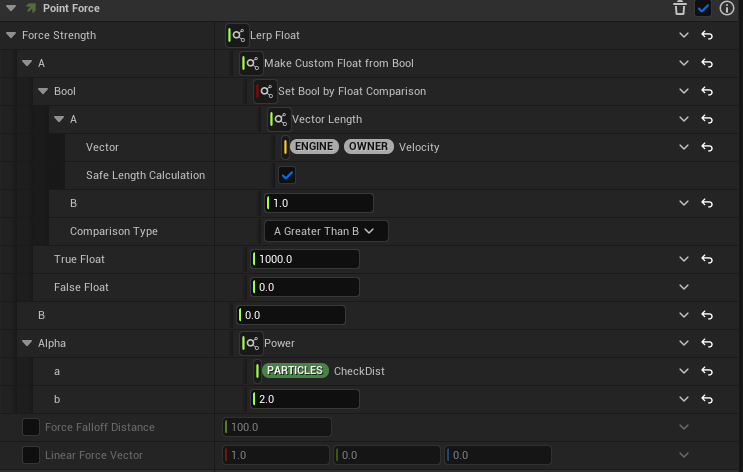
A butterfly will become startled if you make any sudden movements, so I use Point force for this behavior.

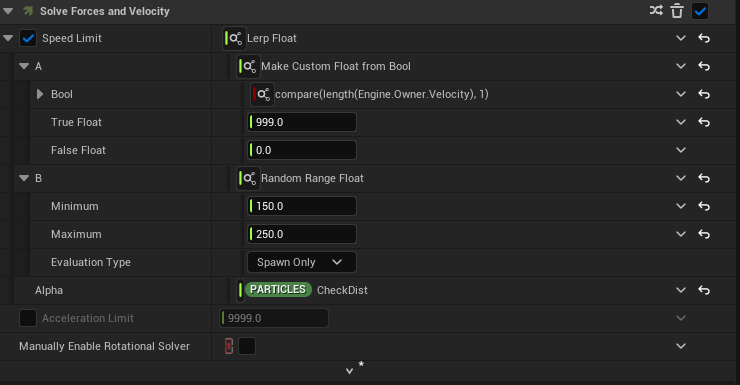
Next, setup the speed limitation for butterflies.

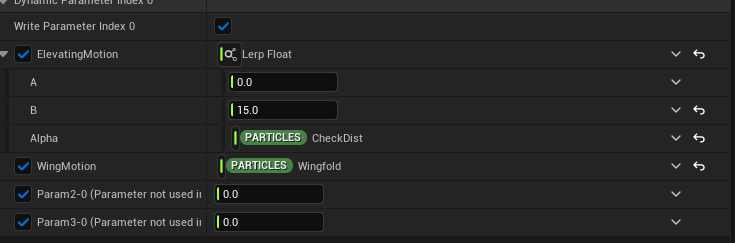
Then, increase the phase of the flapping animation as it moves. I make a wingfold parameter here to fold butterflies’s wing as it lands on the body.

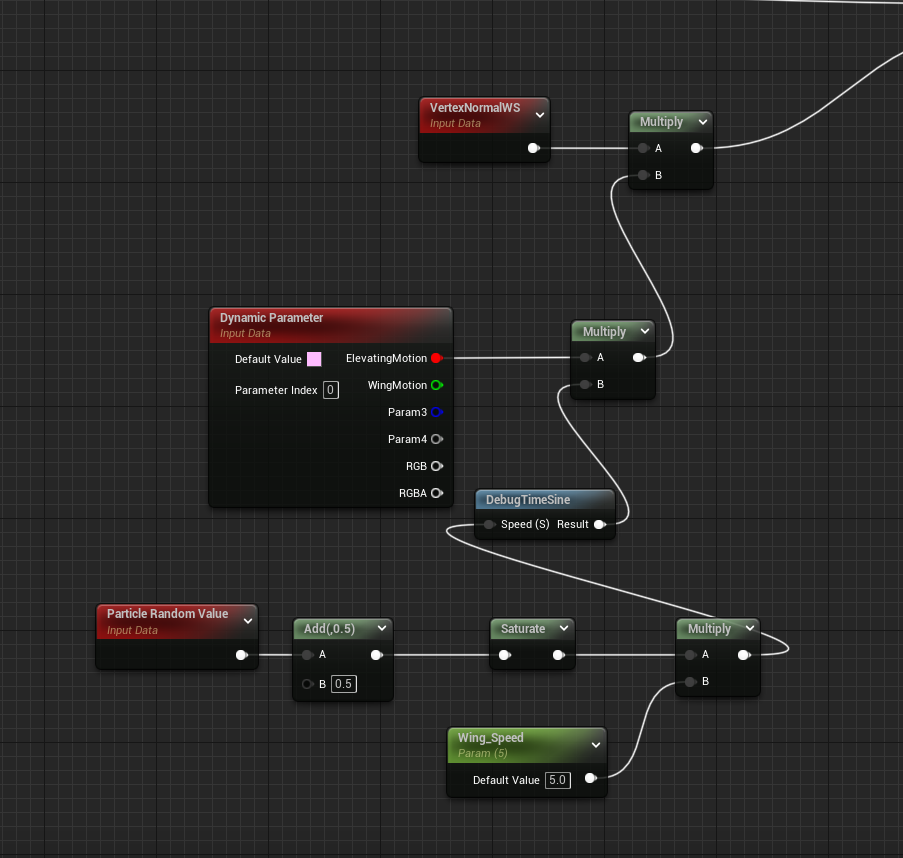
Final is the setup for dynamic parameters, which control the butterfly’s elevating motion and wing motion.

In mesh renderer, set the mesh facing mode to Velocity.
And that’s all for the main butterfly effect, to add effects to butterflies, use Generate Location Event and all’s good.

I want to acknowledge Deathrey, Jordan, Feli, and MichalArendt for their valuable assistance and feedback during the process of working on this.
Also,I was inspired by a similiar effect which I saw on twitter. So thank you Jacckk for referencing it again for me.
https://www.artstation.com/artwork/NyzADN

34 Likes

Not a single scratch pad used! Although its still difficult to get around, it’s a lot more simple than I was expecting, so I can actually dive in a take a look! Thanks

1 Like

An attemp to mimic one of iconic effect in The Finals :smiley:
CoinDeath 640i

8 Likes

Practice combining the impact and a screen effect.
Sequence 01 640i

4 Likes

Great effect, and I really like the idea of using a screen effect as part of the VFX itself, it’s something that I never really thought of :thinking:

You’ve got some really awesome stuff there btw :blue_heart:

1 Like

Thanks for the kind words! Glad you like it. The reason I want to make screen effect in Niagara System is because of its ease of control and independence.

1 Like

This looks interesting so I try: https://www.youtube.com/watch?v=DkpxAOT5154&t=308s
20231205_213150 00_00_02-00_00_10 640i

This looks indeed interesting asset to add effects :laughing:
20231206_160119 640i

8 Likes

Gate of Babylon, but spears.
GateOfBabylonSpear 00_00_03-00_00_19 640i 00_00_00-00_00_07 640i

5 Likes

Polishing the above work with scifi theme :blush: I really feel satisfied with this one.
https://www.artstation.com/artwork/obGKxm
GateofBabylonScifi 00_00_00-00_00_09 FastCopy

7 Likes

Jujutsu Kaisen’s cursed energy reference.
This is made for production, but I get permission to show it! (yay)
CursedEnergy 640i

8 Likes

Damn so cool! I’m so bad with vertex displacements. Do you mind showing your Material Editor setup?

thanks for the kind words! Sorry but I’m not allowed to share that since it’s still work for production. However, I can say that I use UV manipulation and flowmap for the effect. It’s to keep performance while making the visual unique and related to the reference.

1 Like

I see, fair enough :smiley: Sounds good, thanks!

It’s… Za Warudo! :laughing:

10 Likes

haha nice effect :star_struck: Dio would be happy now

1 Like

Daaaaang these are so cool!

1 Like

I am inspired by the post process vfx in the game Detroit: Become Human, so I decide to make my own version :smile:

7 Likes

Amazing work! :clap::clap:

I’d love to hear more about how you set all of this up! My guesses would be:

  • for the 3D grid
    • Probably a blueprint setup which distributes the points, lines and numbers.
    • The points are animated if they pass a certain distance threshold to the player. Animation done via blueprint too or maybe via shader using WPO. With WPO you could affect the lines as well. Or is it super advanced tech art stuff?
    • They all fade in and out based on cam distance.
    • The numbers are animated randomly (at first I thought they also increase and decrease based on cam distance, could be nice too). They use backface culling and for oppacity fade they also use cam distance and maybe a fresnel setup.
    • The whole thing scales up and down in Y on spawn and despawn.
  • for the orange overlay on the monster
    • Probably uses an additional render layer which applies a different material to the monster.
    • The material uses a screen space texture plus a distortion or refraction setup for the glitches.

How far off am I? :smile:

Thank you for taking an interest in my small project. They’re not really advanced, just a few tricks. :blush:

  • I mostly create these effects in Niagara. In the blueprint, I set a key to drive the parameters exposed from Niagara.
  • For the 3D grid, I spawn several sets of particles placed in a grid location (the big white dots) and then spawn ribbons to connect them. As you mentioned, they fade based on a certain distance threshold.
  • I create the numbers using the default debugscalar node in the material editor and connect it to the dynamic parameters. The value is set randomly in the Niagara system.
  • The materialization is a lerp between the target position and the initial position (which I set to collapse to the floor).

For the orange scanline, I explained how to create it in a similar thread (Anyone know how the masked post process was done? for Unreal Engine btw [Solved!] - #2 by Jukerlaw). It’s actually part of the same post-process material, so it’s pretty cheap and optimized. There are a few ways to achieve similar effects, like using a cube mesh and only rendering the wireframe, but that method is quite costly in terms of performance. :blush:

2 Likes

Cool, cool, thank you very much for all the details!

Your explanation of the stencil material is very helpful too :raised_hands:

Looking forward to your next VFX! :blush:

1 Like