Thank you very much for going the extra mile and providing a detailed breakdown of your process, that’s definitely got me itching to take a crack at this now, too! Awesome work! ![]()
Super cool! I’ll take a good look.
Seems I misinterpreted what you were asking for a few posts up. Apologies. ![]()
That said, thank you for the breakdown. At first with ever my (feels like anyway) novice eyes, I thought this was just some more Houdini Magic. But looking at your breakdown… could this be made in Max, Maya, or Blender? My knowledge for creating simulation is also limited, or at least again it feels like it because I’M HERE…lol… but did you just take the sim box and just put it above and below, let it sim to a point and then cut out the middle? Is that it? Is that what I’m seeing?
Yes I think you can do this in any application which supports a liquid sim and a boolean modifier. The strenth of Houdini is the quick iteration. If you’re not satisifed with the look, just re-simulate it and the bool-cuttin will be done for you. In any nother app you would have to re-setup the bool, position the meshes correctly etc. - except you’re using scripts which do that for you…then you could automate it in Blender/Max/Maya as well. But even then: Houdini allows you to do cool stuff like e.g. putting the velocites of your sim into the vertex color. I did not do that but it could be an idea of bringing extra motion into the final result.
1 Like
@Ninjin and me where trying to get motion blur running for spline-mesh-components in Unreal. Those are geometries which are moved along a spline and don’t receive the motion blur everything else gets automatically as the object is not really moving.
But by calculating the position-difference each frame, feeding this value into the shader and using the “Previous Frame Switch”-Node, it kind of works. Here is an example where you see how the motion blur looks like when using this work-around:
I need to update my video where I say that it’s not possible to get motion blur with such a spline-mesh-component:
8 Likes
Added “real” motion blur. Unreal Engine doesn’t have MB for SplineMeshComponents BUT getting the diff between the pos on the spline from current and last frame and feeding this into the material’s “Previous Frame Switch”-Node makes it possible. ![]() Thanks @Ninjin for helping and pushing me to actually implement this.
Thanks @Ninjin for helping and pushing me to actually implement this.
15 Likes
Thanks for breakind down those tileable mesh techniques ![]()
And god, those slime look sooo good so I want to swim in it! Dont stop me i don’t care that it’s deadly!
Just released a new article video about a little water effect in GTA V. it was one part of my inspiration for the liquid slime effect:
Article: GTA V – The Wormy Fountain | Simonschreibt.

11 Likes
Unreal’s spline thicken node will do the rotate to the camera thing without having to build trails or ribbons in unreal ![]()
2 Likes
Yes, I like your videos ![]()
If I need to make a realistic fluid flow for my game, I will use your lesson.
1 Like
Whoohooo, love your articles! Thank you always so much! ![]()
1 Like
Thanks for the hint! I’ve updated the article mentioning the spline thicken node: GTA V – The Wormy Fountain | Simon schreibt.
3 Likes
I’m learning simming right now with Houdini and thanks to @HowardM i was able to learn it quicker than me alone. When I have a nice rendering i’ll put it into unreal where i still work on my sketch22 ![]()
I’m not satisfied with this sim i did a while ago:
https://imgur.com/a/INnQPrs
So I’m learning and these are newer results:
8 Likes
I started following the Houdini tutorials from Steven Knipping. Here is the first result of following his steps 1:1
7 Likes
Lots of really nice detail in there! Out of curiosity, what is your voxel resolution and scale for this sim?
Gorgeous! Thanks for the link too, I’ve been blasting myself with Houdini knowledge the last few weeks so this is very helpful. The next trick is: How to get this into UE4? Flipbook? Motion vectors? That’s my next goal.
@ryvanc very good question. because i was never sure how many voxels are necessary and while film people like to invest many resources and gigabytes of data i’m as a game guy think like “can’t we get away with 100.000 voxels?!” ![]() i’m always very very careful. the tutorial showed me that well … a lot of voxels are necessary to get nice detail. The voxel size is 0.016 everywhere: in the smoke object, the “rasterize volume” etc.
i’m always very very careful. the tutorial showed me that well … a lot of voxels are necessary to get nice detail. The voxel size is 0.016 everywhere: in the smoke object, the “rasterize volume” etc.
@kimber yes, flipbook + motionvectors would be the way to go (if you want to have slowmo in the game, if not, no motion vectors necessary i’d say) but for me i’ll continue learnering and hopefully can translate my knowledge into sketch22 which i never finished ![]()
1 Like
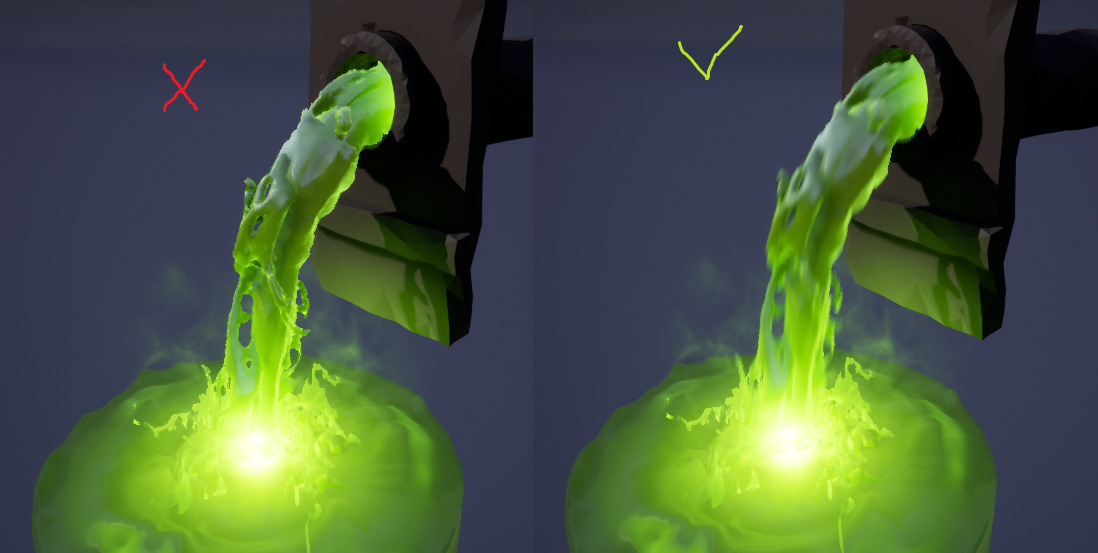
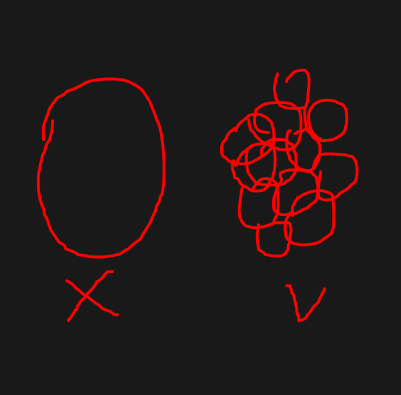
Hi, it’s better make explosion using a lot of small particles for smoke&fire. Many developers told me the same thing when I uploaded my asset with explosions to the Asset Store.
if you want, you can go into a bit more detail. i’m using the pyro-source node which creates many particles on the surface or volume of a geometry. those particles are used to generate the volume. is that what you mean or would you create the particles in a different way?
I think in the next part of the tutorial (Volumes III) he will explain using particles in a different way.
I understand your message when I read it 3rd time. My English knowledge…
I mean different. It’s better to simulate 1 round-shape explosion and use a lot of particles in the engine instead 1 big particle with sprite explosion. This is especially necessary for VR.
Except explosions for 2D
1 Like