I find it hard to believe the waterfall and the fireball (or is a fire wisp?) are using the same shader, really interesting stuff there.
I can see this is some sort of continuation to your “How to not create textures” talk.
Thank you for sharing these.
I’m a newbie so if you’d allow me to ask: how is that fire projectile making that smooth up and down motion? Is it some ribbon magic, or something else?
The “secret” of the projectile is a sine-shaped texture and a trail which is thin at the start and then quickly scales to it’s defined width. The principle is basically the same like here for the angel wings: sine texture on a plane where one part is scaled down → nice wiggly motion (Diablo 3 – Wings of Angels | Simon schreibt.)
In addition the trail uses UV distortion BUT
only for the vertical UVs (meaning only for V, not for U)
The distortion intensity gets stronger over time (so at the start of the trail there is no uv distortion and at the end of the trail it’s full intensity). This makes the trail move the “older” the ribbon particles get.
Simon, I’m studying what you did in there and it’s a really amazing resource to learn! I’m VERY grateful for these files.
I’ve a question regarding LUT coloring and another regarding dynamic parameters.
I’m usually coloring my particles inside the niagara systems using color curves which is the opposite from what you’re doing in your project. Is it preferable to build the coloring in the material itself?
(EDIT) Ok just as I finished typing this I figured you don’t want to map your texture to the particle age, what you’re doing is basically a color remap (duh), and I don’t see how that would be possible in the niagara system itself.
I spotted this interesting node here “Particle relative time”
So, what I was usually doing is using dynamic parameters to drive behaviors like distortion over time, so there a particular reason not to use dynamic parameters?
I’ve no industry experience (YET!) so I’m just looking to learn the workflows from the pros, and sorry for the long post.
Yes, my coloring is a bit more complex by using a LUT BUT I multiply the LUT result also by the particle color. So a simple “color over time” is possible as well as a LUT * color over Time. During the class I also explained that I’d use a Curve Atlas in Unreal because then you can edit your “lut” in Unreal instead of saving/reloading textures all the time but the students used a custom engine without the ability for Curves/Curve Atlas so I showed tha “traditional” approach.
Yes, you’re totally correct using a dyn param because it allows you way more control. In my case, I knew I only need a linear interpolation (instead of custom values via curve) and so the setup is a bit easier because in Niagara you don’t need to setup anything. Just setting the checkbox for UV Distortion over Time in the Material is enough and it just works. But yes, for more control a custom parameter is nice. But here I tried to keep it as simple as possible.
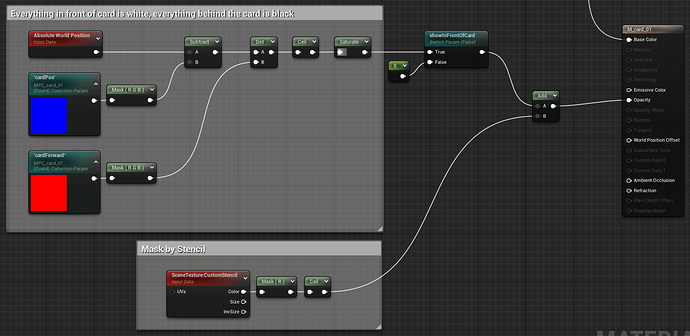
A disc (which uses the same world pos based material as the ground) hovers slightly above the ground and renders into the custom stencil buffer.
A cylinder geo (with translucent material) “hides” below the ground BUT is visible because I disabled Depth Testing (1). This means it’s now visible on top of everything BUT by showing it only were the disc wrote into the stencil buffer (2), I can avoid weird artifacts. For a smoother transition I fade the cylinder a bit on top (3).
I also played around with Unreal Geometry Script & Blender Geometry nodes. Summary: It’s cool but generating good UVs is almost impossible with Unreal Geometry Script (or I missed the some nodes).
In Blender it’s cool (but also a bit complicated) like in Houdini but the actual annoying part: The UVs are not directly saved into the mesh. This means I need to convert my spline (from which all geo is generated) into a mesh, manually copy my uv attribute into a uv map and only then i can export. This is a bit annoying.
Below an example of how to convert a spline into a nice border mesh for my card.
Opaque Dragon test. It’s difficult doing this because only translucent objects can be masked by stencil. But making the dragon translucent looks sh*tty because of all the surfaces behind each other. So my approach:
The card and the parts of the dragon in front of the card write into a stencil mask
The ground is translucent, does NOT do a depth-test (so it’s rendered in front of everything) BUT is only shown where the stencil mask is NOT
added interactivity: pressing 1 brings the card up, pressing 2 sends it to attack pos, pressing 3 triggers dragon attack
Problems:
Environment can’t have shadows because you’d see them on the background
Card can not cast shadows because it would also be visible on the dragon itself
While it’s not a problem having an animation just running, for some reason, when i trigger it per keypress, the stencil mask is laggy and at the dragons mouth you can see edges where the background environment gets visible a bit.
Rough outline how the full sequence shall work. I’ll add a lot of impact/trails to the card itself and then the dragon shall spit a stream of fire (to the opposite side of the battlefield).
Small update: first test vfx (the fire stream is a simple crossed plane with a length of 1.0 and a blueprint calculates the distance from mouth to ground and stretches the plane accordingly and at the end is a particle system placed)
I’ve a material instance (1) which I animate via Sequencer (2) and it works great BUT it auto-generates a new material instance (3) which means, when I now change something in (1), the change is not taken over. I’ve to re-assign my original instance to the mesh first but as soon as I open/play the sequence again, another instance is dynamically generated. I wonder if there is a way to tell it NOT to generate new instances (or to apply changes to the parent instance automatically)?
@simonschreibt
You could maybe try making a MID in BP and assigning that instead of a static Material Instance.
I think they replace it because static instances cannot be animated on runtime