Simon Trümpler - VFX Sketchbook

  • tweaked explosion to communicate scale better (everything slower)
  • lightning now blueish
  • watersplashes with a bit random scale
  • lava debris colliding with volcano

Feedback/Todo:
:white_check_mark: Shockwave in Air & Water 1. https://youtu.be/BUREX8aFbMs?t=13
:white_check_mark: Improve water splash (2 stages, angled when stone hits at anngle?) https://youtu.be/iQW-BE8abZs?t=36

  • additional elements (clouds?) for forground?
  • Physics of smoke, lava lumps and water burts seem to be from different scales, not reading together.
    :white_check_mark: Lava Flow
  • Steam Column
  • Water Foam around Island
  • Tweak colors? Discord
4 Likes

very satisfying to watch on loop and this iteration you made is even more impressive

these are the additions i could see attempting

  • water highlighting around mountain
  • lava flow
  • steam column
    image
3 Likes

@Torbach thank you so much for your feedback! <3

Update

  • smaller debris
  • smaller water splashes (with a first and a 2nd phase/splash)
  • lava streams
  • shock wave on water

Feedback/Todo:

  • :white_check_mark: Shockwave in Air & Water 1. https://youtu.be/BUREX8aFbMs?t=13
  • :white_check_mark: Improve water splash (2 stages, angled when stone hits at anngle?) https://youtu.be/iQW-BE8abZs?t=36
  • :white_check_mark:Small debris also with glow materials & collide with island
  • :white_check_mark:Rework Colliding Sparkles
  • :white_check_mark:Tweak Lightning (new core, color tweak)
  • :white_check_mark:Shockwave along terrain?
  • :white_check_mark:Tweak Shield Wiggle according to shockwave
  • :white_check_mark:New Textures (lit below, lit from inside)
    -:small_red_triangle_down: Recording- Fire should be colder( towards red). Lighting should be mix of blue and red, depending howclose it is tosmoke pillar. Lighting should be somewhat constrained to smoke pillar.
  • :small_red_triangle_down:additional elements (clouds?) for forground?
  • :small_red_triangle_down:Water Foam around Island
  • :white_check_mark:Physics of smoke, lava lumps and water burts seem to be from different scales, not reading together.
  • :white_check_mark: Lava Flow
  • :small_red_triangle_down:Steam Column
7 Likes

I like your volcanic lightning. In my opinion: you could make the lightning darker and more saturated for a stronger contrast.

1 Like

I’ll call this done. Could improve more but I need to finish it, document the texture creation and then give the talk.

New

  • new Smoke Column Textures (improved lighting from below & inside)
  • tweaked water splash (now with 2 stages, scaled them down a bit)
  • Lightning Strikes have a glowing “blob” at their core now

Closer:

14 Likes

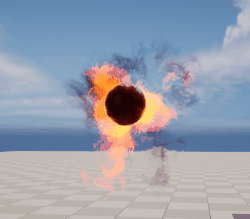
Working on a small effect for a class I’ll give soon. The idea is to have a relatively simple material/shader (mainly uv distortion + alpha erosion) and still get somewhat complex motion:

vfx_01_small

12 Likes

A new version. All elements (sphere, ring, smoke, fire, drips, puddle) use the same shader. The drips & circle are inspired by Alex Fedorov: Sketch #20 WIP @AlexFedorov

preview:
sae2022_vfx_02_small

7 Likes

Here are some more small effect using the same shader (see above). The idea is to be able to create many different effects (projectile trails, collectible glare, scifi barriers, …) with the same shader.

sae2022_vfx_02_axe

6 Likes
  • puddle below fire orb is now less bright and i added some subtle smoke
  • new simple waterfall + waterrings + watersplashes
5 Likes

I find it hard to believe the waterfall and the fireball (or is a fire wisp?) are using the same shader, really interesting stuff there.
I can see this is some sort of continuation to your “How to not create textures” talk.
Thank you for sharing these.

I’m a newbie so if you’d allow me to ask: how is that fire projectile making that smooth up and down motion? Is it some ribbon magic, or something else?

Hi :slight_smile:

The “secret” of the projectile is a sine-shaped texture and a trail which is thin at the start and then quickly scales to it’s defined width. The principle is basically the same like here for the angel wings: sine texture on a plane where one part is scaled down → nice wiggly motion (Diablo 3 – Wings of Angels | Simon schreibt.)

In addition the trail uses UV distortion BUT

  1. only for the vertical UVs (meaning only for V, not for U)
  2. The distortion intensity gets stronger over time (so at the start of the trail there is no uv distortion and at the end of the trail it’s full intensity). This makes the trail move the “older” the ribbon particles get.
5 Likes

The Project FIles are now available! https://www.artstation.com/artwork/4XLk04
artstation_thumbnail_small

10 Likes

Simon, I’m studying what you did in there and it’s a really amazing resource to learn! I’m VERY grateful for these files.
I’ve a question regarding LUT coloring and another regarding dynamic parameters.

  1. I’m usually coloring my particles inside the niagara systems using color curves which is the opposite from what you’re doing in your project. Is it preferable to build the coloring in the material itself?

(EDIT) Ok just as I finished typing this I figured you don’t want to map your texture to the particle age, what you’re doing is basically a color remap (duh), and I don’t see how that would be possible in the niagara system itself.

  1. I spotted this interesting node here “Particle relative time”

    So, what I was usually doing is using dynamic parameters to drive behaviors like distortion over time, so there a particular reason not to use dynamic parameters?

I’ve no industry experience (YET!) so I’m just looking to learn the workflows from the pros, and sorry for the long post.

2 Likes

Hi,

thanks for your interest and the questions!

  1. Yes, my coloring is a bit more complex by using a LUT BUT I multiply the LUT result also by the particle color. So a simple “color over time” is possible as well as a LUT * color over Time. During the class I also explained that I’d use a Curve Atlas in Unreal because then you can edit your “lut” in Unreal instead of saving/reloading textures all the time but the students used a custom engine without the ability for Curves/Curve Atlas so I showed tha “traditional” approach.

  2. Yes, you’re totally correct using a dyn param because it allows you way more control. In my case, I knew I only need a linear interpolation (instead of custom values via curve) and so the setup is a bit easier because in Niagara you don’t need to setup anything. Just setting the checkbox for UV Distortion over Time in the Material is enough and it just works. But yes, for more control a custom parameter is nice. But here I tried to keep it as simple as possible.

Hope that helped! :slight_smile:

6 Likes

Stencil Buffer Test with a small extra detail: Elements can leave the stencil area.

This is done by adding everything in front of the card to the stencil mask. For this to work I store pos + front facing vector via Blueprint:

In the material I then mask out the front/back area of the card with a simple dot product:

Little list of inspirations for later:

Dragon Breath:

16 Likes

Some more tests.

The hole in the ground uses several ingrediants:

  1. A disc (which uses the same world pos based material as the ground) hovers slightly above the ground and renders into the custom stencil buffer.

  1. A cylinder geo (with translucent material) “hides” below the ground BUT is visible because I disabled Depth Testing (1). This means it’s now visible on top of everything BUT by showing it only were the disc wrote into the stencil buffer (2), I can avoid weird artifacts. For a smoother transition I fade the cylinder a bit on top (3).

I also played around with Unreal Geometry Script & Blender Geometry nodes. Summary: It’s cool but generating good UVs is almost impossible with Unreal Geometry Script (or I missed the some nodes).

In Blender it’s cool (but also a bit complicated) like in Houdini but the actual annoying part: The UVs are not directly saved into the mesh. This means I need to convert my spline (from which all geo is generated) into a mesh, manually copy my uv attribute into a uv map and only then i can export. This is a bit annoying.

Below an example of how to convert a spline into a nice border mesh for my card.

blender_2022-12-11_01-43-40

5 Likes
  • Added ground textures (from a free library https://www.texturecan.com)
  • Added test anim for the card
  • Made my material work with dyn mat param so that I can control the uv offset via Niagara (and added some tests [yellow border, blue glare]

8 Likes

Test with adding a swoosh while rotating the card:

The effect is a simple bulgy cylinder with a scrolling texture:

UnrealEditor_2022-12-19_00-51-03

15 Likes

For someone learning this thread is invaluable, thank you Simon!

Can you talk a little bit more about the depth test? I had a lot of problems!