Hey Woailuoku! It’s exactly as @Kris_Wilkins mentioned! Using a ribbon or trail emitter you can have the erosion over each quads lifetime. If you use one mesh, the whole texture will erode making it look uniform like your 2 and 3 example.
4 Likes
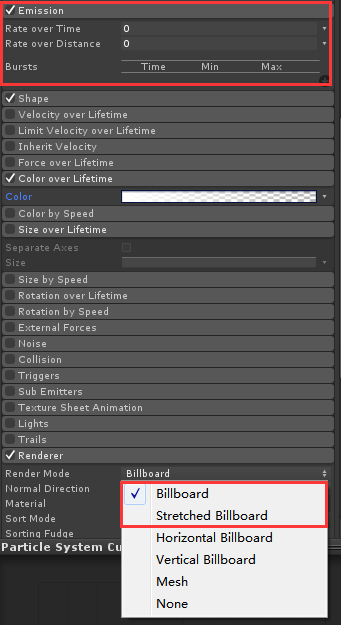
sorry , can i see what kind of texture look like to use with ribbon?
i know use color over lifetime to dissolve the texture.
should i use rate over time or rate over distance?
and ,render mode is billoard or stretched billboard?
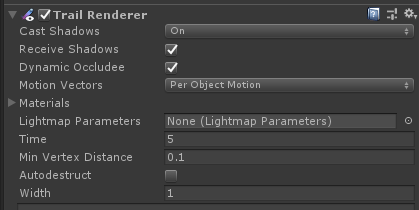
In Unity they are called trail renderers. you can attach one as a component to an existing game object or right click in your hierarchy and select ‘effects>trail.’
2 Likes

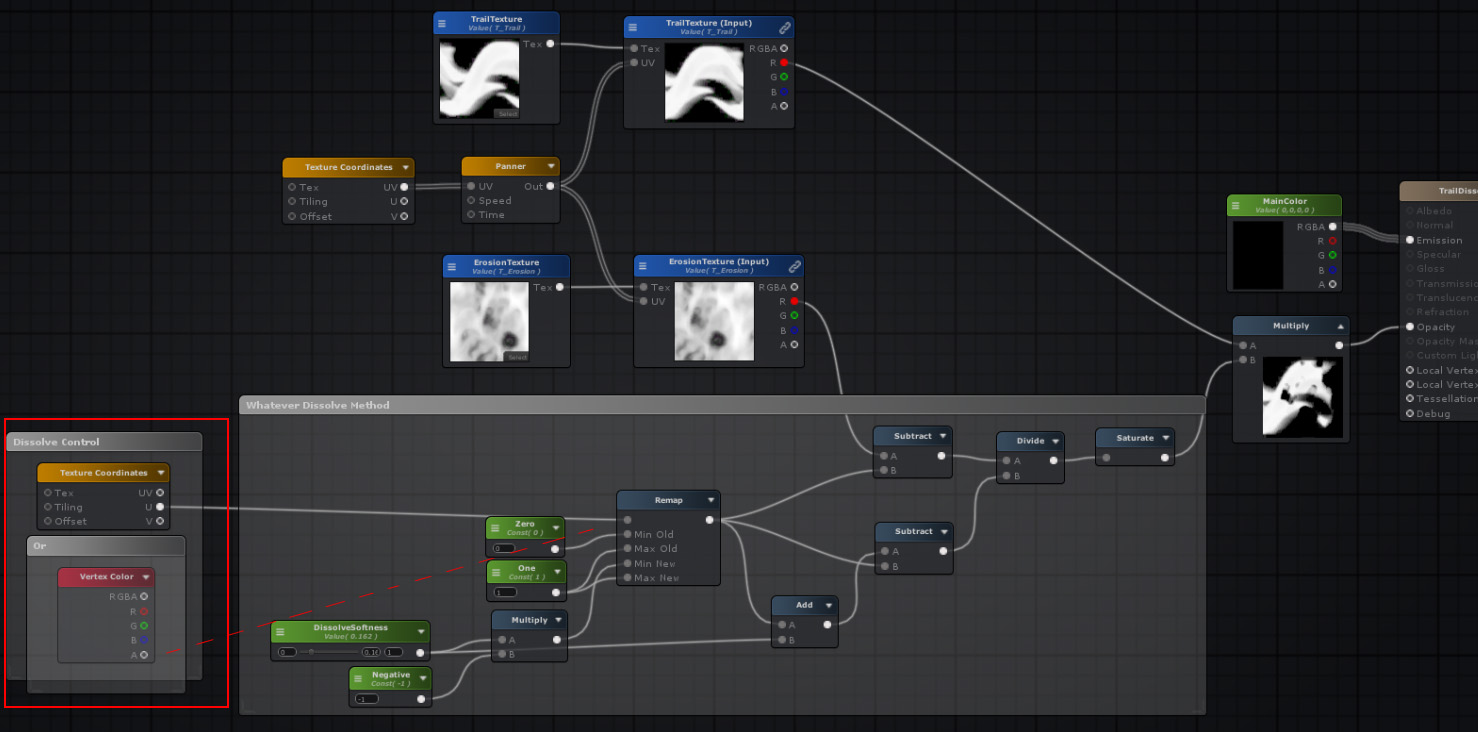
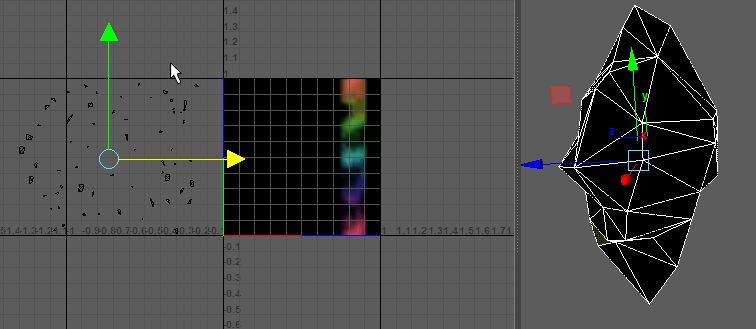
These are two different textures. Left is the trail texture, and right is the erosion. The trail has an alpha channel which isn’t shown here.
Color over life is good to have a fade out over the emitter or particle lifetime
Time or distance is up to the look you’re going for. I used particle lifetime.
I’m not sure what Unity’s exact parameters should be for the look you want, sorry!
If you want to use a trail and see how it looks without moving it around add physics to it.
I hope that helps you!! ![]()
6 Likes
I think he’s isn’t sure about how to get the non-uniformed erosion. it ramps up from 0 to 100% at the end of the trail
Shannon achieves this in-engine tracking lifetime of the quad segments; Unity has the new trail/Ribbon system in shuriken but I can’t figure out how to get Custom vertex streams to access the trail, nor how it would read the geo’s vertex.LifeTime
I think it will need it’s own shader that uses UV space * vertex.r & vertex.a so that we can gradient overLifetime an erosion map but remapping from 0,0 to 0-1 and finally 1-1 so that the whole trail dissolves
[edit] yah… this is actually quite frustrating ![]()

we could pan a ramp… but we really don’t want 3 texture look-ups for mobile so I am tripping over mental shoelaces trying to solve this
6 Likes
@Torbach @woailuoku I should have posted my results when I asked about this 2 weeks ago, as it took me a little brain racking as well.
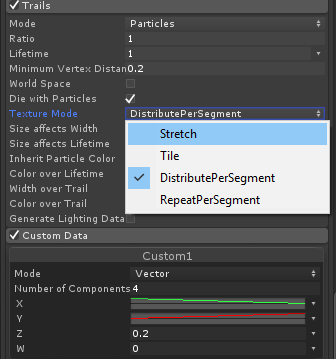
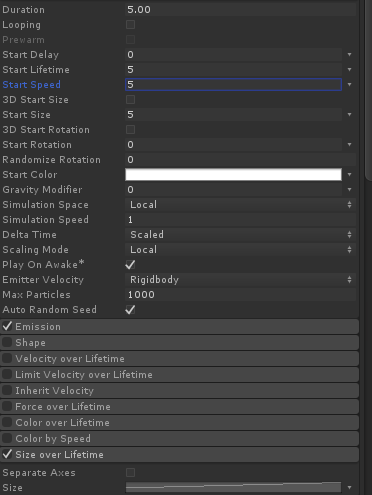
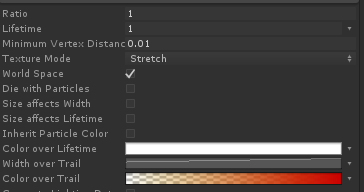
Use the UV or color over trail, in stretch mode, to control the dissolve.
Here’s my settings, shader, and results:
Particle trail settings
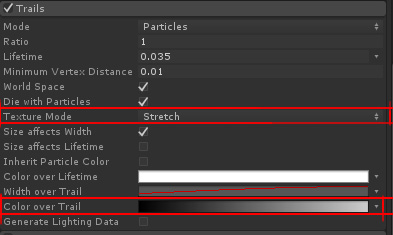
Or
Default trail settings
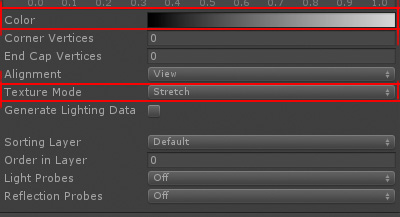
Shader- can use UV or vertex color
UV or Color over trail results
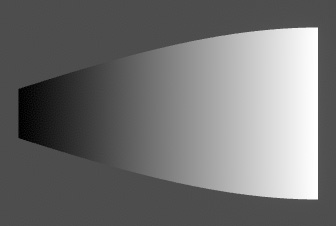
Final Result using @ShannonBerke textures

40 Likes
hi,thank you for your help,
i done this almost.there aslo have some question i want discuss
this is my result

1,i have to give particle speed,or,let it move,then the trail can work.how can i do like you ,particle stop ,trail work !.its my particle setting
2.why my ending is so strange.its look like be extruding.
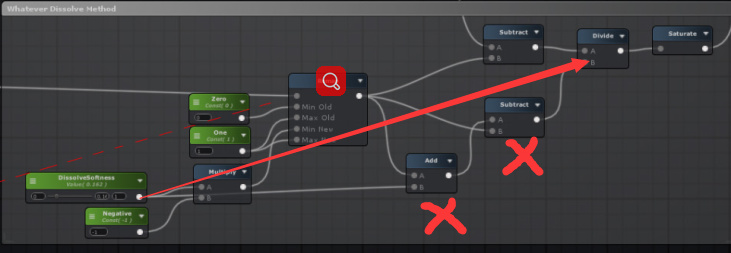
3,your shader ,i think its,not useful with this place ,you can delet this and try agin(if i wrong,pleased dont mind me)
the trail emitter geo dies the same speed as it is generated; unfortunately you have to work around that feature if you want a trail quickly, but then dissipate slowly. My suggestion is to have it live longer and use alpha to get it to dissolve. obviously this costs overdraw.
the stretch feature will certainly give you a extruded feeling, there isn’t really a world-based UV option that I have nailed down, perhaps someone has a better working version.
I’m sorry, I misunderstood how you were doing your effect. I didn’t realize that the glowy tip of the V shape was a particle and the rest of it was a ribbon. Unfortunately when the lead particle dies off the trail will always get left behind and run through the rest of its lifetime ![]() we had to make a custom solution for our studio that allowed the trails to die off with its lead particle. I’m glad you found a solution that got you close to what you wanted
we had to make a custom solution for our studio that allowed the trails to die off with its lead particle. I’m glad you found a solution that got you close to what you wanted
Process Process PROCESS PROCESS
I’d like to take some time to go over general pipeline process. Like I’ve said with my other posts there are TONS of approaches to VFX so by no means should this be prescriptive. There is no one size fits all solution, each project or artist will have their own way, and that’s okay! My goal is to bring incite into a workflow I’ve found successful and hopefully have some helpful nuggets for others. I’ll also be keeping it pretty high level.
I’ll focus generally on how I approached the creation of FX for Irelia’s new kit. Irelia is a playable character in League of Legends. If you haven’t taken a look yet check out the LoL VFX Style guide. It’ll get you in the mindset on some of the constraints LoL develops under.
Hokay so we have her old version ~
Irelia looked like this: 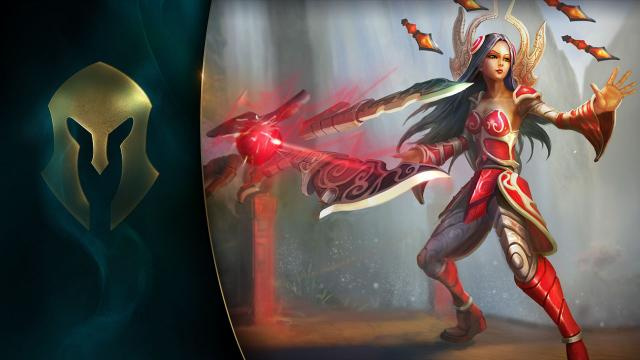
And we were taking her to this ~
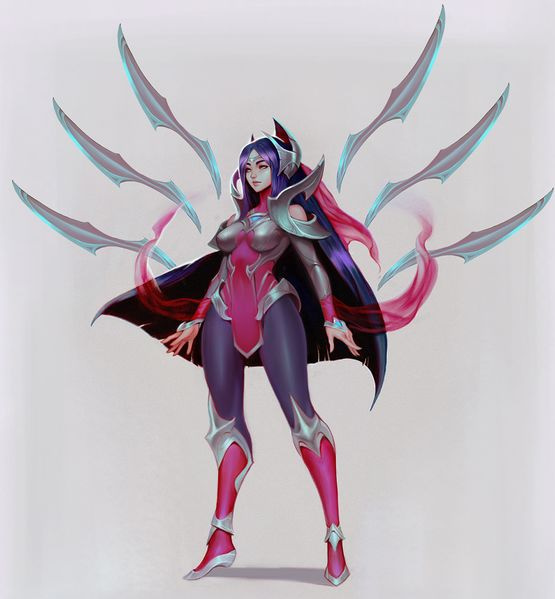
She’s a pre existing character that players already had an expectation for. This already helped me narrow down how we would create her VFX. You can also think of it in broader terms. If you’re making a fire effect, there are already shapes, timing, colors that viewers already associate with fire. The same can be said for a lot of effects, lightning, slime, poison, arcane magic. Even if at first glance it’s not a “real” thing like arcane magic, there might still be shapes or colors associated with it, and there are ALWAYS real world reference to pull from. Don’t reinvent the wheel if you don’t have too, spend that time saved elsewhere!
1 ~GOALS! ~
Art is subjective, feedback shouldn’t be. Always do your best to have clear goals to come back to and build around. Goals should be decided by those most relevant to the project. Sometimes that’s a core production pod, sometimes they might be decided by an art director. If a feedback conversation starts off with “I feel like…” or “I think that…” that’s often a great example of subjectivity! Now that doesn’t mean that feedback is bad or should be ignored. But once you have goals you now have something to compare that feedback too, otherwise the strongest voice can easily overtake the best goal oriented idea. It’s okay to say no ![]() Just be ready to articulate why, goals will help you do that in a positive way. Their may be multiple ways of accomplishing goals, but all conversation is driving towards a focused outcome.
Just be ready to articulate why, goals will help you do that in a positive way. Their may be multiple ways of accomplishing goals, but all conversation is driving towards a focused outcome.
This can also be TOTALLY APPLIED TO ART TESTS wink wink nudge nudge
Art tests are often ambiguous, and some might require you to create your own goals. Once you have those goals AWESOME! Instead of creating a thing and presenting it as “Here ya go, how’d I do?” You’re opening yourself up for subjectivity. Try highlighting the goals you were aiming for, and asking for feedback to drive your next iterations towards those goals. I can guarantee that you will get more relevant feedback.
2 ~What are the knowns? ~
What are the things you know to be true about what you’re working on? Does it have to fit a certain gameplay shape? Timing? Screen space? Expense? Thematic? Color? Is it attached to a moving object? A character? How important is it? Etc. Ask yourself as many questions as necessary to outline what needs the VFX must solve. All of these things are essential to narrow down your blue sky. As exciting as an open ended exploration can be, it can easily be a huge waste of time if the explorations aren’t answering the right questions. Also as part of your knowns, what resources or reference do you have at your disposal? Do you have a concept artist able to assist you? Is there another game or movie that has something similar? The faster you can get the team aligned on the direction the more time you’ll have for execution! Unless you’re a magical wizard I can confidently say concepting an idea is faster than building all the elements to sell an effect.
For League each champion has three core pillars. Irelia’s were:
Burdened Symbol of Ionia
Ferocious Finesse
Lithe blade dancer
Knowing this, and being aligned as a production pod it helped structure each disciplines approach to execution.
** 3 ~What are your unknowns? ~**
Defining your knowns will already help with defining your unknowns. ![]() This can be a short and sweet step to make a list of the areas you/your team will need to solve for.
This can be a short and sweet step to make a list of the areas you/your team will need to solve for.
Irelia’s use of her blades was really integral to her gameplay feel and aesthetics. In order to proof out how multiple blades flying around could look we chose the basic attacks. It was a safe choice because we knew she would have them, it was not a complex moment like a full spell might be, and the animations were already made for her basic attacks when I started on the pod. This was a super helpful step that didn’t require a lot of time. It also gave the pod a point of reference going forward.
** 4 ~Prioritize! ~**
Taking all of the info you have, PRIORITIZE! What are your large unknowns? What are the big ticket items the game can’t ship without? What things are nice to haves? Is there something that might take you a large amount of time to explore?
This step is CRITICAL!! And in most cases will make or break your project. Can you think back to a time where you’ve been SUPER EXCITED about a project. Have you ever been so laser focused on an area of a project you were super passionate about only to find out later on that it wasn’t used, or the design changed, or there was some other much more important effect that SHOULD have been made with that time? Ya me either ![]() But in all seriousness, don’t let your passion blind you to the needs of the project. Hopefully those passions align most of the time though.
But in all seriousness, don’t let your passion blind you to the needs of the project. Hopefully those passions align most of the time though. ![]()
Some of Irelia’s large unknowns were:
How to get the multiple blade feeling while not-
a. Actually having tons of blade meshes on the screen $$
b. Looking overly busy
Designing a visual for her R (a damaging bladewall that you can still walk through) while the gameplay shape was still up in the air
Your team might already have a set way of prioritizing based on your planning methods, but it doesn’t mean those methods can’t be improved upon. Teams, skills, products are always changing, your prioritizing methods should too! Especially if you are new to a team it can be invaluable to bring a fresh perspective and healthy curiosity on why a pod might do something a certain way.
** 5. ~ Communicate! ~**
Communication to KEY my dudes! If you do all of the above, but don’t communicate, it’s all for naught!!!
Communication can be hard, it can be scary, but it needs to happen for you, and those around you to grow! One of the keys to communication is trust. Have you ever had that coworker who only comes to talk with you when somethings wrong, or needs to be fixed? If the only interactions you have with someone are negative it’s SUPER EASY to build up a barrier. But…could you be that person to someone else? ![]() Take the time to build relationships with those around you. When it does come time to give feedback you’ll have that trust and rapport to communicate more effectively. Also, not everyone communicates in the same way. Online, in person, large group discussions, one on ones…by building those relationships you’ll also get to know better ways to communicate to those around you. And like I mentioned above, art is subjective, feedback shouldn’t be.
Take the time to build relationships with those around you. When it does come time to give feedback you’ll have that trust and rapport to communicate more effectively. Also, not everyone communicates in the same way. Online, in person, large group discussions, one on ones…by building those relationships you’ll also get to know better ways to communicate to those around you. And like I mentioned above, art is subjective, feedback shouldn’t be.
For Irelia we had built in communication milestones and check ins:
- A daily standup that’s a short and sweet check in
- A weekly discipline review with the other LoL VFX artists
- A biweekly pod review of the work that we’ve done and retro of how things went and what we’re committed to doing better
- Biweekly planning meets where we go over backlog tasks and prioritize them for our next sprint
- On the floor feedback. On champions team we sit with our discipline so it’s nice to lean over and get some feedback especially if you’ve been staring at something for awhile haha
Find out what and when communication is best for your teams ![]() You can also establish what’s called a working agreement. It’s a short list of things that your pod is aligned around doing. This can be things like all feedback is given in person, or if you’re late to a meeting 5 pushups! Haha, it can be a fun way to establish ground rules for working with a new group of people or provide accountability around ambiguous things like when is the right time for what type of feedback etc.
You can also establish what’s called a working agreement. It’s a short list of things that your pod is aligned around doing. This can be things like all feedback is given in person, or if you’re late to a meeting 5 pushups! Haha, it can be a fun way to establish ground rules for working with a new group of people or provide accountability around ambiguous things like when is the right time for what type of feedback etc.
It’s a pretty high level outlook, but hopefully it’s helpful to others. ![]() And again, their isn’t one size fits all process. Each team is different, find what works for you! Even better, share what others might be able to learn from.
And again, their isn’t one size fits all process. Each team is different, find what works for you! Even better, share what others might be able to learn from. ![]() If anyone has questions or wants clarity feel free to ask or DM me.
If anyone has questions or wants clarity feel free to ask or DM me. ![]()
56 Likes
You’re amazing, thanks so much for this huge write up! Looking forward to diving into it after work! ![]()
1 Like
Thank you for taking the time writing all this!
One thing I noticed in my work as a freelancer: the Implementation of the effects costs a huge amount of the total time. Just finding out at which specific asset, at which time and in which file to implement the effect sometimes costs hours for me to find out.
I wonder if you guys have tech-guys preparing everything for the VFX-artists and you “just” have to do the effects? But usually one has to test the effects right in the game to see them under “real” circumstances, right? That’s at least my approach to not develop into a wrong direction. The disadvantage is, that there’s a lot of implementation-“overhead” before I can see the first little test-particle.
1 Like
Np! I just hope that it’s useful to others, so thanks for posting Simon! Always been a fan of your vids ![]()
For VFX buddies on LoL Designers use temp VFX (whatever gets the job done! haha) to establish the base kit. From their we FX buddies have hooks already setup for most of the FX we need that we can rename/replace so generally setup isn’t too tough to get you rolling. We have a pretty orderly setup for Champions so nothings too tough to find ![]() LoL also has an additional tool that tracks particles on screen. So you could be playing a character or be in a certain area of a map and the tool will tell you what’s playing. You can even right click in that window to easily open anything that’s playing
LoL also has an additional tool that tracks particles on screen. So you could be playing a character or be in a certain area of a map and the tool will tell you what’s playing. You can even right click in that window to easily open anything that’s playing ![]() Sounds like something like that would be pretty valuable for you!
Sounds like something like that would be pretty valuable for you!
Although we have a particle previewer we test things in game mostly. The previewer doesn’t always orient correctly, or know what bone it’ll be attached too etc. We’ve tried to cut down on implementation time to give us as much time creating as possible ![]()
5 Likes
Oooh wow. Thanks a bunch of the detailed breakdown Shannon! I have a bad habit of “winging” my FX once I find enough references and once I’m done I look at it and go damn I wish I had considered said 100x easier way to do the same thing.![]() I really appreciate the tips on how to setup a pre-pro, will totally help me in future endeavours to set up a personal pipeline as opposed to winging.
I really appreciate the tips on how to setup a pre-pro, will totally help me in future endeavours to set up a personal pipeline as opposed to winging.
Ah I’m so jealous of your particle tetsing tools!!! My simulate button in unreal crashes my editor everytime so I have to keep exporting and importing between multiple projects haha.
1 Like
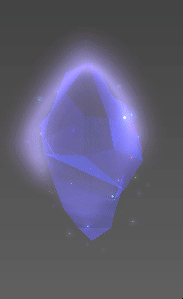
Hi Shannon. How can you make the Taric’ shield ??. Have special shader you use??
I expect your guide. Thank you so much
Hey Max
Nothing too fancy, just scrolling textures and UV trickery ![]()
I have 5 groups for the gem:
1 Gem geometry (texture was screen space bound so I don’t have to have a differently UV’d version of the same geometry)
1 Gem sheen geometry
1 Quad to fake the glow
1 group for the little tiny rainbow sparkles
1 distortion to add a little oomph to the spawn in (you can’t really see it in the gif against the grey background though haha)
- Once you have the shape you want, automatic map it to get all of your UV’s laid out.
- Select them all and cut the edge, this will make each face have it’s own separate UV shard
- Select the shards and shrink them (like the little black UV shards in the gif to the left)
- You can space the UV’s out over the UV grid in any order. I liked to keep mine in somewhat linear.
- I pushed mine up and down depending on what color range I wanted. You can see the VERY small color texture with varying rainbow shades.
The top silhouette of the gem is pretty uniform, so I painted a blury ^ shape to fake a glow that wouldn’t cover too much of the champion.
95 Likes
so amazing. i have must try do it noww! thank you very much ![]()
![]()
![]()
1 Like
That’s so cool! I wouldn’t have thought of something so straight forward. Thanks so much for sharing!
1 Like
Cool, thanks for share ![]()
Just found these posts on here…This will be very helpful in the future. Thanks for sharing. ![]()
1 Like