New update, this time working on some polishing, adding details, etc.
I made a little “object surface data visualization” system with those points being spawned on the mesh randomly, like if it was pointing to flaws or noticeable things on the object.
It was kinda tricky to do since I didn’t want to have simple points being generated and using the mesh’s normals to offset the text part. Doing that would have created points in weird places like under the mesh or inside cavities (like behind the trunk on this one for example) and using the normal at that point would have offseted the text in weird ways (like inside the shape).
So the solution I came up with was using a stretched hemisphere shape encompassing the mesh and spawning point on that. From there, I projected this position onto the mesh thanks to the shape.project() function. I could then draw two points for the two tips and a line between them.
Here you can the part of the graph that computes the positions for every part:
You can clearly see how I sample the Hemisphere shape (showed as debug in the viewport) and use the retrieved Position and Normal data to then either calculate the textpoint positions (with an extra physics added) or calculate the projection on the mesh and position the meshpoint. The axis is simply drawn by averaging the two positions and subtracting them to get the vector axis
From there, I was pretty satisfied but… not entirely
The thing is, I thought it was too bad that texts were still visible when behind the object. It was distracting and not very cool.
So to avoid that, I made a simple script node and went on doing some raycasting (again !). The idea is to cast a ray from camera position to particle position, and check if it intersects with the shape on the way.
Here to part of the graph and the script:
“Shape” input is my Ganesha statue mesh. “RayStart” is my Camera Position. “RayDirection” is a simple normalized subtraction of my particle position and my cam position. My “RayLength” is quite high, to test. And “ParticlePosition” is, again, my particle’s position.
DoCollide condition is triggered when the Ray hits the mesh AND when the ray distance is lower than the particle distance from the camera (why ? because I want to hide the text when it’s behind the mesh, not when it’s in front of it!).
By the way, I’m not a native Hindi speaker at all so I’m using Google Trad to generate some texts… so I’m not sure if it’s correct or totally weird
If anyone speaks Hindi and wants to help, it would be greatly appreciated !
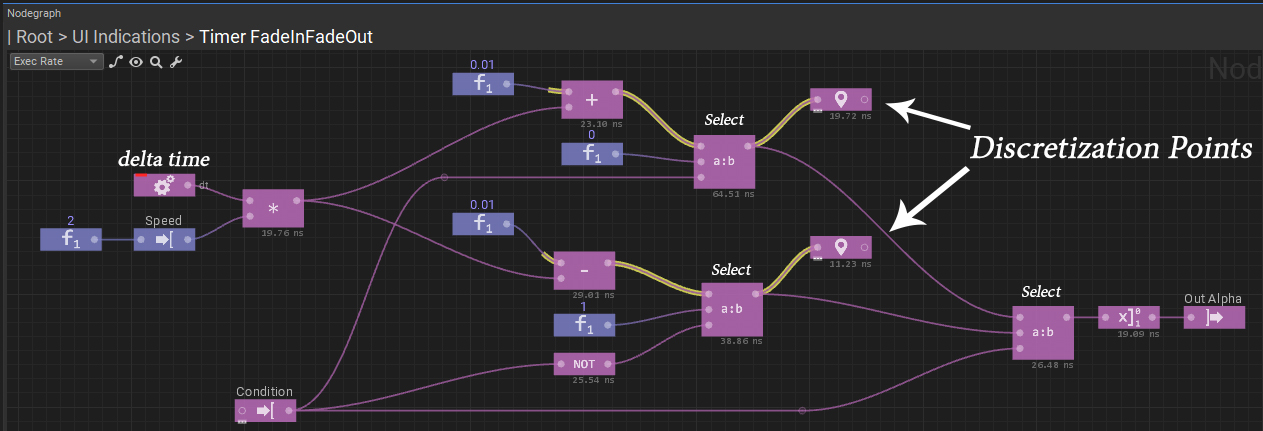
@5919 I was wondering if this was easy to do (fade-in / fade-out depending on raycast condition) and… I managed to do it !
This was a bit tricky since I needed to enable a timer for every condition and select the correct one depending on the raycast return data. In PopcornFX v1 it’s quite easy using Fields and incrementation, but in v2 it’s another trick… you have to use Discretization Points to do that.
So I made a template that does just that:
You can see this graph is in two parts. The upper part computes the “successful raycast” condition (the particle is behind the mesh), the bottom part computes the “failed raycast” condition (the particle is not behind).
Both part takes in the scene.dt node (which is the delta time, aka the timestep between this frame and the previous one) which is multiplied by a Speed property and added or subtracted with a 0.01 float constant.
You can then see these results being plugged inside Select nodes (which is a simple boolean selector, like if/else) which will evaluate the raycast result and select between the addition/subtraction and a constant value.
Both output of the two Select nodes are then wired in a third Select to choose between the two parts.
The Discretization Points are the “pin” nodes just after the first Select nodes. They are here to discretize the graph. You can think of this as a storing function, plugging values in memory and re-using them on the next frame. This allows the graph a increment the delta time each frame and effectively giving us a timer (see the yellow strokes ? these are visual cues of the discretization happening. You can read it as if the output value of the Select nodes was walking back the graph all the way to the 0.01 float constant, and incrementing it).
Some polish on the scanner effect.
Just added some chromatic aberration and some particle stretching based on noise derivative, thanks to the new Partial Derivative node ( 𝛿x/𝛿t ). Kinda works like a shader DDX/DDY node but over time (either based on framerate if discretization is needed, or fully analytic if possible) instead of horizontal/vertical pixel value.
Also worked on polishing the spawning part a bit (especially the Earth globe):
it looks amazing… The only thing that needs some adjustments in my opinion is the text, it feels too static in comparison with other things you’ve got going on there. Epic so far.
Thanks for the feedback, I might boost up that turbulence on those texts to make them less static.
Anyway, in the meantime here’s a small update with an attempt to work on the “effect stop” part:
There’s this new effect.isRunning() function inside v2 which is quite useful for that. Here I can easily swap from infinite-life particles to just 1 second lifetime with this function, simply rewriting the lifetime at runtime.
You can see some parts are fading linearly while some are blinking, they’re all controlled by the same template which I just created for that.
Last update for the final day, I just polished a bit here and there. Reduced the noise a bit, thought it was too much. Also added the noise to the texts connection lines, to add that bit of “interference” to the generated texts.
I think this will be the final entry, thank you all for your love and support <3
Feel free to contact me or reply to this thread if you have any question regarding this effect or PopcornFX v2 in general