Most common / Bread & Butter Shaders and Materials "techniques"?

For the most important techniques are:

2 Likes

:open_mouth: Even though I understood it, this example made it so much more clear to me. I think it finally clicked for real.

Hey, I don’t wanna abuse your good will to help, but what are those last 2? The Center Point and UV Independence.

Have any cool/clear examples to show the logic behind it? I ask this because, due to the example you made for the Distortion + the gifs you already shared earlier…all this doesn’t look like weird complex stuff anymore.

It was very enlightening. Many thanks! :slight_smile:

this is polar coordinates to get something to radiate; the center of the ripples certainly can be repositioned as well as having 2 or more added together for wave interference.moreDistorts
it also has 1 noise for Red/U and another for Green/U so the X and Y motion can be non-uniform

here x2 noise nodes are moved in different directions from a time node; They get combined so that 1 adjusts the Red/U while the other controls Green/V channel to break uniformity.moreDistort2

3 Likes

So Displacement and Tessellation is probably expensive, but the basic World Position Offset (WPO) method is very cheap. It just relies on how many subdivisions you have in your geo, (vs displacement/tessellation which is making more geo) and how far you’re moving your verts.

A good example would be @simonschreibt 's Liquid Mesh project. In the second video from the top, it gives a very clear idea of what it does. That version has lots of subdivisions, but you get the idea, you can make your mesh move. https://www.artstation.com/artwork/BmN5G6


You can add a small amount of this in to even stylized effects for some nice extra detail and motion.
From afar, it’s not as noticeable, but I have some basic WPO moving the geo in these waterfalls I made. It’s more apparent close up, but the far shot was for the demo reel

Color LUTs are super powerful, and especially important for stylized vfx. They allow you to get more than a single color into one particle, and you can control how they are colored.
In this clip, I’m using a gradient with black and oranges to color the barrier around the boss. The main texture with the faces is just a grayscale image that was reused in a bunch of places.
https://youtu.be/o9R-1ANy6rk?t=29

4 Likes

Heeey, I was messing with it for about 2 hours now. I hooked things up as you did on the gifs and started tweaking the numbers to see how they interfere on the final result. Plus, I’m trying to make a more “humanized” sense out of it.

I think I don’t have issues with the radial one. I tweaked a lot and was able to represent various cool wavy jellies.

But the “regular” one…
I know it’s the same principle, but visually speaking…there is something off for me.
Something that my eyes couldn’t make sense. I bet there is logic behind it, otherwise it wouldn’t work.


0 Distortion applied…let’s gradually go all up to 1,5


0,5 Distortion applied.
Ok, we see the curve happening, and it slightly resembles the noise texture used.


1.0 Distortion applied
Well, at this moment I’m lost. I don’t get how the noise texture makes that to the checker. I do notice the black spot seem to work as an anchor for not letting the things around it move a lot, but the rest is going crazy D:


1,5 Distortion applied.
A circle has formed???

I don’t get how the image got to look like that D:

How do you go about picking a Noise texture for a certain VFX you want to make? Can you somewhat tell beforehand what Noise Texture will give you the result you want or is it all about trial and error?

PS: I was about to post and noticed the “Remap” node also interferes on the result. Is it the base “ratio” for the distortion? Because, well…it remaps the UVs?

Anyways, thanks for the attention you’ve been giving :slight_smile:

well i can’t figure out what exactly you might be doing.

  • I use remap to set the 0-1 range of black and white into a small output such as [-0.1] to [+0.1]
  • it means 50% gray now = 0 and we have negative and positive motion.
  • The other thing it does it sets the top and bottom values to only 1/10 what they use to be; that makes the distortion subtle, which it needs to be or you get wild distortion.

this remapped adjustment is added to UV, that means it will be combined into a UV layout rather than multiplying the UVs.

a value of +1 = +100% repositioning… it has left the image and come back on the other side. So that should tell you just a small .01 means the pixel has moved 1% of the image space and 5-10% is usually plenty of ‘wobble’

How do you go about picking a Noise texture for a certain VFX you want to make?

usually distortion is for randomness of a texture so that people can’t see it repeating; there was a time I needed a fish to swim and so I made a simple sine wave texture myself so that it was non-linear

It was this
image
that line just panned across X over infinity
a falloff *X so that the fish head was 0% distortion and the tail was 100%
black was -y
white +y

In order to know specific distortion you have to convert your minds artistic motion into the discrete numerics; That comes down to patience, practice and experience.

Unity URP (Universal Render Pipeline) has Simple (Perlin), Gradient and Voronoi

  • Most needs of noise is for randomness, so they can satisfy that… especially because you can always multiply two to get interference and process them with more calculation complexity.

  • a great deal of artistic RnD can be trial and error -

this particular thread was about trial and error, trying to understand boolean destructive & constructive texture motion and it broke my head without just seeing it.
video here
https://www.youtube.com/watch?v=bo65TluQMBI

[edits, my bad gramer/spelling]

1 Like

Heey,

So sorry for the extremely late reply. I had to go away from my city for a weekend…meaning no PC, no VFX.
When I got back, I went straight to a rabbit hole and…I simply forgot to reply.

I was just trying to wrap my head on what distortion works X just seing the final result.
The experiment made sense in my head, at least :sweat_smile:

I kept looking for stuff regarding different uses of gray scale and stumbled on this:

I really like how the air/dust dissolves on the explosion and wanted to make it on an effect I was working.

I finally made something I really like! Here it is:

Though it is still a WIP and I already spotted some stuff I want to change :sweat_smile:

Does it occurs to you any “technique” that would synergyze well with what I’ve been doing?
After I’m done with the explosion, I plan on checking out how to work with LUTs.

PS: I made this Lightning Projectile too!
https://www.artstation.com/siig

the absolute last thing I consider in my wheelhouse would be specific to my process - Material Capture ‘mat cap’ and Fresnel if you feel like faking lighting / volume and soften edges with something either on the inside or outside of your shapes.

You can use a simple soft particle dot as the matcap to do most of what this is showing, but here I used both to give an idea of two different concepts working together

matcap_fresnel_03
Mat caps are a view based way to apply an image that stays fixed to cam, it is like an environment map that always is projecting from your view.

The Fresnel node in shadergraph quickly lets you feather edges in other interesting ways based on the geo normal direction (used for rounded objects) and it can obviously be inverted

matcap_fresnel_01

and of course the Fresnel can be isolated to apply noise for edge fun as well as have a separated color node to change the internal and external shading of an object : here It is simply added with the mat cap so it behaves like emissiveness
matcap_fresnel_02

i will add that both these ideas are seldom used in RTVFX, it is more common in characters, but they certainly can create unique edge elements.

I’d also like to say your progress is going strong and keep up the good work.
Your projects are shaping up well.

Man, what the heck. What a weird thing to look at hahaha.

I believe I never seen it before in any game. Maybe it’s sublte or have been used in a way I’m not being able to make the connection. Anyway, it looks weird, but also cool. Though it really doesn’t come to my mind what are the possible uses for it. Like…when would I use it? Do you use it often? In what?

i used Fresnel here

the foam/brightness edges on the waterfall is controlled by Fresnel so that darker blue is in the middle.
image
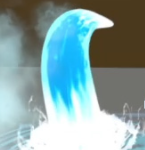
also the noise only exists on edges or portions of the waterfall where I wanted to break the solid shape feel… i guess you could think of it as fake sub surface scattering to give the water the refraction light feel

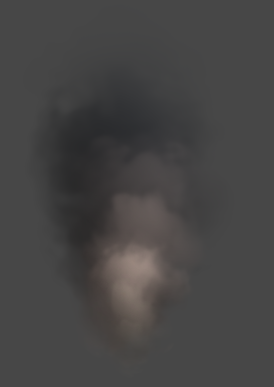
mat caps I used a few times on smoke to apply a gradient that always faces cam. here is a quick dirty version on billboards
matcap_04
uses these two textures * noise distortion
image

when I use Fresnel and with normal faking I get more like this

matcap_06
without a stencil pass (can’t do that i shadergraph as far as I know) shapes clip, but a billboard won’t have that issue as long as it has a normals calc to make a billboard act like it is rounded.

when I need fake volumetric on a mobile game and still retain rotation i’d use matcap, also for mesh based energy or magic I would do this because it’d be hard pressed to use more advanced AAA lighting techniques and shader tricks

edit: hehe … now im playing around, this is 20 vs 12 spheres so it keeps the overdraw lowish


image

7 Likes

Hmmm, at first I was like “well, I don’t see myself using this anytime soon”, but then I stumbled on this:

Though it is the opposite, middle is brighter and borders are darker.

I believe this is a 2D animation, but it came to me it might be possible to achieve this on a sphere, what do you think?

I’m unhappy with the looks of my spherical shape on the explosion I did. :rage: It looks thin, packs no weight…I want to change that :slight_smile:

At first I thought of creating more spheres and layering it, but maybe shader trickiness might do as well.

Btw…
Damn, both Water and Lava versions look so cool. Can I find it in a game scene?

perfect example, aura energy shields or magical shielding - the fresnel would be inverted and used additively to apply gradients that work around the geo

here I put some noise wisps on the previous examples
matcap_07
wrap trails, maybe darken the edges a bit and it’s almost there

water and lava are hobby work inspired by… not used for anything like a game or scene

1 Like

I’m starting to like it. It even started to resemble the animation I linked :star_struck:
I believe I’m gonna dive into it soon…I just gotta finish some stuff on the dissipation of my explosion and I’ll head to the sphere again!

Heeey Torbach, I felt like I might have let something slip by on past posts and decided to revise some of them!

Noise for edge fun and separated color node seems really interesting! I confess I’ve beens struggling to get my spinning sphere right (the one from #50 Sketch).
Would you have one of those magical screenshots/gifs teaching how to wire things up? :star_struck:

Looking at it again, and I really like it <3 <3
Specially when it looks like this:
image
I really love this trembling/shaky look. It seems unstable, wavy. And man, how dense it looks, damn. I really like it and want to snatch it hahahaha.

If it’s not troublesome, could you post another gif with MatCap on and off?

that particular issue is conditional to angles as well as premultiplied alpha blending so that it can occlude what is behind it while retaining an additive nature: it was actaully now that I re-examine the example very much accidental when using negative values for my Fresnel inputs
pillthing
it can not actually render within the object, the moving object is drawn after the static one in this example

  • 2 Fresnel’s are used to create a ring that is pulled away from the edge
  • this edge that get’s noise applied

an inverted version of Fresnel makes a dot added back with the ring

before they are added however I had a color swatch multiplied to tint them separately
image

youll notice the 3d sphere has a seam - to fix that you have to either apply noise in object/world space rather than UV or create a seamless noise texture by hand

noise I used is applied twice, 1u,1v and -1.5u,-1.5v so they scrolled in opposing directions and were multiplied to create undulations

one of the tricks here is to add a dot with the noise that feather off as it approaches the edge more harshly so that it does not apply this darkness OR, try to preserve the noise addition in greater contribution
image

3 Likes

Euphoria levels are raising as I imagine what I will be able to do with this :star_struck: :star_struck:

Man, Fresnel is awesome! All hail Fresnel!

Once again, big thanks, Torbach! You’ve been really helpful ever since I joined :smiley:

This thread turned out to be an awesome resource, great job and thank you everyone :smiley:

Hey, Torbach!

I really liked these orbs at first glance, but I was working on some other stuff at that time and didn’t want to derail myself from that.
But now the time has come!

[Uploading: image.png(1)…]
I specially like these 3 - loved the motion around the core!

General questions:

Are they spheres or billboards?
image
How do you get these cloudy blobs? Is it some trickery with Fresnel + Noises?

…more or less similar to this?

Now an specific question about the spinning element inside this orb:
image
Is it just a billboard rotating and spawning in random orientations?

image
What about the yellow elements inside this one? The way they behave seems fitting for some unstable energy or shockwave feels :star_struck:

Do you have any idea on how to make these dark red slashes that move really quick around the orb?

I’ve been working for 2 days on the anticipation of the orb explosion I made for the Sketch #50 and…still couldn’t make something cool. Everything I made looked waaaay “flat” and dead - looking like a sticker floating on the void :weary:

1 Like

How do you get these cloudy blobs? Is it some trickery with Fresnel + Noises?

just billboard particle, not a complex shader for that element, it is rudimentry trick to hide the shape and add to the illusion
image

Now an specific question about the spinning element inside this orb:

simple particle + 3d tilt like this
image

only the hexagon pattern is an actual Sphere with panning textures, there is no sophisticated shader on those orbs, they are made with very rudimentary objects for mobile hardware in 2017

What about the yellow elements inside this one?

that is the same as the green to the left of it but rotated to look ‘down’ the circle interference from the pole
image
it has a texture like the yellow too it’s circles/waves that pan but they are offset on UV coord so they work destructively to create an illusion of rotation

shapes like this
image

Do you have any idea on how to make these dark red slashes that move really quick around the orb?

exactly : they could be flipbooks ----but you can handle it like the trail +erode from Shannon’s threads , just place them on ring mesh (the glows/bloom however might be a post processes but you could fake it too)

as for the red/dark on the ground that is flipbook on double sided mesh that has different tint vertex coloring as far as I can tell

Oh so it’s possible to set actual Trails to be rendered on a Mesh instead of heaving them floating on
space?

Edit: actually nevermind! I think I got the idea. I have to set the textures panning to happen on the mesh so it behaves like a trail! [?]. Then I can just rotate the ring mesh or stick with tweaking the panning values I think.
I’ll give it a go tonight :slightly_smiling_face:

1 Like