Marina VFX – 50 Weeks of Stylized VFX: Between Art, Emotion & Code

Hi everyone!
I’m Marina — a real-time VFX artist with a background in both art and technology, trying to weave beauty, logic, and emotion into one living flow.

For the past few years I’ve been working with Unity, Unreal, and Houdini — exploring how motion, light, and timing can tell stories and awaken feelings. I love that moment when a few abstract shapes suddenly start to breathe — when something technical turns into something alive.

I’ve been silently reading this forum for about four years, learning so much from all of you — and today I finally decided to write my first post.
To celebrate this small step (and to stay consistent with my own creative growth), I’ve started a personal challenge:
50 Weeks of Stylized VFX.

Each week, I create a new video — showing the process behind a texture, shader, or mesh, or explaining the basic principles that make an effect work. A few videos are already done, but now I want to make this journey more systematic — a space to grow, learn, and refine my voice as an artist.

I’m not chasing perfection — I’m experimenting, observing, and searching for the best format to express what I feel through real-time visuals.
My goal is to find that fragile balance between beauty and logic — and to share what I discover along the way.

I’m completely open to critique, comments, and new ideas — please don’t hesitate to share your thoughts or feedback. I deeply value honesty and dialogue, and I believe that every perspective helps the work become stronger and more alive.

I endlessly love what I do.
And it would mean a lot to walk this journey together — to learn, to exchange ideas, and to keep this spark of wonder alive.

Thank you for creating this space. I’ve been inspired by it for years — now it’s time to finally join in. :cherry_blossom:

upd: I realized it’s more convenient to keep this thread as a clean index of links to my other weekly posts and breakdowns. This will help avoid clutter and make it easier for everyone to find exactly what they’re looking for.

7 Likes

We are very happy to have you here :smiley:
Looking forward to your creations and I’m sure there will be a lot to learn from! I love seeing breakdowns of others :smiley:

1 Like

Week 1 — Stylized Fire Texture :fire:

A few years ago, I started practicing by creating small stylized effects for environments — one of them was fire.
It began as a simple study, just a way to understand motion, heat, and rhythm inside an effect.
But even after I finished it, the idea never really left me.

I kept thinking — what if I turned this process into something I could share with others?
Not just the final texture, but the way it moves, grows, and finds its shape.
So this September, I finally came back to it — and that moment became the first step of what’s now my 50 Weeks of Stylized VFX journey.

StylizedFire_Texture_03
Created in Substance Designer — procedural, looping, and built entirely from noise.

I wanted this fire to feel light and alive — not realistic, but expressive.
To build it, I split the idea into two systems:
one for the main fire motion and one for the wave that gives it breath.

1 - Fire Noise

I started with Anisotropic Noise, warped by Cells 1, to create elongated, fiery streaks.
This combination gave me the sense of vertical tension I was looking for — clean, flowing lines that already carried the structure of heat and motion, even though the texture itself is completely static.
After refining it with a few Blend and Levels adjustments, I got the pattern that felt both organized and alive — the visual rhythm of fire captured in still form.

2 - Wave Motion

For the wave, I started with Perlin Noise and shaped it using Cross Section, which defined most of the wave’s silhouette and gave it that characteristic smooth curve.
From there, I added several Warp and Blend steps to emphasize the edge and enhance the overall wavy feel — not to create motion, but to make the form more expressive and natural.
The result is a static texture with a clear, rhythmic flow — something that feels calm yet full of potential energy when combined with the fire pattern later in the shader.

3 - Blending Both Worlds

Once both base patterns were ready — the fire noise and the wave — I combined them to shape the final look of the flame.
The goal was to find a natural balance between the vertical tension of the fire lines and the soft curvature of the wave.
Through several Blend, Warp, and Levels adjustments, I refined the silhouette and contrast, highlighting the thin bright core and the gentle falloff toward the edges.
For the preview, I used a Gradient Map built from white through yellow, orange, and red to black, to visualize how the temperature and brightness would distribute across the form — while keeping the final texture itself fully grayscale for later use in the shader.


4 - Closing Thoughts

This was the moment where everything clicked for me — I realized how much I enjoy the process itself.
What began years ago as a simple training exercise — just a way to study form and contrast — slowly grew into something much more meaningful.
Through this small experiment, I found a way to connect art, emotion, and structure into one living flow — where every node, every layer, and every choice becomes part of expression rather than just a setup.

It’s still a simple texture, but for me, it marks the beginning of something bigger — the start of consistency, curiosity, and beauty in creation.

:movie_camera: Full video process:
:point_right: Stylized Fire Texture Tutorial (YouTube)

5 Likes

Thank you so much, Manus! :sparkles:
I really appreciate the warm welcome — it feels great to finally share something here after following the forum for so long. :sparkles:

1 Like

Hello! I also just recently started learning VFX. Speaking about fire textures and stylization, I like that even with a small number of nodes you can achieve pretty good results :slightly_smiling_face:

2 Likes

Indeed! It’s like alchemy — a few nodes, a bit of color, and suddenly there’s life in it :fire::sparkles:

1 Like

:fire: Week 2 — Stylized Fire Shader Breakdown

Last week’s fire was just a flat pattern — warm, but silent.
This week, it started to move. To breathe.

I built a stylized fire shader in Unity Shader Graph to bring that texture to life.
Not to chase realism, but to shape rhythm and flow — how the flame expands, softens, and folds back into itself.

Before touching color or transparency, I wanted the movement to feel right — to let the shader breathe through its UVs.
Everything starts there: how the texture drifts, how distortion bends it, how space itself becomes fluid.

UV Flow Setup

The foundation of the fire’s motion lies in how UVs are built and manipulated.

Main UVs control the base texture:

  • The texture uses standard UV0, split into X and Y channels.
  • Two exposed parameters — MainTextureTiling and MainTextureOffset — give control over scale and position.
  • The X-offset is multiplied by Time, creating a subtle horizontal panning.
    This keeps the fire drifting smoothly in one direction while staying calm vertically.

Distortion UVs add movement layers:

  • Each distortion sheet (main & small) repeats the same logic — a tiling + offset setup animated by time.
  • The sampled noise is multiplied by a strength parameter (DistortionAmount) and then added to the base UVs.
  • The large distortion moves slowly, shaping big undulations; the small one runs faster, adding vibration and fine flicker.

Together, these UV flows make the flame feel soft and alive before any color or opacity is applied.

:art: Color

Once the UVs began to move, it was time to let the flame speak through color.
The Main Texture defines the base pattern, but its energy comes from how it blends with Vertex Color and two adjustable hues — MainColor and AdditionalColor.

A Lerp between these colors, driven by the grayscale values of the texture, controls where the flame glows hottest and where it cools down.
The Intensity parameter amplifies that glow — not to make it brighter, but to give it weight, a sense of internal heat.

It’s less about physical lighting and more about emotional temperature — how warmth travels through the shader.

Opacity

With color flowing through the flame, the next step was to let it breathe through transparency.

Fire shouldn’t be trapped inside a square sprite — it needs space to fade.
The opacity here is built around a soft circular mask that hides the corners and shapes a clean, organic silhouette.

  • The Main Texture (R) is first shaped with a Power node (MainPower) to define the overall flame form.
  • The Opacity Mask is sampled separately and also passed through a Power control (OpacityMaskPower) to adjust edge softness.
  • These two textures are then multiplied together, removing the visible borders and blending the flame smoothly into air.
  • The result is multiplied by Vertex Color A (to read alpha from the particle emitter) and by a global OpacityMultiplier for easy control.
  • Finally, a Saturate node keeps the values safely within 0–1.

There’s no dissolve logic here — the mask serves purely to soften geometry and create a natural falloff at the edges.

Full Shader Graph & Texture Setup

(screenshots)


Final material parameters

(screenshots)


:sparkles: Animated result:

stylized_fire_shader_final_02

:movie_camera: Full video breakdown on YouTube: Stylized Fire Shader Tutorial
:orange_heart: Previous part – Fire Texture: Stylized Fire Texture

The shader now feels complete — calm, stylized, and alive.
Next week, I’ll explore how to carry this energy further into motion and timing.

1 Like

:fire: Week 3 — Stylized Fire Particle System

Back then, I thought this was the final step of my little fire journey — but later it turned out there was still more to come: the smoke texture and the heat distortion shader.

At that moment, though, it really felt like a finale — bringing everything together: the procedural texture from Substance Designer and the stylized fire material from Unity into one full particle system that could finally breathe and glow on its own.

:art: Ember Texture — Substance Designer

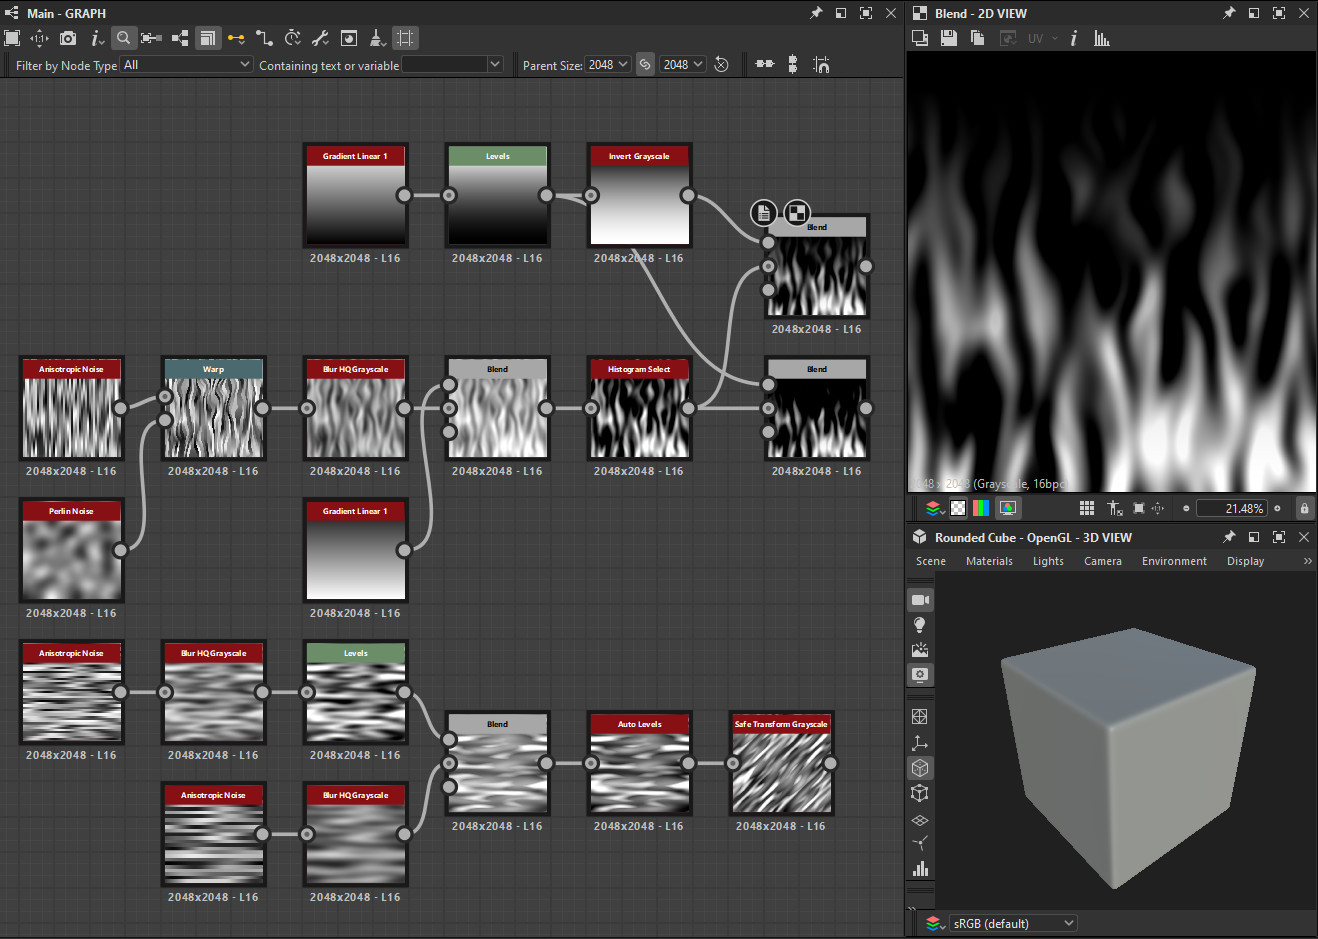
The heart of this setup is the particle texture.

In stylized effects, texture defines the entire character of motion — whether it feels organic, chaotic, or rhythmic.

Usually, I create one texture at a time and later combine several variations into a flipbook, because that gives me more control over shape and rhythm. But this time I decided to experiment and make all four textures at once — and it saved me a huge amount of time.

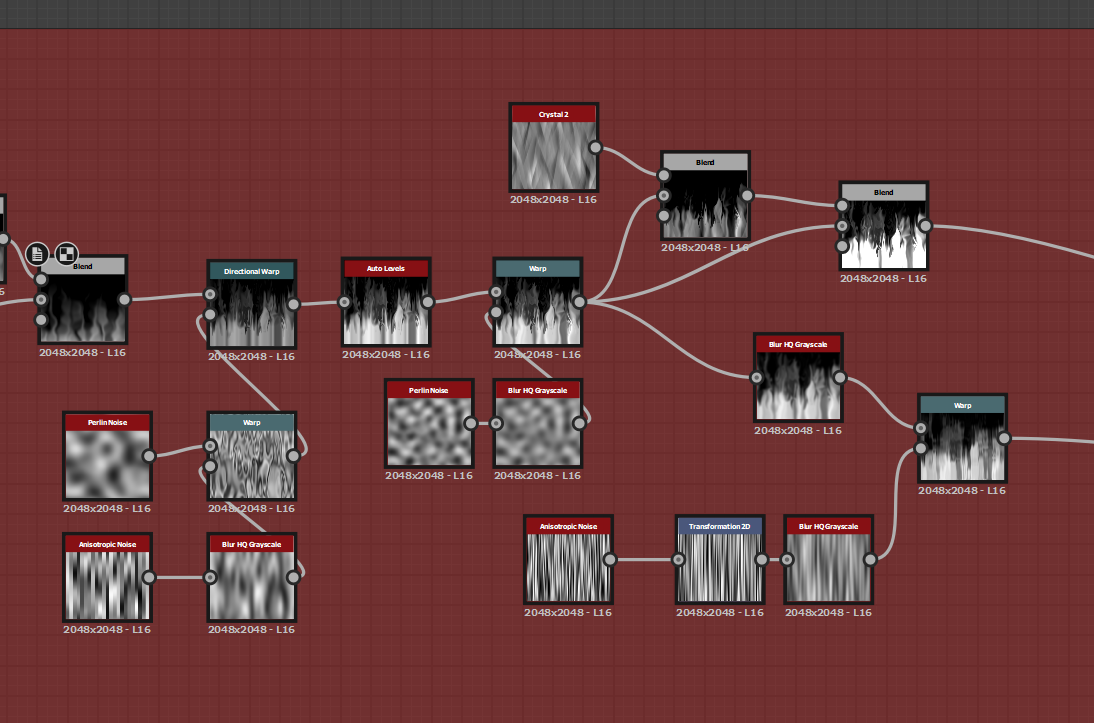
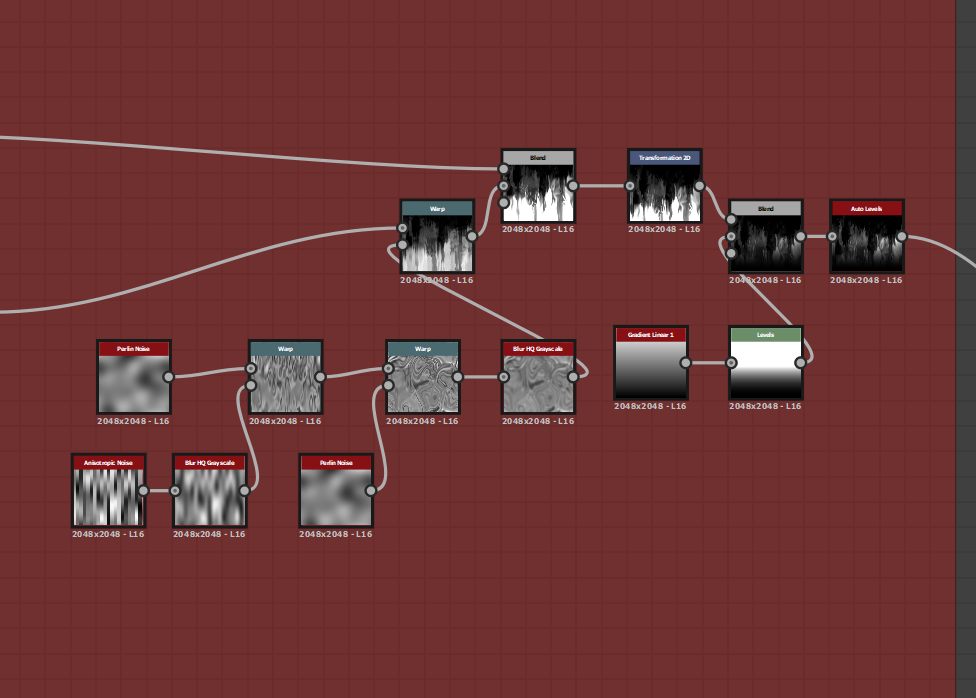
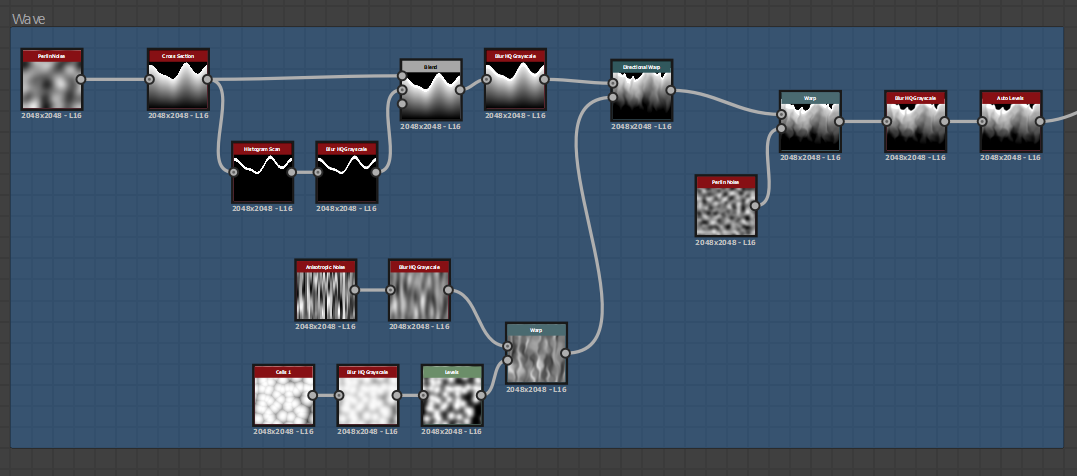
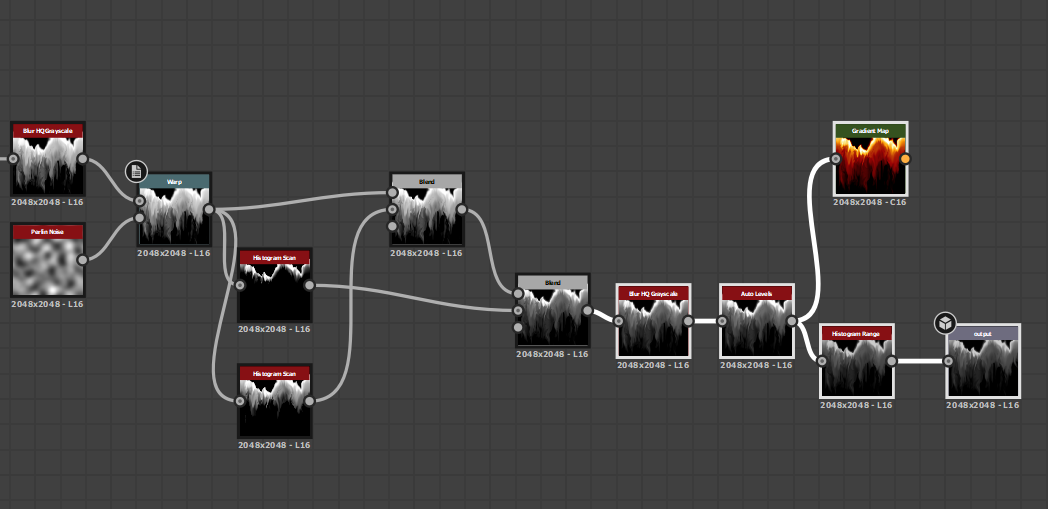
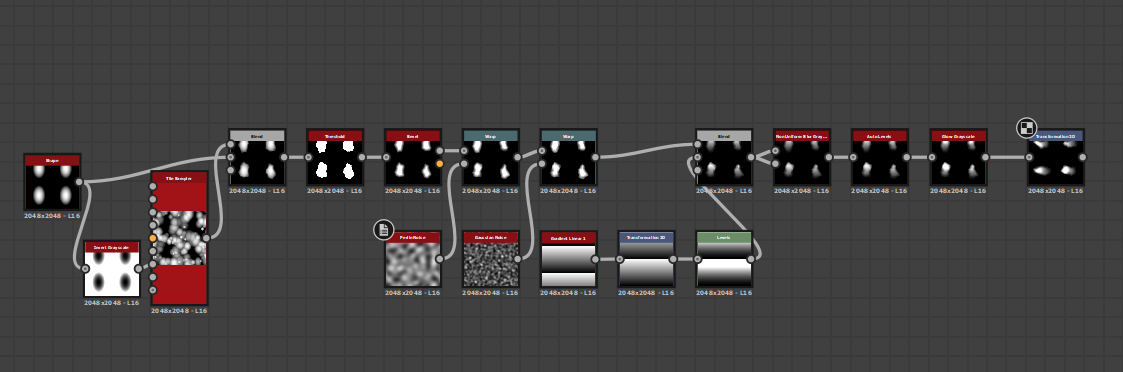
I built them using the Tile Sampler node with scattered paraboloids of different sizes and heights.

By combining them with a base mask, I could “push out” small round forms only where the mask allowed — almost like stamping embers out of shape.

Then I warped and layered additional masks and glow until the texture started to look like something burned but still alive — tiny glowing fragments that keep the memory of the flame.

It’s a very quick but powerful way to get unique shapes for particles, and you can change the whole feeling of your fire just by slightly adjusting their density or softness.


StylizedSparks_Texture_02_512

:gear: Technical Tip — Ring Buffer Mode: Pause Until Replaced

When you build a fire core using a single particle that lives forever, Unity sometimes introduces a strange flicker — a tiny “blink” that happens every time the particle respawns.

It’s easy to miss at first, but once you notice it, it becomes impossible to unsee.

Here’s what’s happening:

if your particle lifetime equals the emitter’s lifetime — for example, 1 second each — the particle will blink every second when it gets respawned.

If both are 5 seconds, it flickers every five seconds, and so on.

The longer the lifetime, the slower the blink — but it never truly disappears.

This setup is common when a particle needs to always exist — like the core of a flame, a glowing crystal, or any continuous effect that should never die.

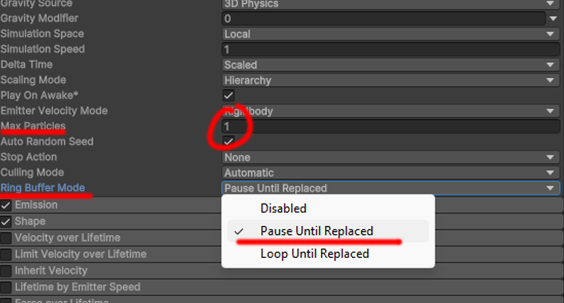
To fix the flickering, enable Ring Buffer Mode → Pause Until Replaced.

This tells Unity to pause the particle instead of respawning it.

And to make it work properly, set “Max Particles” to 1, so the system knows it’s supposed to maintain just a single, persistent particle.

A tiny checkbox — but it completely changes the behavior, keeping your effect stable and alive.

:bulb: Glow Layer

Once the core is stable, I add two layers of glow — one facing the camera (View alignment) and another horizontal (Local alignment).

The horizontal one gives that soft ember-like warmth at the base, while the camera-facing one creates depth and breathing light.

To make it flicker naturally, I animate color and size curves in a loop — starting and ending on the same values.

It’s a subtle detail, but if the curve doesn’t loop perfectly, the light pulse feels broken instead of rhythmic.

:new_moon: Contrast Particles

Even the brightest fire needs darkness to shine.

I duplicated the emitter, switched to Alpha blending, and created slower, larger dark particles with less energy.

On dark backgrounds they’re almost invisible, but in bright environments they make the whole fire play.

This contrast keeps the effect readable in any lighting — stylized, cinematic, or gameplay.

It’s a small artistic choice that adds a lot of realism and balance to stylized VFX.

:sparkles: Reflection

Recording and building at the same time is always tricky — every tweak takes longer when you explain it aloud.

But this process helped me see how texture, glow, and timing work together to create a believable rhythm — the kind of motion that feels alive even before color correction or post-processing.

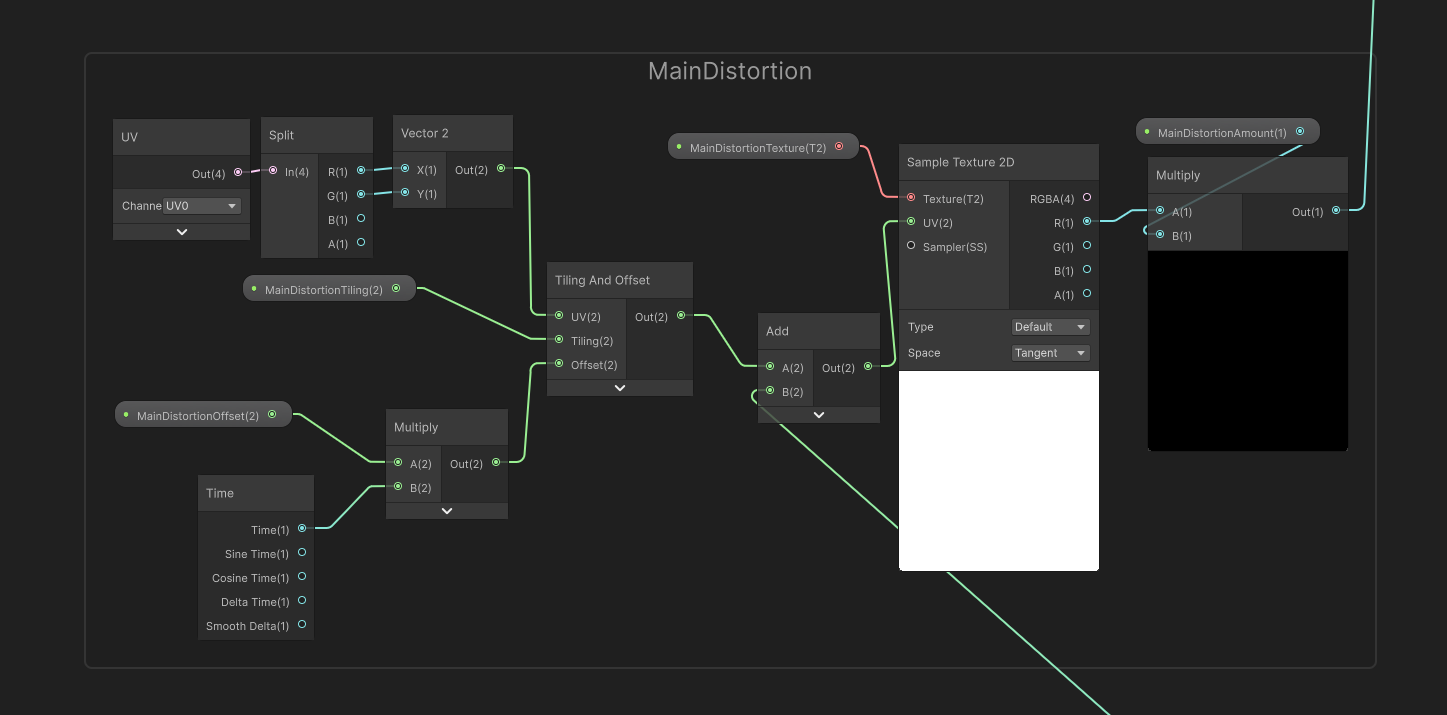
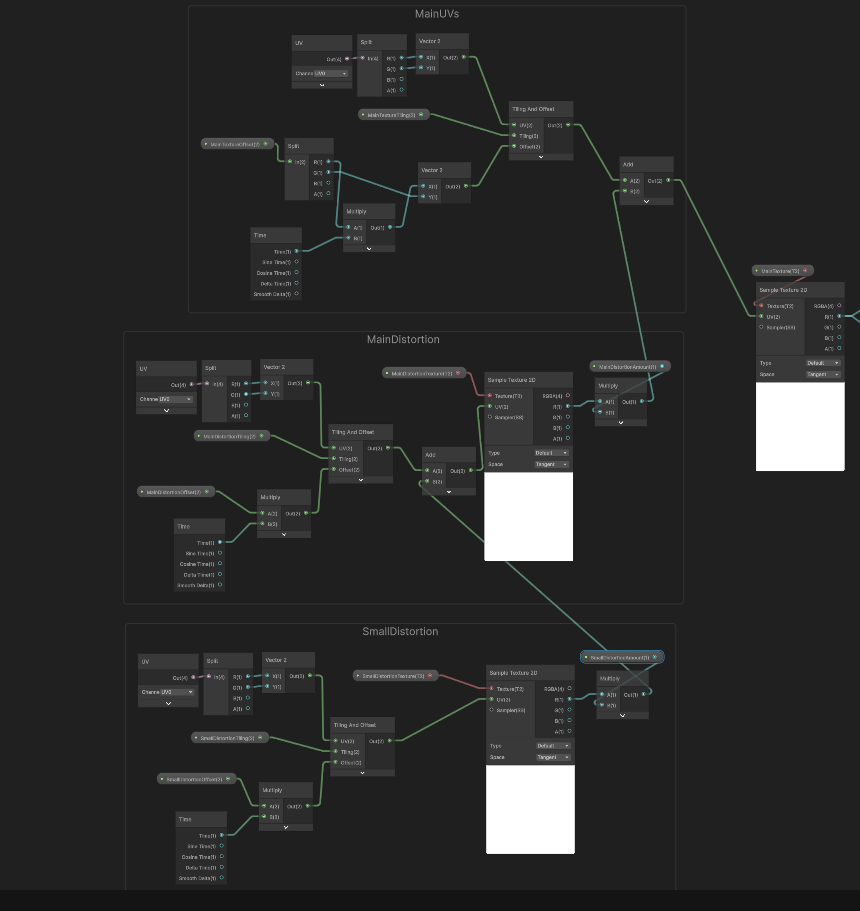
Next week, I’ll move on to something that continues this theme:

a Heat Distortion Shader, to give our fire its warmth and shimmering air.

stylized_fire_particlesystem_final_02

:movie_camera: Full video process:
:point_right: Stylized Fire Particle System :fire:

2 Likes

:fire: Week 4 — Heat Distortion Shader

“You know that moment when the air around a flame starts to tremble?
That’s the feeling I wanted to capture this week.”

heat_dist_05_256

This is Week 4 of my Stylized Fire Series, where I slowly build a fully stylized fire effect step by step.
After working on textures, shapes, motion, and light, this week I focused on the subtle part — the heat distortion around the fire.

Below I’m sharing the breakdown, key techniques, shader logic, and a few insights from the process.

Full video breakdown (~20 min):

1. Concept of Heat Distortion

The idea is simple:
distort what’s behind the object, not the object itself.

In Unity 6 (URP), this is done by sampling the Scene Color and offsetting the screen UVs with animated noise.

The effect is subtle, but that subtlety is exactly what makes the fire feel alive.

Here’s a small GIF showing this step

2. Shader Breakdown (Unity Shader Graph)

This shader was built in Unity 6 URP using Shader Graph Unlit (Transparent).

Main components:

  • Scene Color — samples what the camera already rendered
  • Screen Position (Raw) — gives clip-space position
  • Divide XY by W — converts clip-space to stable screen-space UVs
  • Noise layers — simulate rising heated air
  • Opacity Mask Texture — softens edges

3. Distortion UVs

To simulate rising air, I used two noise layers:

Layer A — low-frequency, slow movement

Gives large-scale “air waves.”

Layer B — high-frequency, fast ripples

Adds fine vibration and detail.

Combined:

distortion = (noiseA * strengthA + noiseB * strengthB);

Applied to the UVs sampled from Scene Color.

4. Scene Color Sampling

This is where the effect becomes visible.

Instead of sampling a texture, we sample what the camera already sees:

result = SceneColor( screenUV + distortion )

Too much distortion breaks the image.
The ideal amount is subtle — just enough to feel the movement, not dominate it.

You can find the GIF preview here
and here

5. Final Result

Here’s the final look of the stylized fire inside the scene.
In this GIF, I show both the full particle system and the heat distortion component on its own, so you can see how each part contributes to the overall effect.

That’s it for this week’s effect.
Heat distortion is subtle, almost invisible, but it brings the fire to life in a way nothing else can.
I’ll keep building the environment around it in the next update.

1 Like