I hope I’m not too late to start on this sketch, but here’s the concept I came up with.
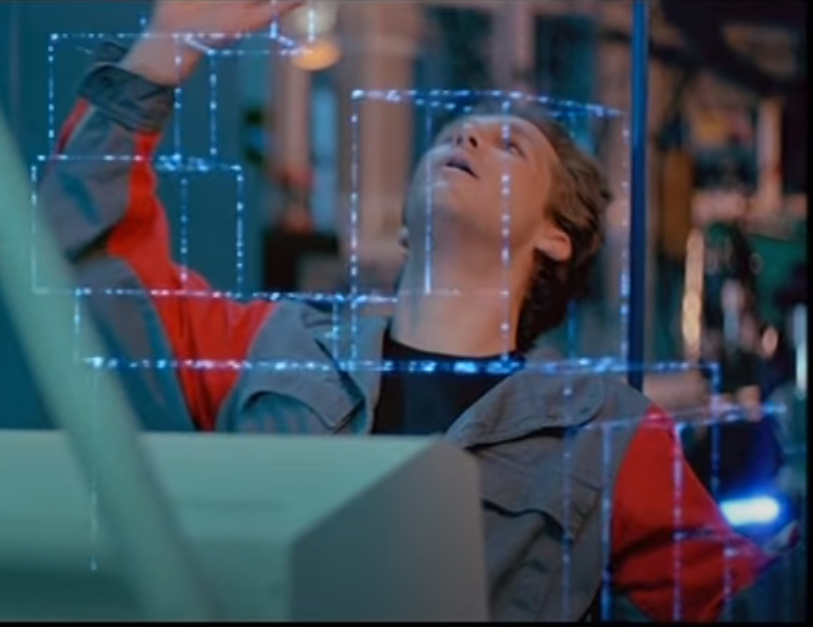
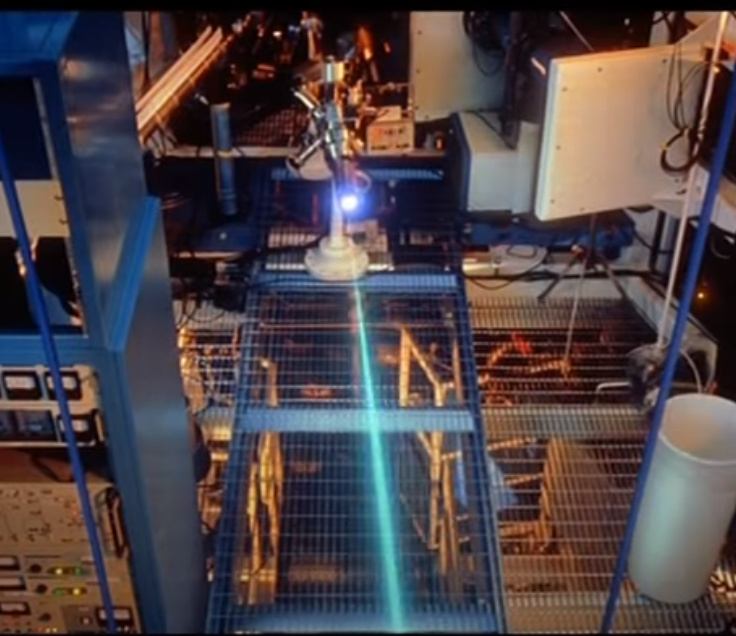
I really enjoy recreating movie effects to work with realtime tools, so that’s what I’ll be doing here. I looked into multiple classic movies with teleportation for inspiration and landed on this scene from the original Tron:
Playing the sequence one way will make the model disappear, and playing it back will make it appear somewhere else.
The part that I think will be the biggest problem is step no.1. I’m not 100% sure how to make it work in Unreal. If you have any suggestions please let me know!
Hey! Very cool idea. It’ll be super fun to execute.
For the step 1 (quick theorycrafting)
You could always hardcode with a few variations using custom static meshes if the animation will always be the same.
Perhaps setting a few sockets in the skeleton and using some maths to randomize the cube sizes.
You might be able to get distances between two sockets (along with a bit of maths) to figure out the box sizes for them all. This might work for weird poses or if the character can be in any animation sequence when he gets frozen and teleported.
Perhaps use Get Actor Bounds and then go from the top to bottom / side to side parallel, randomly distanced rays to find splitting points. This might work for any mesh. And you might need a dummy lowpoly collision mesh skinned to the same skeleton (if skeletal mesh) for simpler ray collisions. But I’m just rambling now.
Or random pointcloud spawned on the mesh, sample the distances between the array of points, get distances and spawn cubes. Perhaps you could even do this in Niagara.
I feel like I’m missing a simple, obvious solution. I’ll keep thinking about it.
That’s all I can think off the top of my head. Good luck! Please let me know how you solve this.
The ready made poses and boxes is something I’ll definitely try to make first, just to setup the whole thing.
An array of boxes that only leaves the ones colliding with the character was my first idea for an interactive version, although part of the appeal is that they’re all different sizes. I also couldn’t find any solid information on colliding with skinned meshes, or baking out a pose in-game.
I was thinking about spawning them on bones, but thanks for reminding me that sockets exist in Unreal! They could influence the size of a box by their own scale, which would have been a problem with using bones.
Btw. I’m using this project to start learning Niagara, so its features are absolutely applicable.
An update on the sketch, I hope this 2AM post will make sense
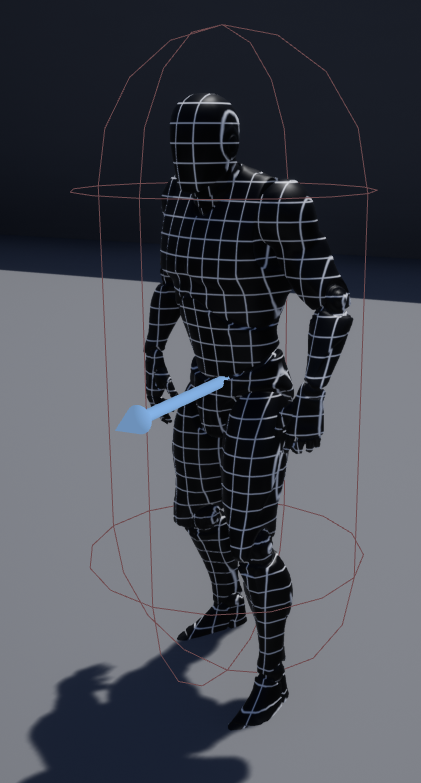
I started with the part that I’m most familiar with in Unreal - the grid shader.
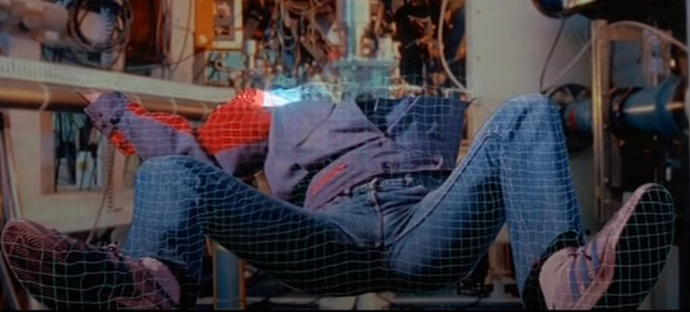
The first step was getting the pattern on the character to look to scale. Initially I started with the grid going in the 3 axis:
The problem was it didn’t really look too appealing and the original reference was only splitting it in 2 directions from the perspective of the laser in the back:
So I downscaled it to 2:
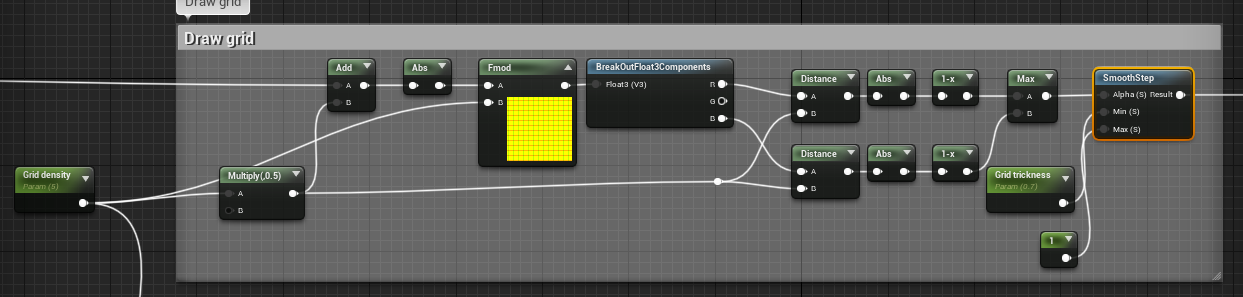
Then the next step was making it disappear one square at the time. Usually when you work on shaders you’re working with gradients and ranges of values, while this is a set number of things (squares) turning on and off. That made it a bit more tricky to translate into shader code.
My first try at masking out the correct areas ended up in a lot of spaghetti nodes that were impossible to understand the next day, but it gave me a clear idea of how to approach it.
You divide the 2 axis into 3 areas each - red is already transparent, green is currently transitioning and blue is still intact:
The laser and disappearing cells go back and forth, so the red and blue columns will be switched in even and odd rows.
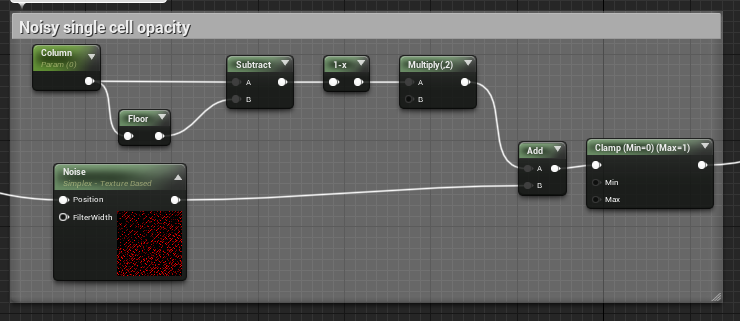
The next thing to do is make the transition of a single cell. I’m using what’s left after the decimal point of the column value mixed with a bit of noise to go from a visible cell to an invisible one:
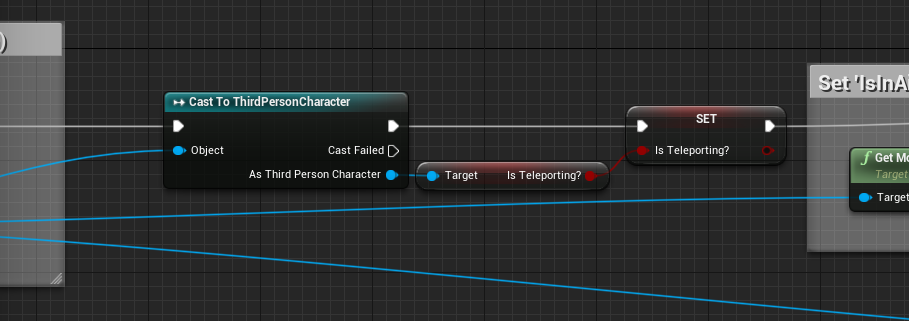
It’s driven by 2 values “Row” and “Column”. Initially, I wanted to calculate each of them from a single value, but if I do it in the blueprint I’ll be able to also use it for placing the end of the laser.
Now on to setting up the teleport mechanic in the blueprint!
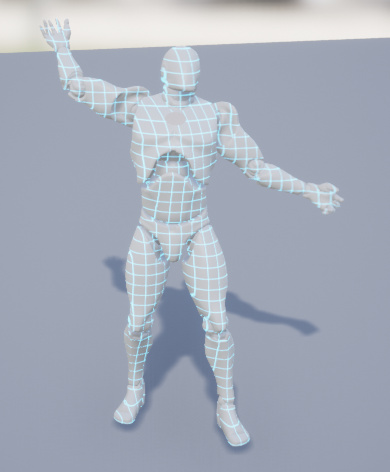
Based on that I can switch to a custom state in the state machine that just blends to a static pose I made from the idle animation:
And the whole thing in action:
Looking back at it, I’ve put too much polish into the values animation at the beginning. Switching from an idle to the custom pose broke the animations of each row (because that hand in the back was reaching too far). Next time I should get the pose first and then put in the work in getting the animations just right.
But looking back at it again, maybe there’s a procedural way to get the start and end of each row, regardless of the pose? I have no idea right now, maybe I need to play around with it later.
Next time - the “bounding boxes”. The deadline is inching closer and closer, but I hope I’ll make it on time
I didn’t manage to get everything I wanted to work for the deadline, but here is what I’ve got right now:
There’s also a laser made out of a Niagara beam, but for some reason, I can’t get it to show in play mode
Maybe someone that has mere experience with it knows what’s going on and how to fix it.
There’s still some work to be done on the reverse sequence, but I’ll have a look at it later on. For now, this is my submission