This isn’t something i’m working on, but it’s something I’ve been questioning for awhile. It seems really simple but I wanted to see if this is a normal technique or if it’s completely bad haha.
Here it is in Unity. All I did was animate the offset for the material in the Y value from 0 to -1 to make the texture move down the spiral mesh.
This could be done going the ribbon/trail route also, but animating the the parent to swirl around like that seems like unnecessary work (unless I’ve been wrong the whole time and that work IS necessary).
I’m questioning this technique because in ‘Step 3’ the texture is wasting half the space. The whole bottom half has no texture on it.
You only need it to be fully transparent on the edge set of pixels and then clamp your UVs after you pan them. So you pan your sheet from (-1,0) which is clamped to the transparent pixels on the edge of your texture, through (0,1) where your texture is, to (1,2) which is clamped to the transparent pixels on the far edge of your texture. Hope that helps!
Oh, my goodness. I can’t believe that flew over me. It’s so simple. I remember I learned about clamping at one point but I haven’t used it enough to get used to what it does! This is awesome, i’m so glad I decided to take the time to make this post (no matter how simply embarrassing it is)!
@ryangatts nailed it. Also, another thing to consider:
When I’m working with something this stretched out, I like to design the wisps in an equally proportioned texture, then squash the whole thing down for the final square export, so they don’t make really long continuous shapes. Adds more motion to the spiral, rather than looking like a solid lit-up spiral that slides in then eats away.
May u think about adding some splined out beginning & end for ur geometry. And some parts like the middle are more impactful like a sphere shape, because currently it looks super linear.
As an example, paint it as a 128 x 1024 texture, then in Photoshop, click [Image], [Image Size…], then un-check the “Constrain Proportions” option, and make it 128 x 128. The image will look super weird, being so squashed, but when it’s stretched out again on your mesh, it’ll sing ;^]
Also worth noting, you may be able to get away with leaving the image at full fidelity, un-squashed at 128 x 1024, depending on the optimization needs of your project / engine. This technique only applies if you must have square textures.
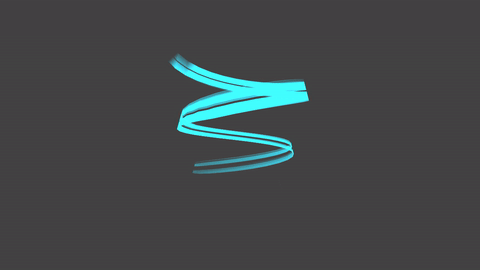
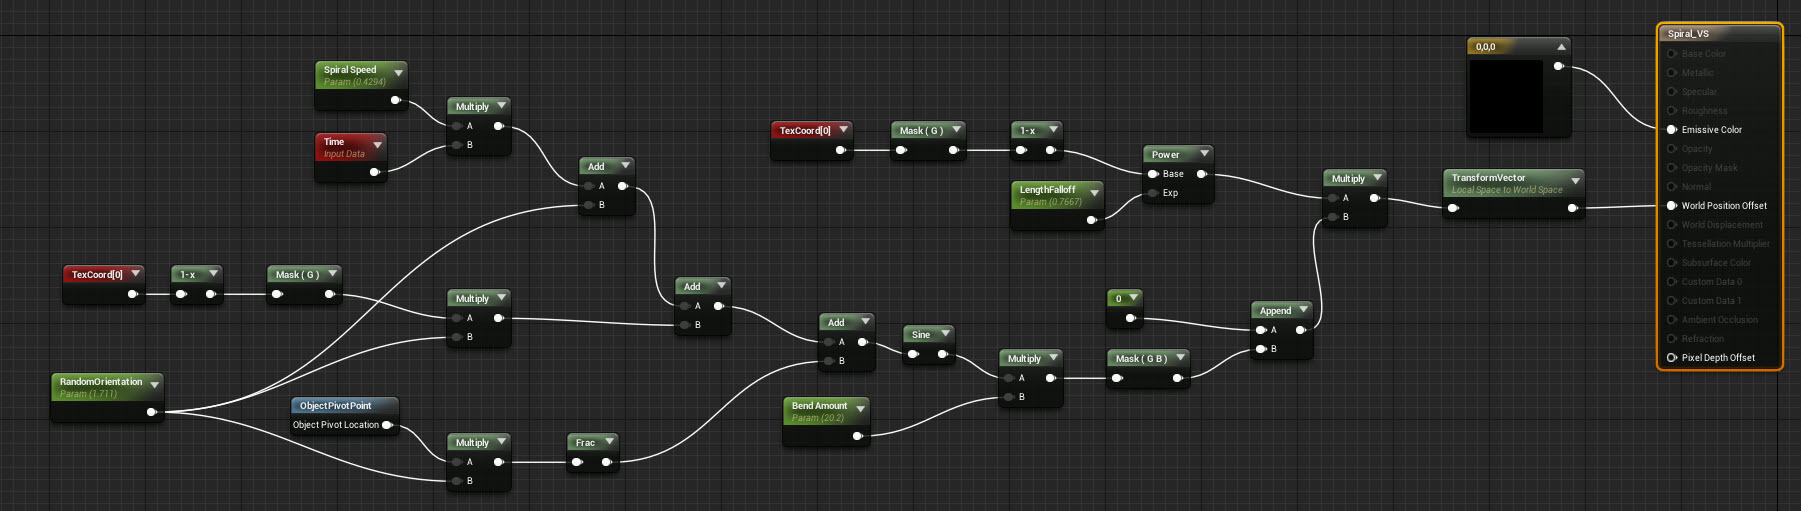
If you have access to vertex shaders, you can do cool spirals with a bit of trigonometry. It’s a cylinder mesh, with UVs cylindrically mapped. In Unreal, it looks like this: