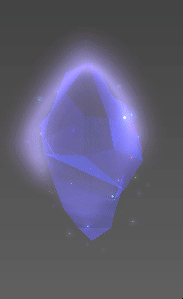
Shannon McSheehan - LoL FX + Knowledge Share

You’re amazing, thanks so much for this huge write up! Looking forward to diving into it after work! :sparkling_heart:

1 Like

Thank you for taking the time writing all this!

One thing I noticed in my work as a freelancer: the Implementation of the effects costs a huge amount of the total time. Just finding out at which specific asset, at which time and in which file to implement the effect sometimes costs hours for me to find out.
I wonder if you guys have tech-guys preparing everything for the VFX-artists and you “just” have to do the effects? But usually one has to test the effects right in the game to see them under “real” circumstances, right? That’s at least my approach to not develop into a wrong direction. The disadvantage is, that there’s a lot of implementation-“overhead” before I can see the first little test-particle.

1 Like

Np! I just hope that it’s useful to others, so thanks for posting Simon! Always been a fan of your vids :slight_smile:

For VFX buddies on LoL Designers use temp VFX (whatever gets the job done! haha) to establish the base kit. From their we FX buddies have hooks already setup for most of the FX we need that we can rename/replace so generally setup isn’t too tough to get you rolling. We have a pretty orderly setup for Champions so nothings too tough to find :slight_smile: LoL also has an additional tool that tracks particles on screen. So you could be playing a character or be in a certain area of a map and the tool will tell you what’s playing. You can even right click in that window to easily open anything that’s playing :smiley: Sounds like something like that would be pretty valuable for you!

Although we have a particle previewer we test things in game mostly. The previewer doesn’t always orient correctly, or know what bone it’ll be attached too etc. We’ve tried to cut down on implementation time to give us as much time creating as possible :smiley:

5 Likes

Oooh wow. Thanks a bunch of the detailed breakdown Shannon! I have a bad habit of “winging” my FX once I find enough references and once I’m done I look at it and go damn I wish I had considered said 100x easier way to do the same thing.:sweat_smile: I really appreciate the tips on how to setup a pre-pro, will totally help me in future endeavours to set up a personal pipeline as opposed to winging.

Ah I’m so jealous of your particle tetsing tools!!! My simulate button in unreal crashes my editor everytime so I have to keep exporting and importing between multiple projects haha.

1 Like

Hi Shannon. How can you make the Taric’ shield ??. Have special shader you use??
I expect your guide. Thank you so much

taric's%20shield

Hey Max

Nothing too fancy, just scrolling textures and UV trickery :slight_smile:

I have 5 groups for the gem:
1 Gem geometry (texture was screen space bound so I don’t have to have a differently UV’d version of the same geometry)
1 Gem sheen geometry
1 Quad to fake the glow
1 group for the little tiny rainbow sparkles
1 distortion to add a little oomph to the spawn in (you can’t really see it in the gif against the grey background though haha)

Taric_Crystal

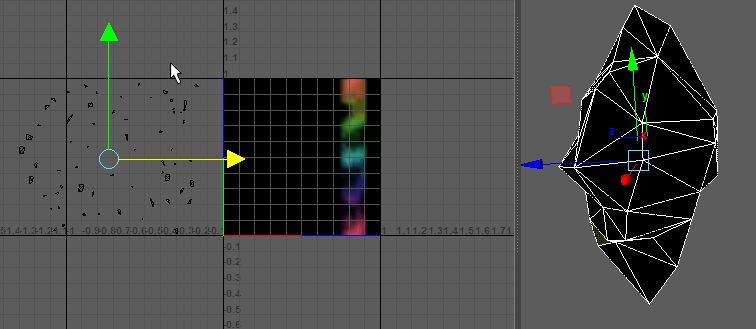
  • Once you have the shape you want, automatic map it to get all of your UV’s laid out.
  • Select them all and cut the edge, this will make each face have it’s own separate UV shard
  • Select the shards and shrink them (like the little black UV shards in the gif to the left)
  • You can space the UV’s out over the UV grid in any order. I liked to keep mine in somewhat linear.
  • I pushed mine up and down depending on what color range I wanted. You can see the VERY small color texture with varying rainbow shades.

The top silhouette of the gem is pretty uniform, so I painted a blury ^ shape to fake a glow that wouldn’t cover too much of the champion.

2018-07-25_18-39-27

92 Likes

so amazing. i have must try do it noww! thank you very much :star_struck::star_struck::star_struck:

1 Like

That’s so cool! I wouldn’t have thought of something so straight forward. Thanks so much for sharing!

1 Like

Cool, thanks for share :kissing_heart:

Just found these posts on here…This will be very helpful in the future. Thanks for sharing. :slight_smile:

1 Like

image

2 Likes

Hy, i don’t know if people will see my post here. After learning how to alpha blend a texture I made my first attemp over the trail tutorial from this thread aaaaaaaaand I think I miss something. There may be something I don’t understand
Can someone give me some help ? that would be very appricieted.
Here is a GIF with my shadder and my resultexemples

1 Like

I’m so sorry, I don’t think I understand what you’re asking for help with ^^;

Woups, my bad ^^
So my problem is that I have some hard time reproducing a decent trail effect and I was asking what could be the problem. I failed to understand why my material look so crapy. Maybe it’s the noise texture ? Or is it my shadder that is not built correctly ?

Have I been clearer or not ?
PS : I’m sorry i’m totally new in VFX so I’m not quitte used to talk about this.

well your graph is doing something odd with the subtraction i can’t figure out why though…

look above at post #149

basics - OK picture more helpful right? i needed visual help with math to be sure it works


simple setup
pan == offset; you could mult one of em to make it pan different speed

output blend mode seem to be (Alpha blend)

SrcAlpha OneMinusSrcAlpha

*‘Saturate’ = 0-1 ; same as 'clamp’0-1 but can be optimized [depending on the GPU AFAIK]

13 Likes

Once again that for the help :+1::+1::+1:
This look wayyyyyyyy better. It may need some improvments to look more impressive but the base is here !
exemples

8 Likes

Hi Shannon, thanks for an amazing post! Bit of a noob question, but what was the process used to create the erode texture? Did you hand paint it and/or use different filters in Photoshop?

This post should answer your question. Imbuefx has some good videos as well. Dated but the technique are still relevant

4 Likes

Thank you! I remember watching the blood one, but didn’t think to link it to this. Haha!

Hiya Tash! I’m happy this post has been useful :smiley: I did hand paint my erosion texture with a lot of motion blur haha. I think the Kog’maw post might also have some heavy use of motion blur too. Here’s a little img one what the use of motion blur and transfer brush with pen pressure on can get ya! Also, if you ever want to test out what your erode will look like slap on a threshold mask in Photoshop!

29 Likes